SSL certificates
By default, Buddy self-hosted uses a self-signed SSL certificate. This article describes how to get and apply a custom-domain SSL certificate to replace the self-signed one.
Purchasing the certificate
When you buy a certificate, you may be asked to provide a Certificate Signing Request (CSR) file. To generate such file, run this command and provide the requested data:
bashopenssl req -new -newkey rsa:2048 -nodes -keyout domain.key -out domain.csr$
This command creates two files:
domain.csr– a Certificate Signing Request (CSR)domain.key– a private key used to set up the certificate. Make sure to keep it safe and never share it with other users.
Generating the PEM file
The purchased certificate consists of two types of files:
- SSL certificate – a single file, usually named
domain.crtordomain.pem - Intermediate certificate – one or more files, usually named
ca.pem
Using these files, you must generate a PEM file that you can upload to Buddy.
To create a PEM file, run this command in the directory that contains all your certificate files:
bashcat domain.crt ca.pem domain.key > full.pem$
If there is more than one intermediate certificate, the command looks like this:
bashcat domain.crt ca.pem ca1.pem ca2.pem domain.key > full.pem$
Activating the certificate
After you generate the PEM file, you can set the SSL certificate in Buddy. You can do it through the UI or using the Buddy CLI.
Setting the certificate in Buddy UI
- Sign in to your Buddy self-hosted instance as admin.
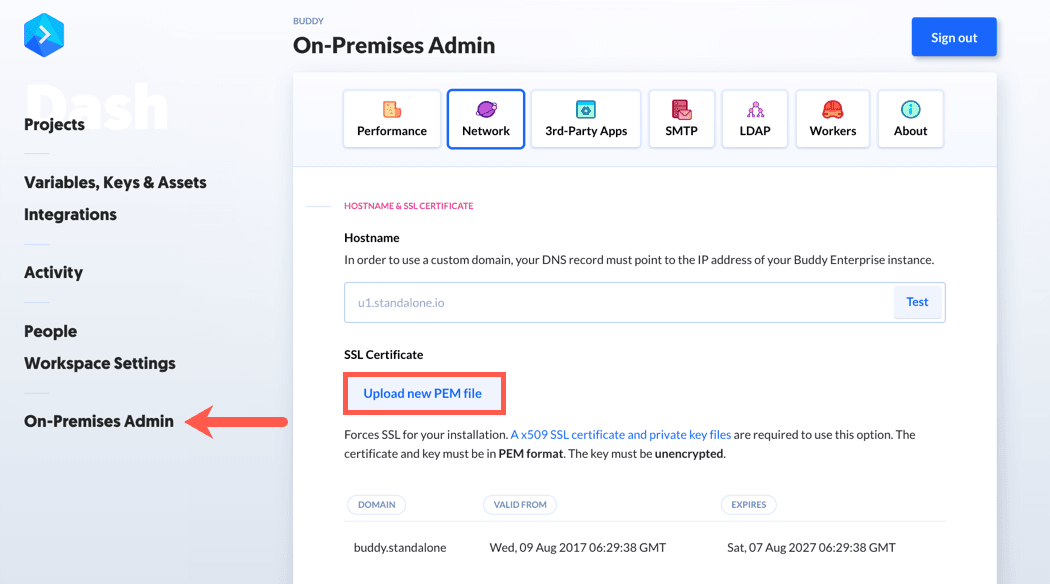
- Go to the Self-Hosted Admin panel and switch to the Network tab.
- Click Upload new PEM file in the SSL Certificate section.
- Upload the generated PEM file.
- Click Save changes.
Image loading...
Setting the certificate with Buddy CLI
- Sign in to the server where Buddy self-hosted is installed.
Run this command to enter instance configuration:
bashbuddy configure$- Go to
Custom domain SSL certificate. - Press
u&enterto update the certificate. - Provide the absolute path to the
full.pemfile. - Restart the application to apply changes.
Verifying the certificate
Once the certificate is set, it’s a good practice to scan it at ssllabs.com.
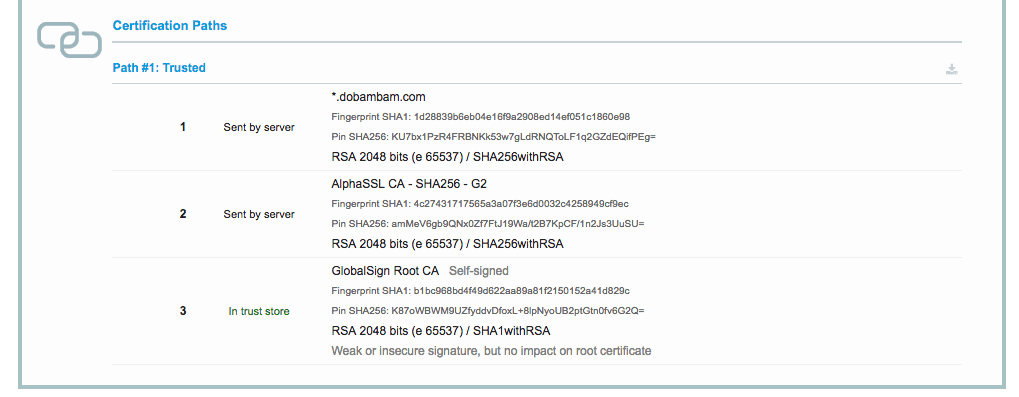
The page displays the contents of the certificate and informs if you need to download any missing parts. This may happen if your provider did not provide all required certificates or the certificates are invalid. In such case you have to copy the names of the certificates from sslabs and look them up in Google. This way you can easily find the missing intermediate certificates and paste them into a correct full.pem file.
A properly generated certificate should look like this:
Image loading...
Restoring the default certificate
You can restore the default self-signed certificate through Buddy CLI:
- Sign in to the server where Buddy self-hosted is installed.
- Run this command to enter instance configuration:
bashbuddy configure$
- Go to
Custom domain SSL certificate. - Press
c&enterto clear the certificate - Restart the application to apply changes.
Using the Let’s Encrypt certificate
To use a free certificate by Let’s Encrypt certificate, follow these steps:
- Sign in to the machine where Buddy Enterprise is installed.
- Run this command to enter instance configuration:
bashbuddy configure$
- Go to
Custom domain SSL certificate. - Press
l&enterto use Let’s Encrypt certificate - Restart the application to apply changes.
Last modified on Jan 29, 2025