Introduction to Docker
Objectives of this guide
This guide will:
- Explain you the basics of Docker.
- Show you how to use Docker throughout the development process.
- Illustrate the automation of the application deployment process with Buddy and Docker.
Why should you care about Docker?
As a developer you probably know that before you can run an application on your machine, you need to configure its environment first. The list of tasks required to do that may be pretty long and include:
- Installing database version xx.xxx
- Installing file server version yy.yyy
- Installing package a version xy.zzz
and so on...
Environment management is cumbersome and expensive
Every change in the environment, like database version change for example, adding a new package or any other dependency means that:
- Every developer has to introduce this particular change to his machine
- Upon release, all the changes have to be introduced to the production server
It’s hard to keep track of dependencies without proper tools. And still, with or without them, configuration-related problems tend to emerge unexpectedly and are hard to debug and fix. This is why over the years we’ve tested various methods of ruling them out.
Current tools may be slow and complicated
We used virtual machines and configuration management tools, such as Vagrant, Ansible or Puppet. However, virtual machines are very resource-consuming and the amount of time required to start and stop them is so huge that it slows down work progress. Dealing with configuration management tools is also pretty time-consuming and requires specialized knowledge.
The Docker Solution
Image loading...
How can Docker help you deal with the above problems? Let’s start with the definition from Docker itself.
To make the message clearer:
- Docker is a faster and less resource-consuming equivalent of the virtual machine.
- In a few minutes you can run Docker on any server, using any operating system.
Think Docker sounds cool and want to give it a try? Read the next section to see how easy it is.
Docker in the development process
Let’s assume we’ve just hired you as the developer responsible for our website. To start working, you need to get access to:
- Source code of the application – hopefully already in the repository. If not, putting your the sources under version control should be your top priority.
- Documentation – it will tell you what components you’re supposed to install on your machine and how to configure them in order to run the application locally. This is how it sounds in practice because in reality in 9 out of 10 cases THERE IS NO DOCUMENTATION AT ALL.
While working with Docker, we eliminate the stickiest problems of dealing with configuration:
- Working out what components need to be installed
- Picking up the correct version for each component
- Configuring the components properly in order to run the application locally
Let’s move to a straightforward example that proves how Docker handles it.
Docker configuration
Install Docker
First of all you need to install Docker according to the guidelines on the supplier’s website:
Download sample files
To show you how Docker works, we'll use a repository with an already Dockerized application. Download the package and unzip the contents in any directory.
Get Docker running
Run the terminal, go to the directory where you unzipped the files, and execute the docker-compose up command:
bashcd unzipped_directory docker-compose up$$
Marvel at the results
You’re done—your development environment is running—you can view the website at http://localhost:8080:
Image loading...
Remember: all you’ve just done was installing Docker—no HTTP server installation, no dependencies to deal with. You didn’t have to configure one single component. Yet, you are ready to work. Awesome, huh? So let’s get busy!
Change the code: Blue is the new Black
Now, open the index.html file with your favorite IDE and change anything you like. For example, change:
html<body class="bg-black">
to
html<body class="bg-blue">
Enjoy your new background
Save the changes and refresh the site. The background is now blue—your changes are visible right away! What’s the conclusion? Introducing you to our team was fast and easy and you did your job very well!
What about the other sample files?
You’ve probably noticed that index.html is not the only file. Let’s take a closer look at the contents of our project:
index.html, with the source code of the websitenginx.conf, with the NGINX server configurationdocker-compose.yml, with all information on the environment
Since we’ve already made some changes to index.html, let's have a closer look at the other two
nginx.conf
This is a very basic configuration of the NGINX server. All it says is that the server is supposed to serve files from the /www directory:
server {
    index index.html;
    root /www;
}
docker-compose.yml
The file contains the definition of the application environment. The syntax of the file might be a bit scary at first glance, but don’t worry—we’ll clarify all the necessary issues.
yamlversion: “2”

services:
  web:
    image: nginx
    ports:
      - "8080:80"
    volumes:
      - .:/www
      - ./nginx.conf:/etc/nginx/conf.d/default.conf
And here come the explanations:
version: “2“– determines the syntax used throughout the file. There are two versions of the docker-compose file format—version 1 (the legacy format, which doesn’t support volumes or networks) and version 2 (most up-to-date).services:– this section defines the containers. In this particular file we’re defining only one container namedweb.image: nginx– this means the container will be created on the basis of the NGINX image. Images are stored in a Docker registry. You can pick one of the ready-to-use images from the Docker Hub, or create your own image.ports:– this section redirects the ports from the local host (8080) to the container (80) where the NGINX server is listening. Thanks to this, we are able to view the site athttp://localhost:8080volumes:– this section is about mounting disks to the container. In this example, it ensures that the project files that accompanydocker-compose.ymlare placed in the/wwwfolder and our NGINX configuration file overwrites the one in the container.
How to extend the Docker image with more services
Up till now, as our new employee, you didn’t have to worry about the configuration of the environment. To make sure you don't feel too comfortable, it's time to assign you a new task. It’s pretty straightforward: you have to add the current date and time below the “hello-world” sentence on our website.
To do this, you're going to need PHP. By default, the NGINX server is not handling PHP files, but we can deal with that by completing two tasks:
- Configuring the NGINX sever file to process PHP files
- Installing PHP server
Configure NGINX server to process PHP files
Configuring NGINX server means simply updating the nginx.conf file:
server {
        index index.php;
        root /www;
            location ~ \.php$ {
                      fastcgi_pass php:9000;
                      include fastcgi_params;
                      fastcgi_param SCRIPT_FILENAME $document_root$fastcgi_script_name;
                            }
       }
The above changes indicate that all PHP files are supposed to be interpreted by the PHP service on the port number 9000.
Install PHP server
Next thing we need is the PHP server. We’ll add another container, responsible for interpreting PHP files. To do that, add the php service to your docker-compose.yml file and define the image version and the links command order for the NGINX service. The second thing is linking the web-service container to the PHP container so that both can communicate:
dockerversion: "2"

services:
  web:
    image: nginx
    ports:
      - "8080:80"
    volumes:
      - .:/www
      - ./nginx.conf:/etc/nginx/conf.d/default.conf
    links:
      - php
  php:
    image: php:7-fpm
    volumes:
      - .:/www
We are ready with the configuration, which means it's time to move on to actual development and work on our index.html file. Let's assume we want to display date and time on the website. To do it, we need to do two things:
- Change the filename to
index.php - Add the line displaying the current date and time:
html
  <?php
  echo "<p>".date("F j, Y, g:i a")."</p>";
  ?>
Relaunch the Docker container
Now we can try the new configuration and check if the date and time are really displayed on our website. To do this, run the following commands from the terminal:
bashdocker-compose down docker-compose up$$
Refresh the website and marvel at the results yet again:
Image loading...
With the above instructions, you can add other services, like MySQL, MongoDB, PostgreSQL and so on to your docker-compose.yml file. And, what’s the most important, with every push to the Git repository the changes you made will be available for other team members. Nobody needs to configure anything—all they have to do is run the docker-compose up command and the environment will be launched, regardless of the local operating system or the PHP server installation.
Automating deployment with Buddy and Docker
Image loading...
Till now we’ve been working on the website locally, using the local development environment. But how can we streamline the actual deployment with Docker? The answer is pretty obvious: install docker-compose on the production server, upload new source files there, and execute docker-compose down and docker-compose up on the server.
Sounds easy, but when you have to do this manually a couple of times a day, it’s annoying. Every change in the repository that you want to deliver requires connecting the server, uploading the files there, logging in and running the commands back and forth, which can not only prove time-consuming but error-prone as well. And you probably have more than one project and more than one delivery to deal with every day.
In other words, it would be really nice to automate the process. This is where Buddy steps in, whose delivery pipelines makes Docker automation a breeze.
All you need is:
- An account in Buddy. If you haven't registered yet, you can sign up for free with your GitHub/Bitbucket account or email
- A server with Docker installed
Set up a project in Buddy with the provided repository
In this example, we'll use the website that we used before and put it under version control in Buddy:
- Add a new project and select Buddy as your Git hosting provider:
Image loading...
Download the file:
https://assets.buddy.works/guides/buddy-docker-nginx.zipand unzip itRun the following commands in the unzipped folder:
bashgit init git add . git commit -m "init repo" git push --all BUDDY_REPO_URL$$$$
BUDDY_REPO_URL is the URL that appears while adding the project:
Image loading...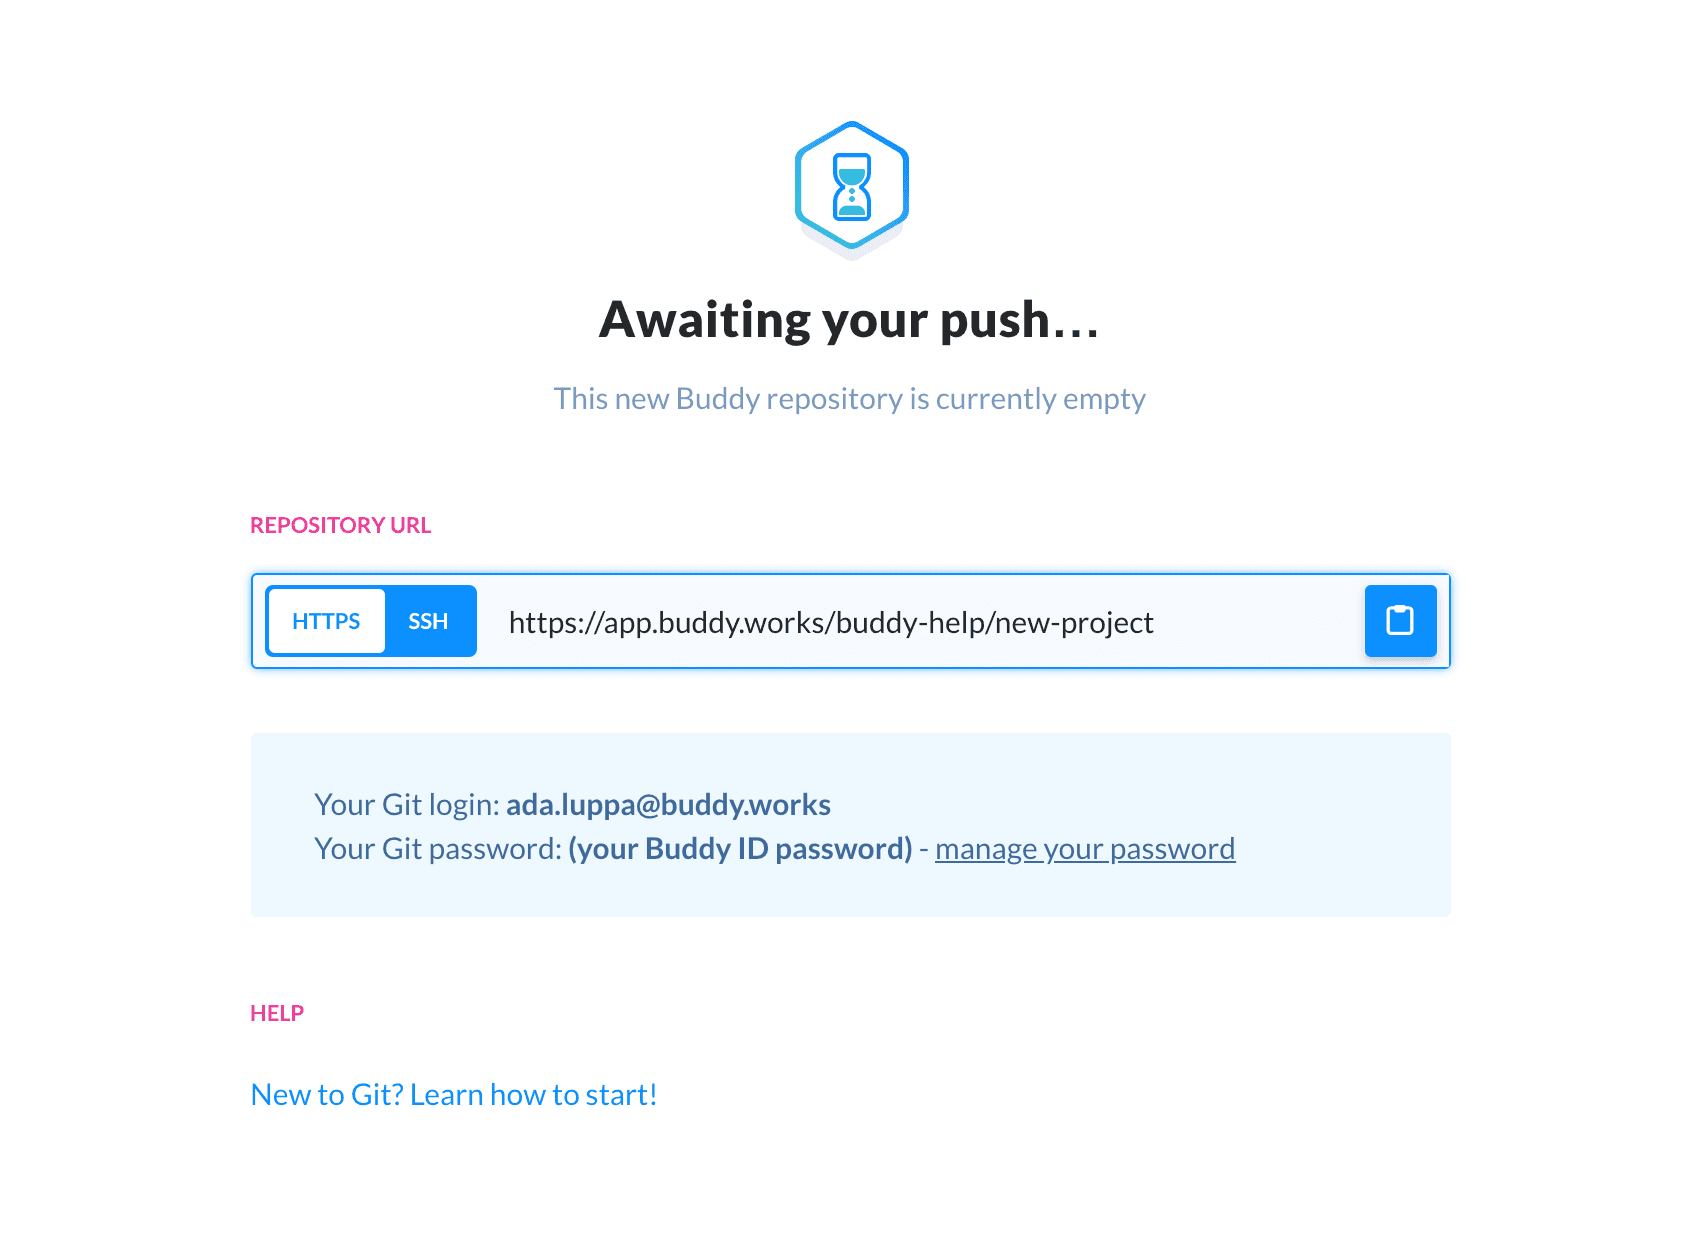
Create your first Buddy pipeline to automate your daily development workflow
Now we’ll take care of the pipelines—delivery automation tools.
Add a pipeline
First, add a pipeline that will automatically deploy changes introduced to the repository to the production server.
Image loading...
Let Buddy upload the website for you on every change
Add an action that will upload the source files of your application to the server. In Buddy, you can choose from numerous uploading options, from bare-metal servers to cloud services like AWS, DigitalOcean, and Microsoft Azure. In this example we’ll use SFTP:
Image loading...
On the action details screen, enter the authorization data and the upload path:
Image loading...
Let Buddy relaunch the Docker container
Add an SSH action that will run docker-compose down and docker-compose up. This action requires authorization data and defining methods to be executed in the working directory. The working directory must be the same as the one for the upload action, so that the commands are run in the folder where the source files are placed.
Image loading...
Your pipeline is ready
When you're done, the pipeline should look like this:
Image loading...
You can see the upload action followed by an SSH action with the script triggering the Docker commands. With such setup every change in the repository will automatically be pushed to the server and visible in the production environment. This concerns the configuration and the source code as well.
You can manually check how the pipeline works—simply hit the Run button on the right side of the pipeline name. Now open the page (server IP:8080) and check your site on live server.
See how easy it is to setup a pipeline to ensure Dev-Test equivalance
And now we have one more trick for you. During the development process we recommend using the staging server. This is the place where the changes undergo testing prior to release. With Docker and Buddy configuring this machine will be easy—just follow the steps listed below.
Create a Staging branch
Add a new branch to your repository (stage branch). Git branches let you work on multiple disparate features at once, without having to deal with project dependencies or synchronization of changes:
Image loading...
Add a delivery pipeline for the Staging server
Add a new pipeline that will be dealing with the staging server. This pipeline will execute exactly the same tasks as the production server pipeline, but for another branch. To streamline the work, you can clone the existing pipeline. After that you need to modify it a little bit:
- Change the branch name from production to staging
- Edit the file upload action: change the path so that it points to your staging server (staging application files must be placed in a different directory than live application files)
- Edit the SSH action:
- Change the execution path to the one you’ve just set for the upload action (see above)
- Change the docker compose up command to docker-compose run -d -p 8081:80 web (we are doing this to run staging application on a different port than the live application is running).
- In the end, make sure to reassign the branch to
staging
Image loading...
Play with it
Now your live and staging applications are running on the same server:
- Live application at server IP:8080
- Staging application server IP:8081
They may use different configurations and no changes in staging application will affect your live environment, as both applications are running in separate containers and are isolated from each other.
Summary
- We’ve just learned how to deal with Docker and use
docker-compose.ymlfile to set up the application environment in a very short time. - We managed to introduce two simple changes into the application code and review them.
- We used Buddy and Docker to automate the process of delivering the application to the server.
Thanks to Docker, we got you up and running in no time. All you had to do was to install Docker, pull the files from the repository and you were able to commit code in no time and provide value for our company. You also know how to perform the same operations on the server and how to use Buddy and its pipelines to automate your work.
Happy sailing on the blue whale's tide!
Jarek Dylewski
Customer Support
A journalist and an SEO specialist trying to find himself in the unforgiving world of coders. Gamer, a non-fiction literature fan and obsessive carnivore. Jarek uses his talents to convert the programming lingo into a cohesive and approachable narration.