Run agents in a sandbox
Buddy sandboxes are fully isolated cloud environments - a clean Ubuntu box preloaded with Node 24, Docker, Go, Python 3, git, and the Buddy CLI. Running an AI agent inside a sandbox keeps it off your machine: it gets its own throwaway workspace with your repo fetched in, and full freedom to install packages, run commands, and deploy - without touching your local setup.
Quick start
Install the Buddy CLI
bashnpm install -g bdy$
Log in to Buddy
bashbdy login$
Link your project
Run this in your project directory:
bashbdy proj link$
You'll be walked through creating or picking a project:
? PROJECT Create new
? Provide project name: f1
✔ Project created
✔ Project linked to https://app.buddy.works/myplayground/f1-2
? INITIALIZE GIT REPOSITORY No

→ TRY NOW
$ bdy tunnel http 3000                            - Expose localhost:3000 to the internet
$ bdy artifact publish <identifier> . --create    - Publish an artifact from the current project
$ bdy sandbox create --run "npm start"            - Spin up a cloud sandbox and run your app
Create a sandbox
bashbdy sandbox create$
The sandbox boots on Ubuntu 24.04 with Node 24, Docker, Go, Python 3, git, curl, wget, jq, rsync, ripgrep, unzip, nano, and bdy already installed.
Run your agent
AI coding agents come pre-installed in the sandbox - just start the one you want, and it works in a fully isolated environment:
bashclaude$
Programmatic access with the SDK
Prefer to manage sandboxes from code instead of the CLI? The Buddy Sandbox SDK is a TypeScript library for creating and driving sandboxes programmatically - ideal for building your own agent orchestration.
bashnpm install @buddy-works/sandbox-sdk$
typescriptimport { Sandbox } from "@buddy-works/sandbox-sdk";

const sandbox = await Sandbox.create({
  identifier: "my-sandbox",
  os: "ubuntu:24.04",
  fetch: [{
    type: "PUBLIC_REPO",
    repository: "https://github.com/octocat/Hello-World",
    ref: "master",
    path: "/workspace/hello",
  }],
});

await sandbox.start();
await sandbox.runCommand({ command: "npm test" });
await sandbox.stop();
The SDK covers the full lifecycle - create, start and stop, run commands, manage long-running apps, fetch repositories and artifacts, and create or restore snapshots - with regional configuration for US, EU, and AS. See the source on GitHub and the package on npm.
Fetch your repo into the sandbox
Use --fetch to pull code in at creation time, so the agent starts with your project ready to go:
bash# project repository, default branch, into the working directory bdy sandbox create --fetch # a specific branch bdy sandbox create --fetch feature-branch # an external public repository, into a chosen path bdy sandbox create --fetch "path=/home/buddy/repo,url=https://github.com/acme/app,ref=main" # fetch a branch and build it on boot bdy sandbox create --fetch "path=/home/buddy/repo,ref=main,build=npm install && npm run build"$$$$$$$$$$$
Repository access
By default, sandboxes get read-only access to the project repository - enough for the agent to fetch and read the code.
To let the agent push changes back, grant read-write access: open the Project repository target, go to the Permissions tab, and add the sandbox with RW rights. You can also change the default so that all sandboxes get RW access to the repository.
Image loading...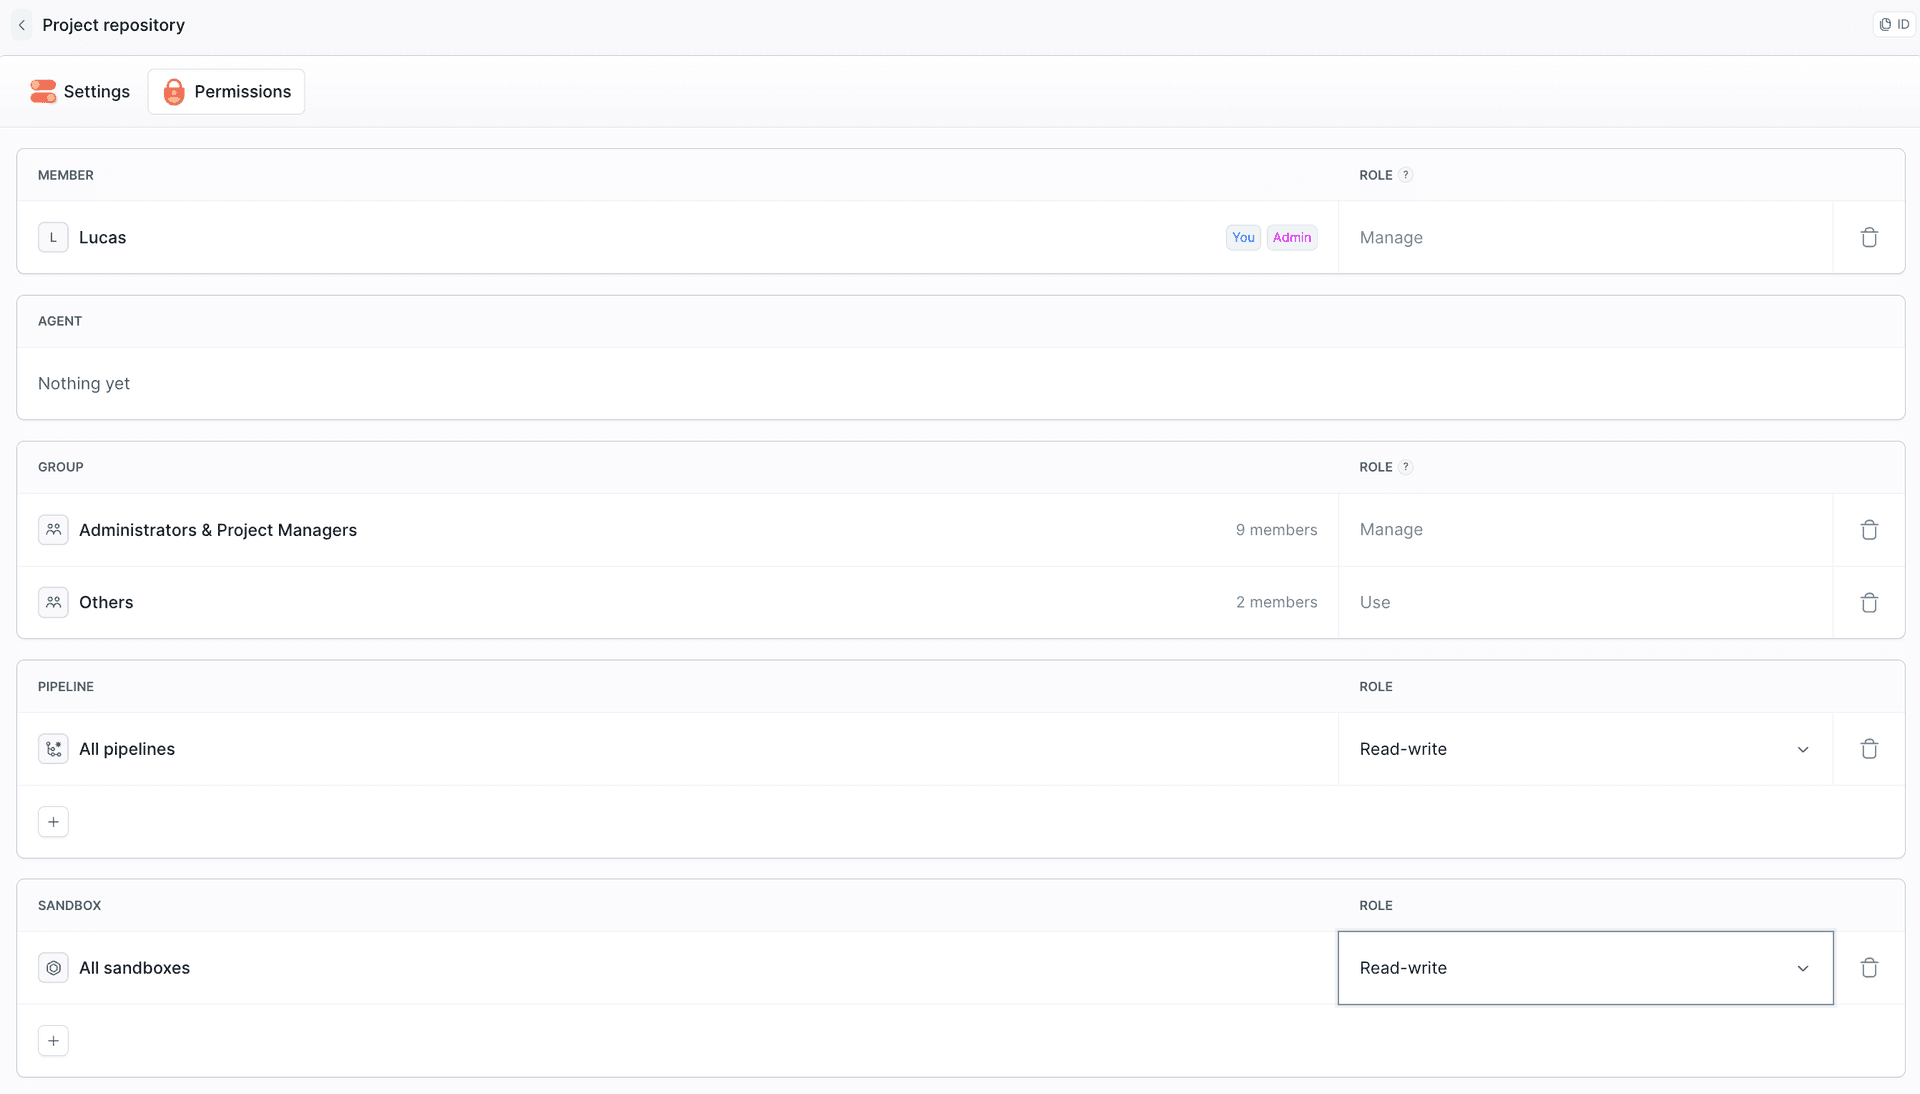
The agent can edit its own sandbox
Once inside, the agent isn't just a passenger - it can reshape the sandbox it's running in through the this command. this mirrors bdy sandbox, but every command is scoped to the current sandbox, so the agent never needs to know its own identifier.
bashthis --help$
The subcommands match bdy sandbox:
this get/this status/this yaml- inspect the current sandboxthis update- edit the sandbox definitionthis endpoint- expose ports and manage endpointsthis app- manage running appsthis exec/this cp/this logs- run commands, copy files, read setup logsthis snapshot- snapshot the current statethis start/this stop/this restart/this destroy- control the lifecycle
This lets the agent do things like expose the dev server it just started, install an app, or snapshot a known-good state - all from inside, mid-task. Run this <command> --help for the exact options.
More use cases
Run setup on boot and keep the app running:
bashbdy sandbox create --boot-command "npm install" --app-command "npm start" --app-dir /home/buddy/repo --wait-for-configured$
Pick larger resources (CPUxRAM) for heavier agent work:
bashbdy sandbox create --resources 4x8$
Run a one-off command in a sandbox (runs as buddy with passwordless sudo):
bashbdy sb exec command <sandbox-identifier> "npm test" --wait$
Copy local files into a sandbox:
bashbdy sb cp ./local-dir <sandbox-identifier>:/home/buddy/$
Manage the lifecycle:
bashbdy sb list bdy sb get <sandbox-identifier> bdy sb stop <sandbox-identifier> bdy sb start <sandbox-identifier> bdy sb destroy <sandbox-identifier>$$$$$
Inspect the setup log (boot commands and fetch steps):
bashbdy sb logs <sandbox-identifier>$
Last modified on Sep 1, 2026