How to optimize Node.js Docker image (Part 1)
Introduction
Docker is a containerization method that lets you pack applications and dependencies in so-called images and then run them basically on any operating system, in a similar manner to a virtual machine. You can run your app in a single container, run multiple containers with Docker Compose, heck, even go big time and scale your app on Docker Swarm or a Kubernetes cluster!
Don't worry, though – in this guide, we'll stick to the basics.
Let's say you've just built an amazing Node.js application and want to distribute it as a Docker Node image. You write a Dockerfile, build the image, and distribute the generated image on a registry such as Docker Hub.
"Not too shabby!", you utter to yourself. Then, you run docker pull, docker run and... start wondering why it's taking so long. Being the perfectionist you are, you ask yourself a question: is there anything you can do to speed things up? Is your image actually optimized to do the job?
Well, that's exactly what we'll cover in this article! However, since there's a lot of best practices for optimizing Docker images, we've split this article into several parts.
Contents
Part 1
This part of the guide covers the following issues:
- Reducing the number of running processes
- Handling signals in a proper manner
- Making use of the build cache
- Using ENTRYPOINT
- Using EXPOSE to document exposed ports
Part 2
In the second part, we cover:
- Reducing the Docker image filesize by:
- Removing obsolete files
- Using a lighter base image
- Using labels (
LABEL) - Adding semantics to labels
- Linting your Dockerfile
Part 3
The last article published covers securing our Docker image, in which we'll cover:
- The Principle of Least Privilege
- Signing and verifying Docker Images
- Using
.dockerignoreto ignore sensitive files (similar to.gitignorefile) - Vulnerability Scanning
Prerequisities
The first step is installing some basic stuff (which you probably already have):
- Git and Docker Desktop installed for your operating system
- (Optional) A Docker Hub account for pulling and pushing images
For the purpose of this guide Docker Desktop will suffice (no need to install Docker Compose and other advanced tools).
Preparations
For this guide, however, you only need the docker/basic branch:
bashgit clone -b docker/basic https://github.com/d4nyll/docker-demo-frontend.git$
With the repos cloned, open the Dockerfile in a text edit to see what lines (instructions) are already there:
DockerfileFROM node
WORKDIR /root/
COPY . .
RUN npm install
RUN npm run build
CMD npm run serve
These instructions are pretty much self-explanatory for developers who already worked with Docker. Here's a brief overview if you need are new to the party:
FROM node– use the official Node Docker image as the base imageWORKDIR /root/– run all subsequent Dockerfile's instructions in the specified directory (similar to runningcd /root/in your terminal)COPY . .– copy everything from the build context to the currentWORKDIRRUN npm install– install dependencies specified JSON file (package.jsonandpackage-lock.json)RUN npm build– build application with WebPack (as specified inpackage.json)CMD npm run serve– specifies the first process to run inside the container (executed upon running the image)
Let's try building our image for the first time:
bashdocker build -t demo-frontend:basic . ... Removing intermediate container a3d5032b851b ---> 703e723acecf Successfully built 703e723acecf Successfully tagged demo-frontend:basic$$$$$$
You should now be able to see the demo-frontend:basic with the ID and image size when you run docker images:
bashdocker images REPOSITORY TAG IMAGE ID SIZE demo-frontend basic 703e723acecf 939MB node latest b18afbdfc458 908MB$$$$
With everything verified, you can launch the Docker container:
bashdocker run --name demo-frontend demo-frontend:basic > frontend@1.0.0 serve /root > http-server ./dist/ Starting up http-server, serving ./dist/ Available on: http://127.0.0.1:8080 Hit CTRL-C to stop the server$$$$$$$$$
Run npm run serve and you should see the application's (rather rudimentary) interface on the URL 127.0.0.1:8080:
Image loading...
Reducing the Number of Processes
Examining internal processes
With the Docker container running, you can run docker exec on another terminal to see what processes are running inside our container.
bashdocker exec demo-frontend ps -eo pid,ppid,user,args --sort pid PID PPID USER COMMAND 1 0 root /bin/sh -c npm run serve 6 1 root npm 17 6 root sh -c http-server ./dist/ 18 17 root node /root/node_modules/.bin/http-server ./dist/ 25 0 root ps -eo pid,ppid,user,args --sort pid$$$$$$$
That's a lot of interconnected processes that are not needed to run our application – and each one takes up a huge chunk of the container's memory.
It would be ideal if we could just run node /root/node_modules/.bin/http-server ./dist/ command and nothing else.
ps command is the same that we are running with docker exec and can be ignored.
Avoid using npm script
It's best not to use npm as a Docker command because, as you saw above, npm invokes a sub-shell and executes the script inside that sub-shell, yielding a redundant process.
Instead, you should specify the command directly as the value of the CMD instruction:
DockerfileFROM node
WORKDIR /root/
COPY . .
RUN npm install
RUN npm run build
CMD node /root/node_modules/.bin/http-server ./dist/
Next, try to stop your existing http-server instance by pressing CTRL+C. Hmmm, seems like it's not working, but why? Don't worry, we'll explain that shortly.
For now, launch and serapate terminal run the following commands to stop and remove the container:
bashdocker stop demo-frontend docker rm demo-frontend$$
With a clean slate, let's build a new image and run it:
bashdocker build -t demo-frontend:no-npm . docker run --name demo-frontend demo-frontend:no-npm$$
Once again, run docker exec in a separate terminal. You'll notice that the number of processes have been reduced from 4 to 2:
bashdocker exec demo-frontend ps -eo pid,ppid,user,args --sort pid PID PPID USER COMMAND 1 0 root /bin/sh -c node /root/node_modules/.bin/http-server ./dist/ 6 1 root node /root/node_modules/.bin/http-server ./dist/ 13 0 root ps -eo pid,ppid,user,args --sort pid$$$$$
If you calculate the real memory used by the Docker container before and after the change, you'll find that you saved ~16MB just by removing the superfluous npm and sh functions.
However, our node command is still being run inside the /bin/sh shell.
The quesion is: how to get rid of that shell and invoke node as the first and only process inside our container? To answer that, we must understand and use the exec form syntax in our Dockerfile.
Using the Exec Form
Docker supports two different syntaxes to specify Dockerfile: the shell form, which is what we've been using, and the exec form.
The exec form specifies the command, its options, and arguments in the form of a JSON array, rather than a simple string.
Translated into exec, our Dockerfile would look like this:
DockerfileFROM node
WORKDIR /root/
COPY . .
RUN ["npm", "install"]
RUN ["npm", "run", "build"]
CMD ["node", "/root/node_modules/.bin/http-server" , "./dist/"]
Shell vs. Exec Form
The practical difference is that with the shell form, Docker will implicitly invoke a shell and run the CMD command inside that shell (this is what we saw earlier).
With the exec form, the command we specified is run directly, without first invoking the shell.
Again, stop and remove the existing demo-frontend Docker container:
bashdocker stop demo-frontend && docker rm demo-frontend$
Let's rebuild the Dockerfile into the exec form:
bashdocker build -t demo-frontend:exec .$
Next, run the image:
bashdocker run --name demo-frontend demo-frontend:exec$
Finally, run docker exec to query the container's processes:
bashdocker exec demo-frontend ps -eo pid,ppid,user,args --sort pid PID PPID USER COMMAND 1 0 root node /root/node_modules/.bin/http-server ./dist/ 12 0 root ps -eo pid,ppid,user,args --sort pid$$$$
Now, the only process running in the container is the node process.
Signal Handling
However, saving a single process is not the reason why we prefer the exec form over the shell form. The real reason is because of signal handling.
On Linux, different processes can communicate with each other through inter-process communication (IPC). One method of IPC is signalling.
Remember when we tried to stop our container with CTRL+C and it didn't work? Let's try that again with the image running as demo-frontend:exec. This time, the http-server stops successfully:
bashdocker run --name demo-frontend demo-frontend:exec Starting up http-server, serving ./dist/ Available on: http://127.0.0.1:8080 http://172.17.0.2:8080 Hit CTRL-C to stop the server ^Chttp-server stopped.$$$$$$$
Why did it work now, but not before? This is because when we send the SIGINT signal from our terminal, we are actually sending it to the first process run inside the container. This process is known as the init process, and has the PID of 1.
Therefore, the init process must have the ability to listen for the SIGINT signal. When it receives the signal, it must try to shut down gracefully. For example, a web server must stop accepting any new requests, wait for any remaining requests to finish, and only then exit. Makes sense now.
With the shell form, the init process is /bin/sh. When /bin/sh receives the SIGINT signal, it'll simply ignore it. Therefore, our container and the http-server process won't be stopped.
When we run docker stop demo-frontend, the Docker daemon similarly sends a SIGTERM signal to the container's init process, yet again, /bin/sh ignores it. After around 10 seconds, the Docker daemon realizes the container is not responding to the SIGTERM signal, and issues a SIGKILL sugnal instead, which forcefully kills the process.
bashtime docker stop demo-frontend real 0m10.443s user 0m0.072s sys 0m0.022s$$$$$
SIGKILL signal cannot be handled; this means processes within the container do not get a chance to shut down gracefully. For a web server, it might mean that existing requests won't have a chance to run to completion, and your client might have to retry that request again.
In comparison, when we use the exec form, the init process is node and it will handle the SIGINT and SIGTERM signals. You can either include a process.on('SIGINT') handler yourself, or the default one will be used. The point is, with node as the first command, you have the ability to catch signals and handle them.
To demonstrate, with the new image built using the exec form Dockerfile, the container can be stopped in under half a second.
bashtime docker stop demo-frontend real 0m0.420s user 0m0.053s sys 0m0.026s$$$$$
--init flag. The flag executes Tini as its first process, a minimalistic init system which, unlike sh, can handle and propagate signals.
Caching Layers
So far, we've looked at techniques that improve the function of our Docker image whilst it's running. In this section, we'll look at how we can use Docker's build cache to make the build process faster.
Here's what happens when we're building the Docker image:
- Docker runs the base image as a container.
- Executes each instruction sequentially on top of it.
- Saves the resulting state of the container in a layer.
- Uses that layer as the base image for the next instruction.
- Repeats the process to build the image layer by layer.
Image loading...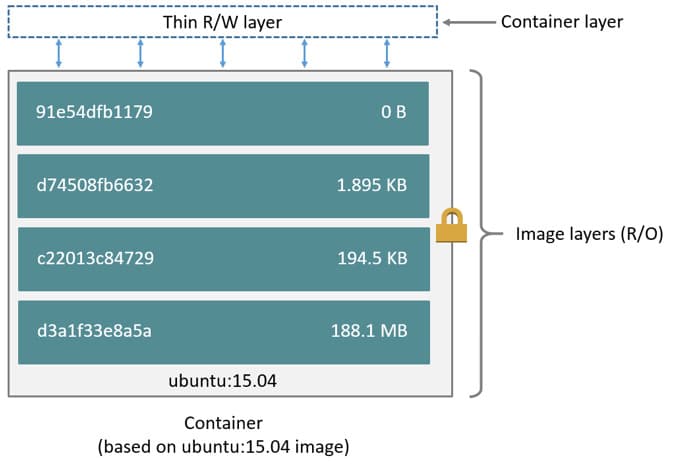
However, pulling or building an image from scratch on every run can be very time-consuming. This is why Docker attempts to use an existing cached layer whenever possible. In other words, if Docker determines that the next instruction will yield the same result as an existing layer, it will use the cached layer.
For example, let's say we've updated something inside the src directory; when we run the build command again, Docker will use the cached layer associated with the FROM node and WORKDIR /root/ instructions.
When it gets to the COPY instruction, however, it will notice that the source code has changed, invalidate the cached layer, and build it from scratch. This will also invalidate every layer that comes after it. Therefore, every instruction after the COPY instruction must be built again.
In this instance, this build process takes about 10 seconds:
bashtime docker build -t demo-frontend:exec . Sending build context to Docker daemon 511kB Step 1/6 : FROM node ---> a9c1445cbd52 Step 2/6 : WORKDIR /root/ ---> Using cache ---> 7ac595062ce2 Step 3/6 : COPY . . ---> 3c2f3cfb6f92 Step 4/6 : RUN ["npm", "install"] ... Successfully built 326bf48a8488 Successfully tagged demo-frontend:exec real 0m10.387s user 0m0.187s sys 0m0.089s$$$$$$$$$$$$$$$$$$
Still, making a small change in the source code (e.g. fixing a typo) shouldn't affect the dependencies of our application, and so there's really no need to run npm install again. However, because the cache is invalidated in an earlier step, every subsequent step must be re-ran from scratch.
COPY only the package.json and package-lock.json, and nothing else.
Update our Dockerfile to copy only what is needed for the next immediate step:
DockerfileFROM node
WORKDIR /root/
COPY ["package.json", "package-lock.json", "./"]
RUN ["npm", "install"]
COPY ["webpack.config.js", "./"]
COPY ["src/", "./src/"]
RUN ["npm", "run", "build"]
CMD ["node", "/root/node_modules/.bin/http-server" , "./dist/"]
By copying only what is needed immediately, we allow more layers of the image to be cached. Now, if we update the /src directory again, every instruction and layer up until COPY ["src/", "./src/"] is going to be cached:
bashtime docker build -t demo-frontend:cache . Step 1/8 : FROM node Step 2/8 : WORKDIR /root/ ---> Using cache Step 3/8 : COPY ["package.json", "package-lock.json", "./"] ---> Using cache Step 4/8 : RUN ["npm", "install"] ---> Using cache Step 5/8 : COPY ["webpack.config.js", "./"] ---> Using cache Step 6/8 : COPY ["src/", "./src/"] Step 7/8 : RUN ["npm", "run", "build"] ... Successfully tagged demo-frontend:cache real 0m3.175s user 0m0.193s sys 0m0.132s$$$$$$$$$$$$$$$$$$
And again: instead of taking ~10 seconds to build, it takes only ~3 seconds. Of course, the mileage may vary for every user, but using the cache will always be faster.
Using ENTRYPOINT and CMD together
Right now, the command executed on run is specified by the CMD instruction. This command can be overridden by the user of the image (command invoker). For example, if I want to use a different port, e.g. 4567 instead of the default 8080, then I can run:
bashdocker run --name demo-frontend demo-frontend:cache node /root/node_modules/.bin/http-server ./dist/ -p 4567 Starting up http-server, serving ./dist/ Available on: http://127.0.0.1:4567 http://172.17.0.2:4567 Hit CTRL-C to stop the server$$$$$$$
However, we have to specify the whole command in its entirety. This requires the image user to know where the executable is located within the container (i.e. /root/node_modules/.bin/http-server).
All in all, we should make it as easy as possible for the user to run our application. How about running a containerized application in the same way as the non-containerized application?
Let's do it!
Instead of using only CMD, we can use the ENTRYPOINT instruction to specify the default command and options to run, and use the CMD instruction to specify any additional options that are commonly overridden.
Update the Dockerfile so that it makes use of the ENTRYPOINT instruction.
DockerfileFROM node
WORKDIR /root/
COPY ["package.json", "package-lock.json", "./"]
RUN ["npm", "install"]
COPY ["webpack.config.js", "./"]
COPY ["src/", "./src/"]
RUN ["npm", "run", "build"]
ENTRYPOINT ["node", "/root/node_modules/.bin/http-server" , "./dist/"]
Now, build the image with the entrypoint instruction:
bashdocker build -t demo-frontend:entrypoint .$
Using this method, the user can run the image as if it was the http-server command, and does not need to know the underlying file structure of the container.
bashdocker run --name demo-frontend demo-frontend:entrypoint -p 4567$
The command specified by the ENTRYPOINT instruction can also be overridden using the --entrypoint flag. For example, if we want to run the /bin/sh shell inside the container, you can run:
bashdocker run --name demo-frontend -it --entrypoint /bin/sh demo-frontend:entrypoint # hostname 1b64852541eb$$$$
Using EXPOSE to document exposed ports
Lastly, let's finish up the first part of this article with some documentation. By default, our http-server listens on port 8080; however, a user of our image won't know this without looking up the http-server documentation. Likewise, if we are running our own application, the user would have to look inside our implementation code to know which port the application listens on.
We can make it easier for the user by using an EXPOSE instruction to document which ports and protocol (TCP or UDP) the application expects to listen on. This way, the user can easily figure out which ports needs to be published.
DockerfileFROM node
WORKDIR /root/
COPY ["package.json", "package-lock.json", "./"]
RUN ["npm", "install"]
COPY ["webpack.config.js", "./"]
COPY ["src/", "./src/"]
RUN ["npm", "run", "build"]
ENTRYPOINT ["node", "/root/node_modules/.bin/http-server" , "./dist/"]
EXPOSE 8080/tcp
Once again, build the image, this time with the expose instruction:
bashdocker build -t demo-frontend:expose .$
Now a user can see which ports are exposed either by looking at the Dockerfile, or by inspecting the image:
bashdocker inspect --format '{{range $key, $value := .ContainerConfig.ExposedPorts}}{{ $key }}{{end}}' demo-frontend:expose 8080/tcp$$
Note that the EXPOSE instruction does not publish the port. If the user wishes to publish the port, they would have to either:
- use the
-pflag ondocker runto individually specify each host-to-container port mapping - use the
-Pflag to automatically map all exposed container port(s) to an ephemeral high-ordered host port(s)
Summary
By following the 5 best practices outlined above, we have improved our Dockerfile and Docker image. However, this is only the beginning! Keep an eye out for the next part of this article, where we will reduce the Docker image size, learn to use labels, and lint our Dockerfile. 💪