Securing Node and Express RESTful API with Json Web Token (JWT)
What You Will Build
In this article, we shall be securing the restful API built in previous session with Json Web Token (JWT). We shall go through all the steps needed a build a User Authentication API for a To-do application API built in the previous session.
Prerequisites
In order to follow along with this article series, firstly you should have gone through Building RESTful APIs using Express and Node with MongoDB Atlas. Also, prior knowledge around JavaScript and an ideal understanding of Nodejs is needed or required you might not understand the article well and it might make sense to learn about it first. The code and the concepts explained in this article are not complex, therefore, with a previous experience with JavaScript, and a bit know how about Node.js, you won't have a hard time here
Introduction to Authentication
Authentication simply means the action of proving or showing that something is true or valid. So, we can say that user authentication is the action of validating a user, while authorization is permitting or granting the user access to web resources, features, or pages. In the following section, we shall be looking at how a user can be authenticated and authorized using a JSON Web Token. API (Application Programming Interface) is a set of subroutines and protocols that makes communication between two components possible.
In terms of web applications, we have reached a stage where the application data doesn't only benefit you alone. It is often required to enable a third-party application access/usage of your backend applications and APIs to unleash the full potential of your application. For example, Twitter provides an API to grab its data (for an authenticated user, of course) and makes this usable for all third-party applications. Thus, there's always a reason to have a secure backend application or API.
Introduction to JWT
JSON Web Tokens (JWTs) transmit restricted information that can be verified and trusted by means of a digital signature via JSON. JWT explicitly defines a compact and self-containing secured protocol for transmitting data. A JWT is made up of three components in the form of strings separated by a dot (.). These components are as follows:
- Header
- Payload
- Signature
Header – A Base64 encoded object that consists of two properties: type declaration and the hashing algorithm. The object declaration is seen in the following snippet:
{
    "typ": "JWT”, // will always be JWT
    "alg": "HS256” // any preferred hashing algorithm (HMAC SHA256 is preferred in this case)
}
The result for the above object after encoding - eyJ0eXAiOiJKV1QiLCJhbGciOiJIUzI1NiJ9
Payload - A JWT object and is known as a claim, where information about the token with information to be transmitted is held. The object also gives room for multiple claims, and this includes the either of the following:
Registered claim names - reserved claims that are not mandatory, such as:
iss:  issuer of the token,
sub: subject of the token,
aud: information about the audience of the token,
exp: expiration (after the current date/time) in NumericDate value and many more.
Public claim names. There are also user-created or defined claims such as username, information, and so on.
Private claim names: These claims are defined based on the agreement between the consumer and the producer. Private claim names are subject to name collision (name clashing), therefore it is advisable to use them with caution.
For example, Let's consider an example payload that has two registered claims (iss and exp) and two public claims (author and company).
The resulting snippet would be as follows:js{ "iss": "buddy works blog", "exp": 2000000, "author": "Paul Oluyege", "company": "Buddy Works" }
The above object after going through base64 encoding will form the second part of JWT token. The endoded result is shown below eyJpc3MiOiJidWRkeSB3b3JrcyBibG9nIiwiZXhwIjoyMDAwMDAwLCJhdXRob3IiOiJQYXVsIE9sdXllZ2UiLCJjb21wYW55IjoiQnVkZHkgV29ya3MifQ
Signature - made up of a hash of the header, payload and secret in the following format:
bashSignature = HMACSHA256((base64UrlEncode(header) + "." + base64UrlEncode(payload)), ‘secret’);$
The JWT encoded token is shown below:
basheyJhbGciOiJIUzI1NiIsInR5cCI6IkpXVCJ9.eyJpc3MiOiJidWRkeSB3b3JrcyBibG9nIiwiZXhwIjoyMDAwMDAwLCJhdXRob3IiOiJQYXVsIE9sdXllZ2UiLCJjb21wYW55IjoiQnVkZHkgV29ya3MifQ.RDDSEubrucmTzyMQ4ofOMD7BSgm7tvItP5sf2-GaIuA$
Getting Started With Securing Node and Express RESTful API with Json Web Token (JWT)
Outline
- Updating To-do API folder structure
- Creating Schema and Model for User
- Defining User Authentication Endpoints and Routes
- Creating Controller functions for User Authentication and Signing JWT Token
- Applying User Authentication Controller on To-do API endpoints
- Verifying JWT Token
- Testing API on Postman
Updating Todo-API Folder Structure
Firstly, we need to update the File structure of the existing To-do API directory by some the following command line code below in other to add some new files and folders.
bashtouch api/controllers/authController.js api/models/userModel.js$
At the end of this implementation our expected file structure is seen below.
Todo-API/
├──api/
│  ├── controllers/  * API Controller folder
│  │  └── todoController.js  * To-do controller file
│  │ **└── authController.js**   * _User Authentication controller file_
│  │
│  ├── models/ * API Model folder
│   │  └──  todoModel.js * To-do model file
│  │ **└── userModel.js** * _User model file_
│  │
│  ├── routes/ * API route folder
│  │  └──todoRoutes.js * To-do route file
│  │
├── config/
│  └──db.js * Db connection file
│  │
├── package.json  * Defines our JavaScript dependencies
├── package-lock.json  * ----------
├── server.js * API server file
All your files and folders are presented as a tree in the file explorer. You can switch from one to another by clicking a file in the tree.
Let’s run the snipet below in the command line to install other dependences to be used.
bashnpm install jsonwebtoken npm install bcryptjs$$
Having gone through the first part of this series, it’s assumed that we already done the following.
- Cluster created in MongoDB Atlas cloud database.
- Database connected to Application
- Express Application created
- Application API Endpoints defined
- Listening to Server
All of the above could be seen from the server.js as shown below:
js'use strict' // require express and bodyParser const express = require("express"); const bodyParser = require("body-parser"); // Import DB Connection require("./config/db"); // create express app const app = express(); // Import API route var routes = require('./api/routes/todoRoutes'); //importing route routes(app); // define port to run express app const port = process.env.PORT || 3000; // use bodyParser middleware on express app app.use(bodyParser.urlencoded({ extended: true })); app.use(bodyParser.json()); // Add endpoint app.get('/', (req, res) => { res.send("Hello World"); }); // Listen to server app.listen(port, () => { console.log(`Server running at http://localhost:${port}`); });
Creating Schema and Model for User
Just as we created schema and model for the To-do application API. We are also going to do the same here to create a schema for the user. To get started with this, let's open userModel.js file in the model folder and follow the steps as shown in the snippet below.
js'use strict'; // Import mongoose const mongoose = require("mongoose"); // Import bcryptjs - for password hashing const bcrypt = require('bcryptjs'); // Declare schema and assign Schema class const Schema = mongoose.Schema; // Create Schema Instance for User and add properties const UserSchema = new Schema({ fullName: { type: String, trim: true, required: true }, email: { type:String, unique:true, lovercase:true, trim:true, required:true } , hash_password: { type:String, required:true }, createdOn: { type: Date, default: Date.now } }); //Create a Schema method to compare password UserSchema.methods.comparePassword = function(password){ return bcrypt.compareSync(password, this.hash_password); } // Create and export User model module.exports = mongoose.model("User", UserSchema);
From the above snippet, we imported bcryptjs, which has already been installed alongside all needed dependencies. we used bcrypt.compareSync function in the snippet above takes only 2 arguments and returns a boolean value true or false.
It is important to know that bcryptjs is a password hashing function that does not only incorporating a salt to protect against rainbow table attacks, also provide resistant to brute-force search attacks even with increasing computation power. bcryptjs and bjcrypt work as the same but the former is an optimized bcrypt in JavaScript with zero dependencies. Compatible to the C++ bcrypt binding on node.js and also working in the browser.
Defining User Authentication Endpoints and Routes
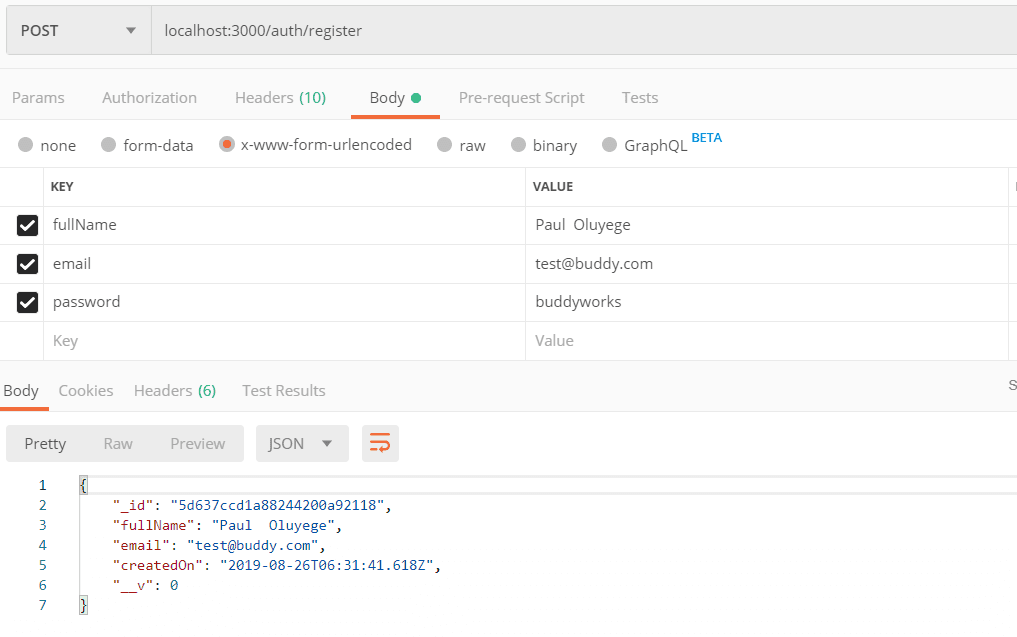
The endpoints needed for the user authentication (to register and login users) are shown in the table below:
/auth/register
|Method | Description |
|--|--|
|POST| Create user |

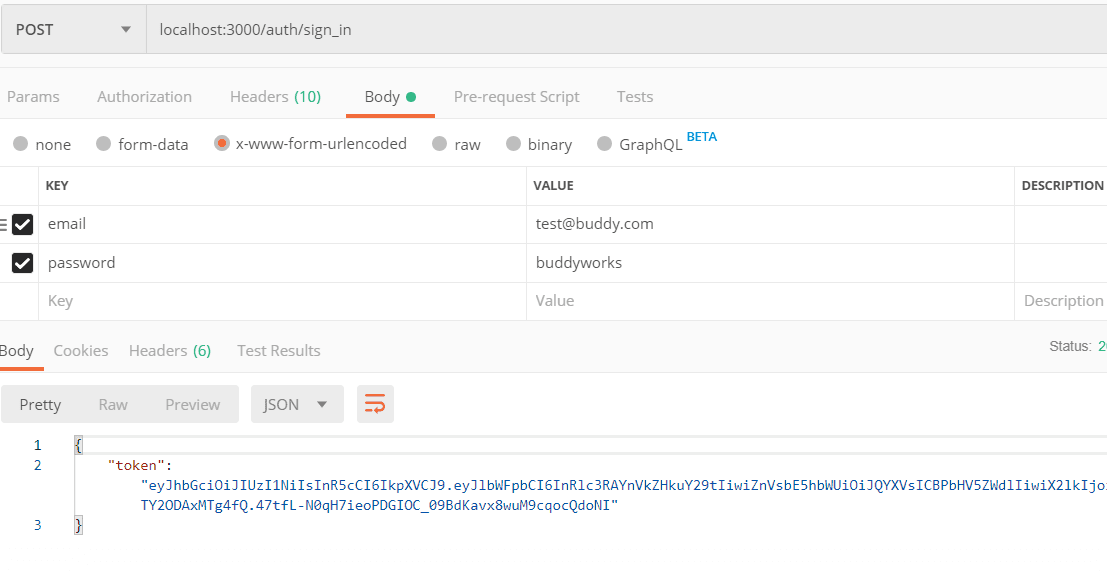
/auth/login
|Method| Description |
|--|--|
|POST | Login and authenticate user |
Now that we have defined user authentication endpoints, the next is to create and define controller functions for those endpoints and updates the routes
Creating Controller functions for User Authentication and Signing JWT Token
Before authentication can take place, user credentials must have been submitted, In the part, we are going to write controller functions to register user credentials and to authenticate the user before access to restricted resources. Open the authController.js file and follow comment guide in the snippet below:
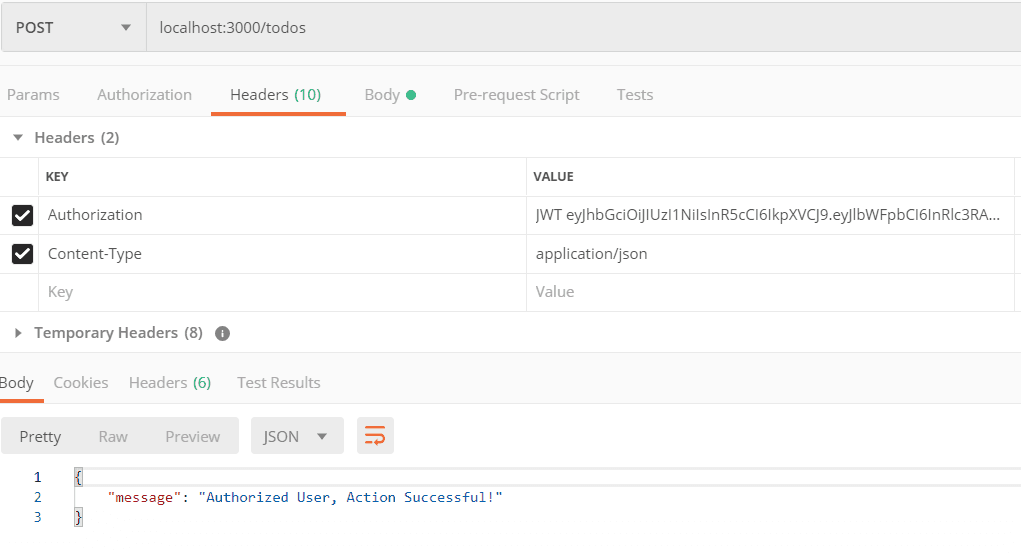
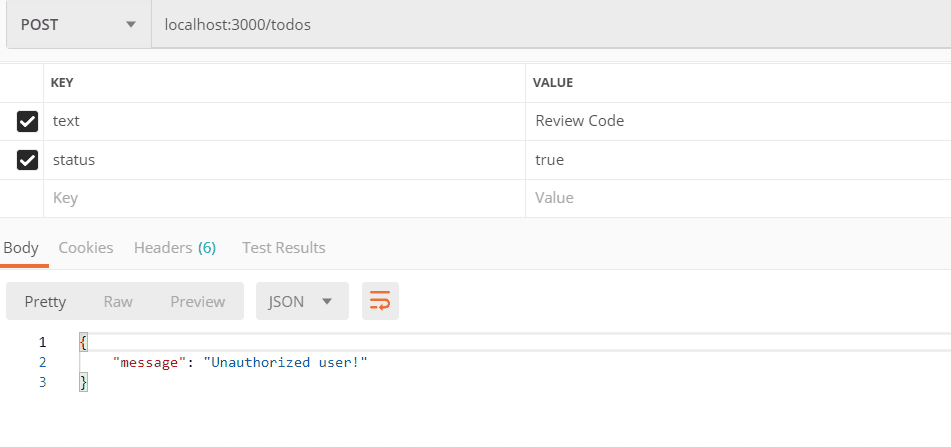
js// import User model const User = require("../models/userModel"); // import jsonwebtoken jwt = require('jsonwebtoken'), // import bcryptjs - hashing function bcrypt = require('bcryptjs'); //DEFINE CONTROLLER FUNCTIONS // User Register function exports.register = (req, res) => { let newUser = new User(req.body); newUser.hash_password = bcrypt.hashSync(req.body.password, 10); newUser.save((err, user) => { if (err) { res.status(500).send({ message: err }); } user.hash_password = undefined; res.status(201).json(user); }); }; // User Sign function exports.signIn = (req, res) => { User.findOne({ email: req.body.email }, (err, user) => { if (err) throw err; if (!user) { res.status(401).json({ message: 'Authentication failed. User not found.' }); } else if (user) { if (!user.comparePassword(req.body.password)) { res.status(401).json({ message: 'Authentication failed. Wrong password.' }); } else { res.json({ token: jwt.sign({ email: user.email, fullName: user.fullName, _id: user._id }, 'RESTfulAPIs') }); } } }); }; // User Register function exports.loginRequired = (req, res, next) => { if (req.user) { res.json({ message: 'Authorized User, Action Successful!'}); } else { res.status(401).json({ message: 'Unauthorized user!' }); } };
From the above snippet, we imported User model, bcryptjs and jsonwebtoken libraries (already been installed alongside all needed dependencies). The bcrypt.hashSync function used in the register controller function takes plain text password and rounds(in number) uses a random segment (salt) to generate the hash associated with the password. This was stored along with the password.
You can Recall from the user model that the compareSync method recalculates the hash of the password entered by the user and compares with the one entered when registering and see if they match as returned by the comparePassword function.
Also, from the Sign In controller function, the jsonwebtoken sign method jwt.sign({…}, 'secret') is used to sign web token.
Applying User Authentication Controller on To-do API endpoints
Open todoRoutes.js file and updates the HTTP request(POST, PUT, DELETE) that modifies resources with authentication handler as shown in the snippet below:
js'use strict'; module.exports = function(app) { var todoList = require('../controllers/todoController'); var userHandlers = require('../controllers/authController'); // todoList Routes // get and post request for /todos endpoints app .route("/todos") .get(todoList.listAllTodos) .post(userHandlers.loginRequired,todoList.createNewTodo); // update with login handler // put and delete request for /todos endpoints app .route("/todo/:id") .put(userHandlers.loginRequired, todoList.updateTodo) // update with login handler .delete(userHandlers.loginRequired, todoList.deleteTodo); // update with login handler // post request for user registration app .route("/auth/register") .post(userHandlers.register); // post request for user log in app .route("/auth/sign_in") .post(userHandlers.signIn); };
Verifying JWT Token
Recall that JWT token were created in the process of signing in. Therefore, in other to grant access to users on authenticated endpoints, the token initailly created my be verified using JWT verify method. Open the server file, server.js and updates with Token verification.
js'use strict' // import jsonwebtoken const jwt = require('jsonwebtoken'); // Token Verification app.use((req, res, next) => { if (req.headers && req.headers.authorization && req.headers.authorization.split(' ')[0] === 'JWT') { jwt.verify(req.headers.authorization.split(' ')[1], 'RESTfulAPIs', (err, decode) => { if (err) req.user = undefined; req.user = decode; next(); }); } else { req.user = undefined; next(); } }); // API endpoint
Test API on Postman
Test Authenticated endpoints
Image loading...
Image loading...
Image loading...
Image loading...
Next in series: Unit Testing JWT Secured Node and Express RESTful API with Chai and Mocha