Building RESTful APIs using Express and Node with MongoDB Atlas
What You Will Build
In this article, we'll build an API from scratch (i.e. from an empty directory), then go through all the steps needed to build a secure RESTful API for a to-do list application. The front-end of the application will be described in the latter part of this article. Upon finishing this tutorial, you will be able to create, retrieve, update, and delete a to-do list.
Prerequisites
In order to follow along with this article, moderate knowledge of Node.js is required. The code and the concepts explained in this article are not complex, therefore, with a previous experience with JavaScript, and a bit know-how about Node.js, you won't have a hard time here.
On top of Node.js and NPM, you'll need a code editor, such as Virtual Studio Code, and Postman installed in your machine. We shall use MongoDB Atlas, a cloud database for data persistency. If you have an existing MongoDB Cloud Account, use your credentials to login into MongoDB Atlas dashboard. If you don't, go to the signup page for Mongo DB Atlas. It's free and no credit card required.
Introduction to RESTful API
In case you're new to RESTful APIs, let's have a quick head start with brief definition and explanation of RESTful APIs.
API (Application Programming Interface) is a set of subroutines and protocols that makes communication between two components possible. REST (Representation State Transfer) is an architectural style that defines a set of restrictions based on HTTP (Hypertext Transfer Protocol). Therefore, an API is said to be RESTful if its design is based on REST.
Taking advantage of a REST API design is now made easy, because there's no need to install libraries or additional software. Building APIs that meet the needs of your customers has become simple due to the freedom and flexibility that the REST API design provides.
CRUD (Create, Read, Update and Delete) makes HTTP methods like GET, POST, PUT, and DELETE available for mutation, creation, and deletion respectively. REST's stateless protocol and its interaction through standard operations on resources help the systems achieve scalability, fast performance, and reliability.
For more information on the design concepts, read up on Representational state transfer and [Richardson Maturity Model](https://martinfowler.com/articles/richardsonMaturityModel.html nofollow).
Getting Started with Building RESTful APIs
Outline
- Create DB Cluster on MongoDB Atlas - Cloud Database
- Connect Application to MongoDB Atlas
- Create Schema and Model
- Create Express HTTP Server Application
- Define API Endpoint and Routes
- Create Controller functions
- Import Controllers functions App Routes
- Import DB Connection into Server
- Test API on Postman
Todo-API Application Folder Structure
Starting from scratch, let’s create our project directory named Todo-API and run some commands on the terminal.
>> mkdir -p api/{controllers,models,routes}
>> touch api/controllers/todoController.js api/models/todoModel.js api/routes/todoRoutes.js
>> mkdir config
>> touch config/db.js
>> touch server.js
Here's the expected file structure at the end of the process:
Todo-API/
├──api/
│      ├── controllers/* API Controller folder
│      │                 └── todoController.js  * Todo controller file
│      │
│      ├── models/  * API Model folder
│      │                  └── todoModel.js  * Todo model file
│      │
│      ├── routes/  * API route folder
│      │                  └──todoRoutes.js  * Todo route file
│      │
├── config/
│                  └──db.js  * Db connection file
│      │
├── package.json  * Defines our JavaScript dependencies
├── package-lock.json  * ----------
├── server.js  * API server file
All your files and folders are presented as a tree in the file explorer. You can switch from one to another by clicking a file in the tree.
Initialize the package.json file and install dependencies:
>> npm init
>> npm install mongoose express body-parser
Before we delve into writing code, let's quickly create a cluster in MongoDB Atlas cloud database.
Create DB Cluster on MongoDB Atlas - Cloud Database
After setting up a MongoDB Atlas account, the next step is to create Clusters. Before we dive into it, let's define what clusters are. Clusters are a set of MongoDB servers that applications can connect with. The available clusters are of three types, they are shared, dedicated and production. The only freely available among these is the shared cluster.
To create a free tier cluster, let's do the following:
- Visit https://www.mongodb.com/cloud/atlas/register as a new user or https://account.mongodb.com/account/login?nds=true to log in as a returning user
- Click Build New Cluster button and type in the Project name
- Select any free tier available and click Next Cluster tier button
- Select M0, a shared Cluster (for the purpose of this course) and click Create cluster button
- Now that Cluster is created, select Security tab for IP Whitelist setting and Add whitelist IP
After Cluster has been created, it's time to connect our cloud database with the application.
Connect Application to MongoDB Atlass
We can establish connections with applications using middleware, such as the native MongoDB driver and Mongoose. However, in this article, we shall use the Mongoose default method to create model. Open db.js and do as shown in the snippet below:
js// Export mongoose
const  mongoose = require("mongoose");

//Assign MongoDB connection string to Uri and declare options settings
var  uri = "mongodb+srv://buddy-works:fabregas10@cluster0-8iysb.mongodb.net/test?retryWrites=true&w=majority"

// Declare a variable named option and assign optional settings
const  options = {
useNewUrlParser:  true,
useUnifiedTopology:  true
};

// Connect MongoDB Atlas using mongoose connect method
mongoose.connect(uri, options).then(() => {
console.log("Database connection established!");
},
err  => {
{
console.log("Error connecting Database instance due to:", err);
}
});
Run node db.js inside the config folder to test the connection
>> node db.js
Image loading...![]()
After a successful connection has been established, the next step is to create and define schemas with Mongoose.
Create Schema and Model
Open todoModel.js file in the model folder and do the following:
js'use strict';
// Import mongoose
    const mongoose = require("mongoose");

// Declare schema and assign Schema class
    const Schema = mongoose.Schema;

// Create Schema Instance and add schema propertise
    const TodoSchema = new Schema({
        text: {
            type:String,
            required:true
        },
        status:{
            type:Boolean,
            required:true
        },
        createdOn: {
            type:Date,
            default:Date.now
        }
    });

// create and export model
module.exports = mongoose.model("todoModel", TodoSchema);
The previous steps handled database cluster creation, database connection, schema and model creation. Now we need to create an Express HTTP Server application.
Create Express HTTP Server Application
Express Js provides a robust set of features for building web applications. For the application we are building, our major need is to be able to send and receive HTTP requests. To meet this need, a third-party middleware is used on the Express application object. For example, a body-parser is a middleware that extracts the body of an incoming request, exposes it on res.body, and parses the JSON, buffer, string, and URL encoded data that's submitted using an HTTP POST request.
An Express application server can also be used to create our to-do application API. Since we've already installed bodyParser alongside all required dependencies, open server.js file, and follow the steps below:
js'use strict'

// require express and bodyParser
const  express = require("express");
const  bodyParser = require("body-parser");

// create express app
const  app = express();

// define port to run express app
const  port = process.env.PORT || 3000;

// use bodyParser middleware on express app
app.use(bodyParser.urlencoded({ extended:true }));
app.use(bodyParser.json());

// Add endpoint
app.get('/', (req, res) => {
res.send("Hello World");
});

// Listen to server
app.listen(port, () => {

console.log(`Server running at http://localhost:${port}`);
});
To test the Express server, run the command:
>> node server.js
If the steps have been followed perfectly, you should get the response Server running at http://localhost:3000:
Image loading...
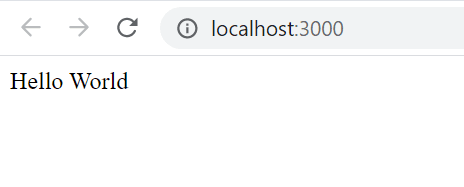
Go to http://localhost:3000 in your browser to view the output.
Image loading...
If you managed to follow all the steps above, you've got a basic understanding of how to develop an Express HTTP server. Now we need to modify the server.js file and update it with a defined API endpoints and routes.
Define API Endpoint and Routes
Endpoint definition is a major step in creating APIs. This is where we define the endpoints to be exposed. For our to-do application, we shall allow users to perform CRUD operations. The endpoints(based on todo model propertise) we’ll need are:
/todos
| Method | Description |
|---|---|
| GET | Find all todos |
| POST | Create a new todo |
/todos:id
| Method | Description |
|---|---|
| GET | Find a todo by id |
| PUT | Update a todo status by id |
| DELETE | Delete a todo by id |
Now that we have defined the API endpoints, the next step is to create a controller function for those endpoints.
Create Controller functions
Controllers are functions that handle incoming HTTP requests and send response back to the caller. Open the todoModel.js file and define the functions as follows:
js// import Todo Model
const  Todo = require("../models/todoModel");

// DEFINE CONTROLLER FUNCTIONS

// listAllTodos function - To list all todos
exports.listAllTodos = (req, res) => {
Todo.find({}, (err, todo) => {
if (err) {
res.status(500).send(err);
}
res.status(200).json(todo);
});
};

// createNewTodo function - To create new todo
exports.createNewTodo = (req, res) => {
let  newTodo = new Todo (req.body);
newTodo.save((err, todo) => {
if (err) {
res.status(500).send(err);
}
res.status(201).json(todo);
});
};

// updateTodo function - To update todo status by id
exports.updateTodo = (req, res) => {
Todo.findOneAndUpdate({ _id:req.params.id }, req.body, { new:true }, (err, todo) => {
if (err) {
res.status(500).send(err);
}
res.status(200).json(todo);
});
};

// deleteTodo function - To delete todo by id
exports.deleteTodo = async ( req, res) => {
await  Todo.deleteOne({ _id:req.params.id }, (err) => {
if (err) {
return res.status(404).send(err);
}
res.status(200).json({ message:"Todo successfully deleted"});
});
};
Last but not least, we need to import the controller functions into the route file.
Import Controller functions into App Route
Open the todoRoutes.js file and update it as follows:
js'use strict';

// create App function
    module.exports = function(app) {
        var todoList = require('../controllers/todoController');

// todoList Routes

// get and post request for /todos endpoints
        app
        .route("/todos")
        .get(todoList.listAllTodos)
        .post(todoList.createNewTodo);

// put and delete request for /todos endpoints
        app
        .route("/todo/:id")
        .put(todoList.updateTodo)
        .delete(todoList.deleteTodo);
    };
Import DB connection and API Route into Server
Before we test our API, let's updates the server.js file. Add the database connection file import before the Express app creation line, then add the API route import:
js// Import DB Connection
require("./config/db");

// Import API route
var routes = require('./api/routes/todoRoutes'); //importing route
routes(app);
At this junction, all coding is finished.
Congratulations – let's run and test the API!
If everything has been configured correctly, you should get an output command as shown below:
Image loading...
Test API on Postman
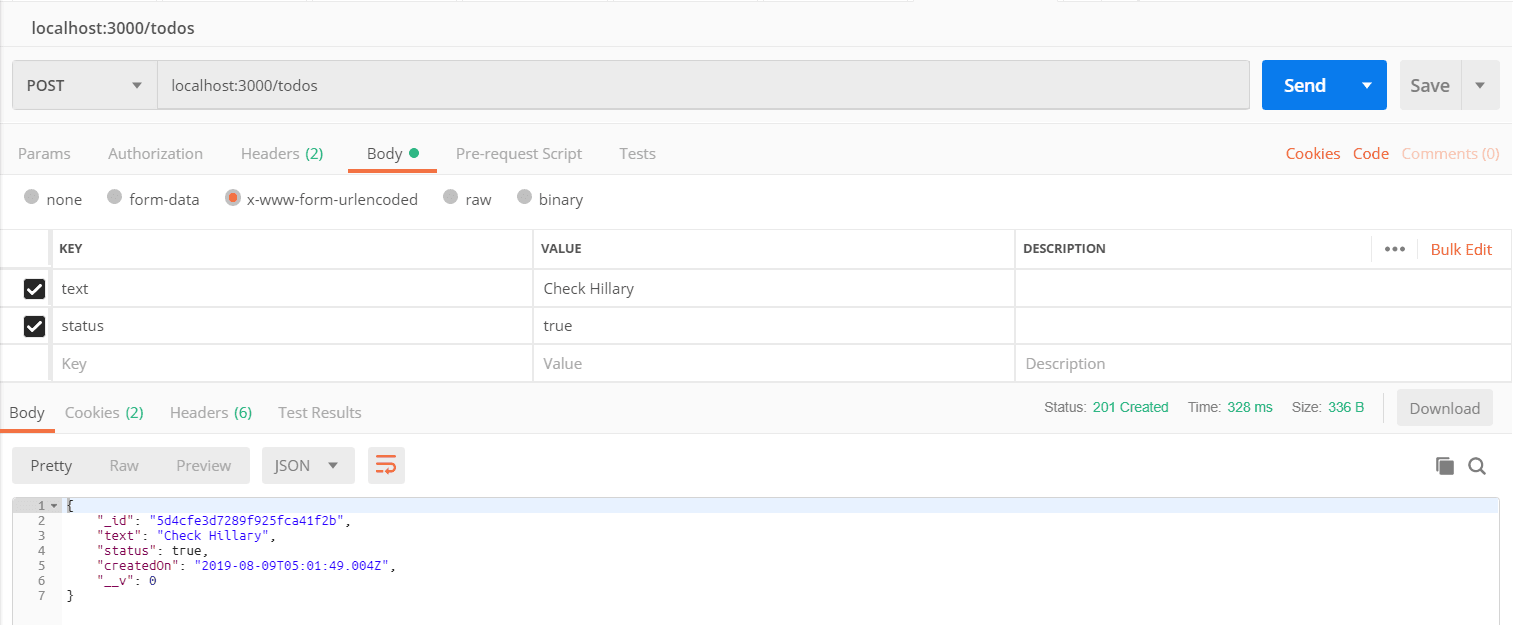
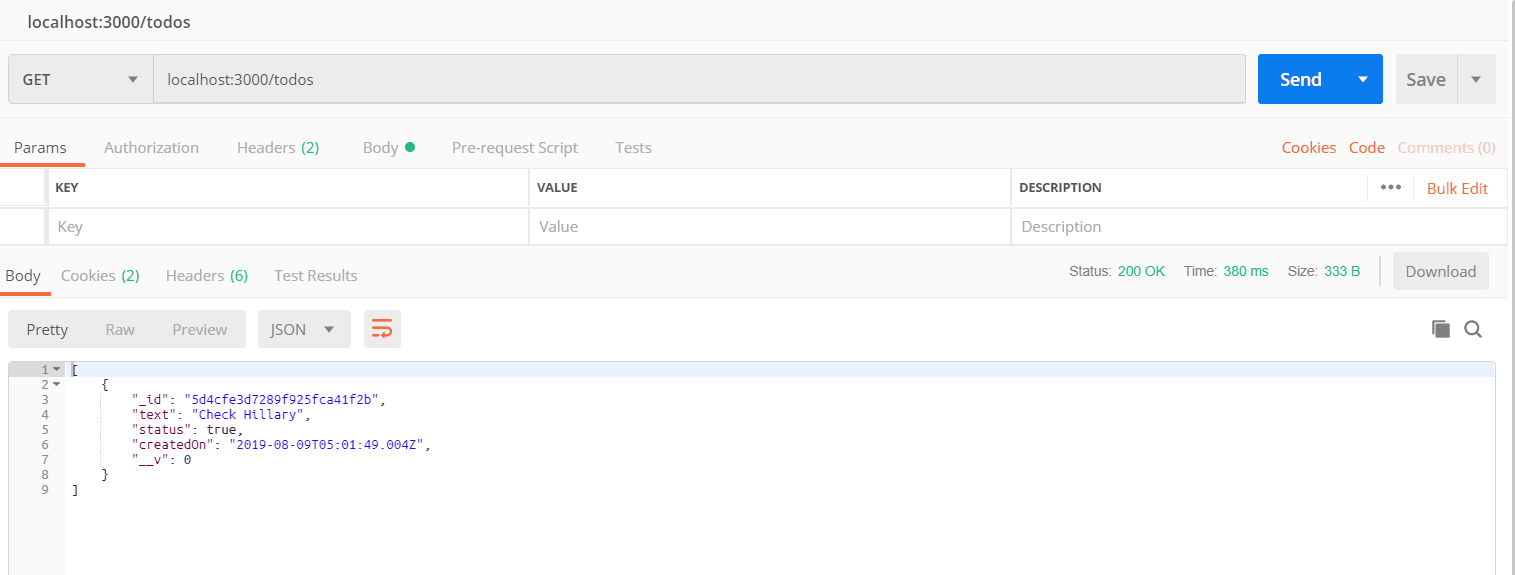
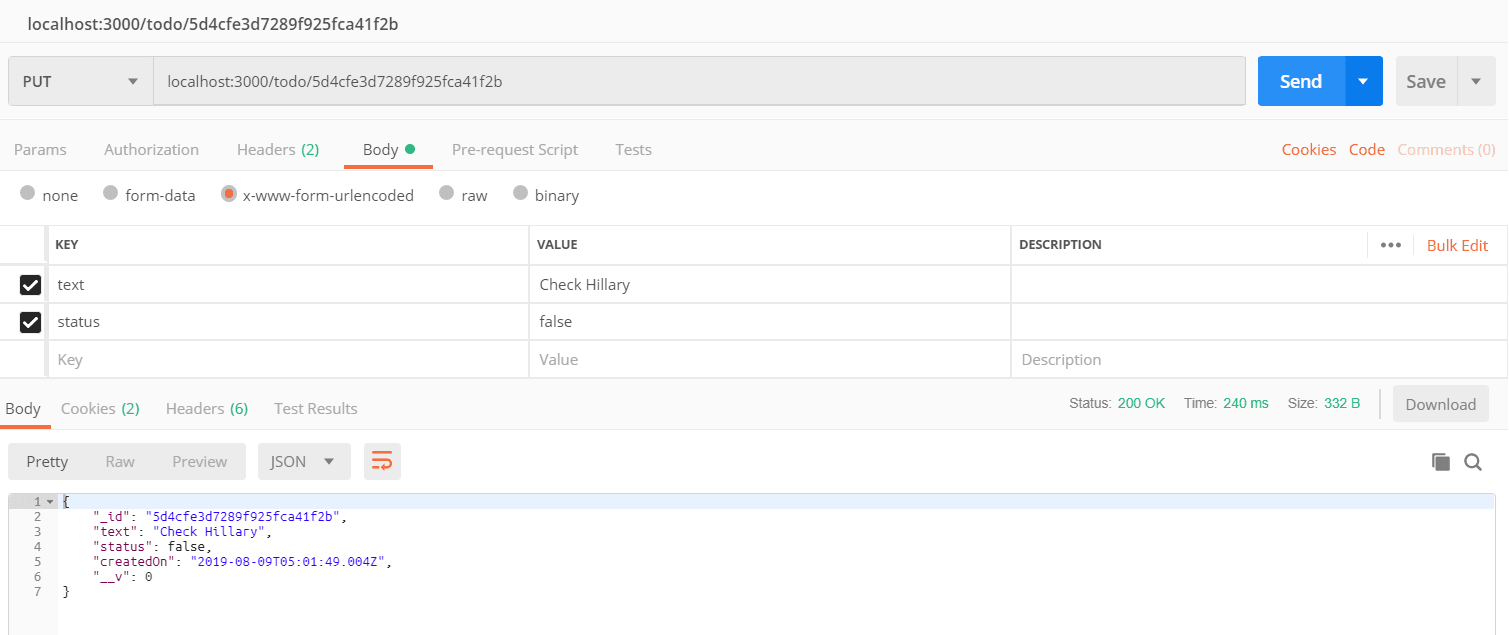
Test for POST,GET,PUT and DELETE Requests on todo API
for POST request on todo API - localhost:3000/todos
Image loading...
for GET request on todo API - localhost:3000/todos
Image loading...
for PUT request on todo API - localhost:3000/todo:id
Image loading...
for DELETE request on todo API - localhost:3000/todo:id
Image loading...
Next in series: Securing Node and Express RESTful API with Json Web Token (JWT)