Integration testing for AWS Lambda in Go with Docker-compose
This article is part 2 of the series on AWS Lambda. Check out the other articles:
AWS Lambda is an amazing piece of technology that allows developers to run code in the cloud without having to manage servers.
I personally find that writing a Lambda is a different experience compared to writing most traditional application servers. With Lambda, as a developer, you need to embrace a different mindset in terms of organizing, packaging your code and even testing it.
In addition to this, Lambda is still a relatively young piece of technology and there isn't yet a great body of shared knowledge and best practices. Therefore developers are, to some extent, left on their own to figure out what's the best way to structure the full development lifecycle of their Lambdas.
In one of my previous articles "Determine prominent colors in a picture, your first AWS Lambda in Go" we demonstrated how to write a simple Lambda in Go.
This article is a follow up and it aims to expand on the same Lambda example and show how to write an integration test to make sure everything works as expected before you release your code to production.
We will see a way of authoring integration tests for Lambda by using docker-compose. This approach is particularly interesting as it can be easily run locally or added to your CI pipeline.
Pre-requisites
In addition to the pre-requisites from the previous article you will need to have:
docker-composeinstalled in your system- The lambda code in a repository on GitHub or Bitbucket. If you have a GitHub account, the easiest option is to fork my repository.
There's (a lot) more than "integration" in "testing"
If you have been writing tests or CI pipelines in your career, you probably know that there's generally a lot more than integration testing when talking about testing.
As part of the quality assurance of a software project, these are generally some of the most commonly adopted types of testing:
- Linting: validates the source code to make sure that it is compliant to an agreed code standard. In go, this is generally done through the command
gofmtwhich enforces an opinionated set of style rules. Other alternatives aregolintandrevive. - Static analysis: used to spot suspicious constructs that might result in bugs or security issues (e.g.
Printfstatements with arguments that are not aligned with the types in the format string, concurrency issues, invalid use of pointers, etc.). This class of analysis is something that the go compiler does not cover, so you need additional tools if you want to spot these problems. Go offers a built-in tool calledgo vetto carry over this type of analysis. - Security/dependency Scanning: tools that will analyze the code to look for common security mistakes that could lead, for instance, to SQL injections or other attacks. One tool that can do this is
gosec. Another class of these tools can scan dependencies and looks for vulnerabilities (generally by using CVE archives). GitHub itself started to provide this service directly in your repos for many languages. There also other commercial third party that can offer a similar service, the first 2 that come to my mind are Snyk and Veracode SourceClear. - Unit tests: a type of automated tests that aims to check the correctness of small and isolated units of code. This is probably the most common type of test and one of the most important. No surprises that go offers a built-in library to help with Unit testing: the
testingpackage. - Integration tests: allows you to tests how different parts of the system are integrated together. It allows you to validate that specific integration points are conformant to the contracts defined and that data can flow between the parts as expected. Setting up these tests generally requires a decent amount of effort as you might have to simulate or isolate the different components. Generally you don't want to spin up all the components of an entire application only to test the integration surface between two of them. I generally end up writing integration tests by isolating some components through containers and with some script to perform the expected action and validate the behavior. Another interesting approach to deal with integration tests is Pact that allows you to test producers and consumers compliance to contracts independently.
- Functional tests (or E2E, "End to End"): aims at testing the complete functionality of an application through all its layers. If it's a web application, the testing will probably need to spin up a real browser, click around to simulate specific user interactions and validate if UI and data change as expected. In the case of a serverless application on AWS, you will probably end up running a functional test in a realistic copy of your production environment. That's why functional tests are generally the hardest write and the most expensive to run.
A good CI pipeline will try to cover most of these types of test, so that, every time that your code changes, you can have more confidence that software quality is kept under good care and that no pre-existing functionalities has been altered unexpectedly.
Of course, writing and running an extensive test suite could be expensive and you don't want to over-invest in that.
There are several ways to visualize what's important for different stakeholders involved with testing.
Ankit Mehta from Google was one of the first testing experts to discuss the concept of Testing Pyramid:
Image loading...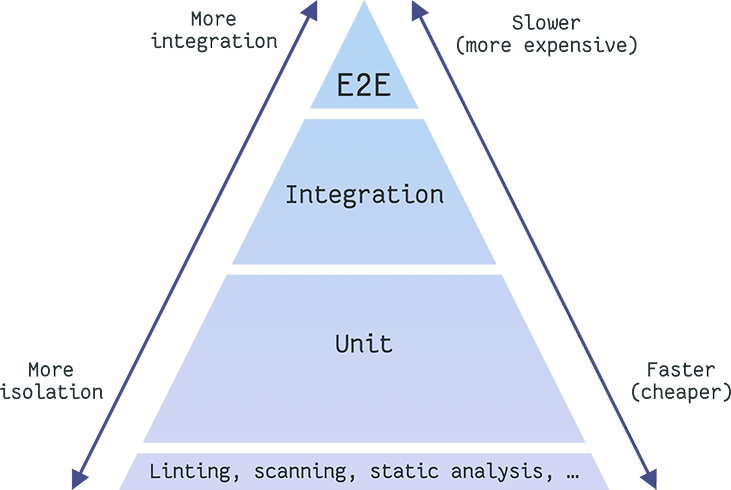
In this pyramid you can see that the lower levels aim at testing isolated units or specific characteristic of your software and they are generally cheaper to write and run. The upper levels require more and more integration and it becomes more complex and expensive to write and run those.
Gleb Bahmutov of Cypress.io likes to point out that there's another way to represent this pyramid and it's with the customer hat! In this case the pyramid get inverted and it looks like this (slightly revisited):
Image loading...
In this case we are focusing on the value that each layer of testing provides. Users will care that the applications works as expected end to end as they have a global view and they don't have to understand how different components are built and connected together.
Developers, on the other end, will need to keep sanity in their codebase. We know that modular software is easier to develop, maintain and test, therefore it's more natural for developers to think in composable units and write tests for those.
I believe that based on the type of application you have to find the right balance and the right level of coverage across the different layers of the testing pyramid.
Why integration testing is important with Lambda
The reason why I want to focus particularly on integration testing in this article is because I think it is one of the most valuable pieces of testing in the context of a Lambda.
In my experience, Lambda functions tend to be small units of software that solve one specific business case. They are triggered by an external event and, most likely that event will be used to generate some sort of mutation in another system, for instance a new record in a database (RDS or DynamoDB), a new file in a distributed storage service (S3) or an email to a customer.
In this context, Lambda essentially becomes the "glue" between different systems, or in other words "an integration point" between them. If you try to use a classic unit test approach you might end up writing a lot of Test doubles (e.g. mocks). If you write too many of them you are potentially nullifying your test coverage. I like to say that "if you have too many test doubles in your tests, you are only testing the test doubles", which might differ a lot from the real implementation you will have in production.
In my opinion, integration tests are the sweet spot of testing for what concerns Lambda functions.
I still recommend to break down your Lambda function business logic into small units that you can test in isolation through unit tests, but I wouldn't recommend to write a unit test for the Lambda handler function. That's what you want to cover with an integration test.
Let's try to clarify this idea a bit more by having a look at our prominent colors Lambda.
Image loading...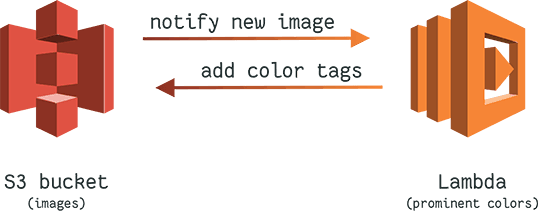
We have two systems here, integrated together by 2 different contracts:
- Our S3 bucket will notify our Lambda whenever a new image has been added to the bucket
- The Lambda will read the content of the image from S3, analyze it and write the prominent colors as S3 tags back to the original S3 object.
S3 and Lambda offer very specific interfaces for these 2 contracts (lambda notification and tags). If we wanted to write unit tests for this logic, we probably would end up mocking the notification logic, the S3 SDK object reading logic, and finally the S3 SDK tag writing logic.
It would be very easy to get something wrong by doing this and also, if something changes in the contract (because of a new S3 or Lambda release), it's up to us to find that out and update our mocking to reflect those changes if we want to make sure that our implementation is still working.
Anatomy of our integration test
In our integration test we need to run the two components (S3 and the Lambda) and then we need a test runner that generates the proper test events and validates the result. We will be using Docker, so our setup will be looking like the following picture:
Image loading...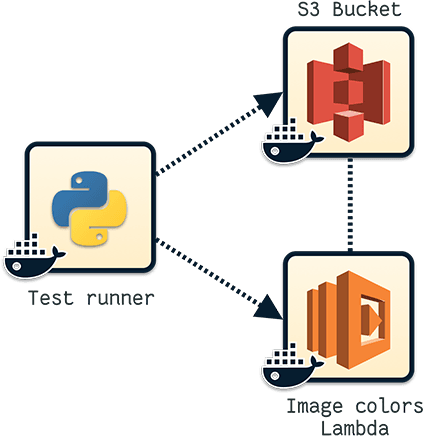
Our test runner will be a containerized Python script that will upload a set of sample images to our S3 bucket container and then invoke the Lambda container using synthetic S3 Put Object events. Finally the script will check again against S3 to see if all the images now have Color tags.
We will be using docker-compose to orchestrate the 3 containers.
But at this point you might wonder: "how do we dockerize an S3 bucket?" and "how do we dockerize a Lambda?"
Good questions!
AWS (unfortunately) doesn't give us official tools to be able to run a local copy of S3 or a Lambda so we have to find alternative solutions.
How to run S3 locally
Even if there is no official support for a local S3 instance from AWS, there are many open source projects that provide a storage layer that is compatible with the S3 API.
One of these project is localstack, which also offers local support for other AWS services (API Gateway, DynamoDB, etc).
Localstack is built to help with local integration testing of AWS infrastructure, which is exactly our use case.
There's already a localstack distribution available on Docker Hub, so you can easily test it by running something like this:
bashdocker run \ -it \ -p 4572:4572 \ -e "SERVICES=s3" \ -v /tmp/localstack:/tmp/localstack \ --name localstack \ localstack/localstack$$$$$$$
Notice that we are spinning up only the S3 service by setting the environment variable SERVICES to s3. You can specify multiple services if you need to mock more than just S3. Each service gets exposed in a predefined port. You can redefine ports if needed. For instance, setting SERVICES to "kinesis,iam:4569,sqs:4570" will start Kinesis on the default port, IAM on port 4569 and Sqs on port 4570.
It's important to call out that you will need to explicitly configure the endpoint URL for a given local service in order to use it with the AWS SDK or the CLI. You cannot point to localstack using AWS credentials or profiles alone.
Now you can play with your local S3 by using the AWS command line. For instance you can create a bucket, copy and read a file as follows:
bashexport AWS_ACCESS_KEY_ID=foo export AWS_SECRET_ACCESS_KEY=bar # create bucket aws --endpoint-url=http://localhost:4572 s3 mb s3://mytestbucket # create a local file echo "Hello World from my local s3" > myfile.txt # copy a file aws --endpoint-url=http://localhost:4572 s3 cp myfile.txt s3://mytestbucket/ # read the file aws --endpoint-url=http://localhost:4572 s3 cp s3://mytestbucket/myfile.txt - # you should see: # Hello World from my local s3$$$$$$$$$$$$$$$$$
Note that you need to have some random values exported for AWS_ACCESS_KEY_ID, AWS_SECRET_ACCESS_KEY. Any value will work, but leaving these variables empty will make your requests fail.
We will use a similar approach later to configure our S3 container in our integration test environment.
From now on, you won't need this localstack container running, so feel free to terminate it with:
bashdocker kill localstack$
How a Lambda in Go actually runs
A Lambda written in Go is nothing else than a Go net/rpc server that exposes the Function.Invoke remote procedure in order to trigger the related Handler. This procedure must be called by passing an InvokeRequest instance and it will return an InvokeResponse instance from the package github.com/aws/aws-lambda-go/lambda/messages.
When a Lambda is deployed and running on AWS this is all transparent to you. You don't have to worry about these details, because AWS events will take care of making the correct RPC call for you.
But now that we have to trigger a Lambda running locally this becomes important to understand. If you just run the Lambda handler from our code base you will have a local RPC server (by default running on port 8001). How do we invoke it with a specific JSON event?
You could write some code like the following:
go// sample_invoke.go

package main

import (
  "fmt"
  "log"
  "net/rpc"

  "github.com/aws/aws-lambda-go/lambda/messages"
)

func main() {
  // establish a connection to the RPC server
  connection, err := rpc.Dial("tcp", "localhost:8001")
  if err != nil {
    log.Fatal(err)
  }

  // creates a dummy event
  event := "{\"hello\":\"world\"}"

  // allocates a response instance
  var response messages.InvokeResponse

  // creates the request instance
  request := &messages.InvokeRequest{
    Payload: event,
  }

  // invokes the handler with the dummy event
  err = connection.Call("Function.Invoke", request, &response)
  if err != nil {
    log.Fatal(err)
  }
  if response.Error != nil {
    log.Fatal(response.Error.Message)
  }

  // prints the payload of the response (lambda handle return value)
  fmt.Printf("result: %v\n", string(result.Payload))
}
Which you can run with go run sample_invoke.go. This is not going to work as our Lambda handler expects an S3 event and we just gave it a dummy {"hello":"world"} event. Also our Lambda is not connected yet to a local S3, so even if we sent a properly formatted S3 event it won't be able to retrieve the actual file content.
We will sort out all these inconveniences in a moment, but right not you should be wondering if there's any easier way to invoke a generic Lambda by passing an arbitrary payload.
I made the code above a little bit more generic and built an open source command line tool called invok.
You can install invok by running:
bashgo get github.com/lmammino/invok$
Now you can invoke a local Lambda with an arbitrary JSON payload as follows:
bashcat someJSONevent.json | invok --host "localhost:8001"$
We will be using invok in our test runner to trigger Lambda events for every test image in our test bucket.
Notice that invok is not the only solution to this problem. If you are using the Serverless framework or AWS SAM they both offer options to run lambdas locally with a given event.
It's also worth emphasizing that what we are doing here with invok (or similar tools) is trying to address a critical missing piece of the Serverless development workflow. With localstack, you have a simulation of AWS services so you can call out to them when needed. In production most often you don't really have to call out services directly as you can rely on event-based triggers. For instance, dropping a file on an S3 bucket will automatically trigger a Lambda listening for S3 PUT Object events to that bucket (if you registered that event as a trigger in your Lambda configuration). You don't have to programmatically generate that event to trigger the Lambda, AWS will do that for you.
Events from these services (i.e. event-triggers for Lambda) are largely missing from a Serverless local development environment, therefore we need to manually synthetise and trigger them to test our code locally.
Building the Lambda container
At this point, you should be able to understand how things are connected together, so let's start to define the various containers we will be using in our integration test.
The first one we will build is the Lambda container.
Let's create the path tests/integration/images/lambda/ in our repository. Within this folder we will put all the files needed to build the Lambda docker image:
draft: yes a Dockerfile and a entrypoint.sh.
This is our Dockerfile:
dockerfileFROM golang:1.11.1

# /app will need to be a volume that mounts the entire project path
RUN mkdir -p /app
WORKDIR /app

ENV PATH="/app:${PATH}"

# install simpleproxy to forward external to internal tcp traffic
RUN apt-get update && apt-get install -y simpleproxy

COPY ./entrypoint.sh /opt/entrypoint.sh
RUN chmod +x /opt/entrypoint.sh

ENTRYPOINT ["/opt/entrypoint.sh"]
entrypoint.sh will contain the following code:
bash#!/usr/bin/env bash # run the command passed as argument in the background # (this is generally the lambda executable) "$@" & # give lambda 1 second to start sleep 1 # Exposes LAMBDA gRPC port externally # This is needed as LAMBDA listens on localhost echo "* PROXYING 0.0.0.0:${LAMBDA_EXTERNAL_PORT} -> localhost:${_LAMBDA_SERVER_PORT}" simpleproxy -L ${LAMBDA_EXTERNAL_PORT} -R localhost:${_LAMBDA_SERVER_PORT}$$$$$$$$$$$$$
Everything here should be quite straightforward. The only new element is simpleproxy.
The reason why we need simpleproxy here is because the Lambda TCP RPC server will only listen for local connections and this is something we can't change (we can only change the default port but not the binding address). When we wrap the Lambda in a container, we need to have a way to listen for requests coming from the outside and redirect them into the Lambda RPC server listening on the local interface.
This is a visual representation of how we are using simpleproxy assuming that LAMBDA_EXTERNAL_PORT is set to 8002 and _LAMBDA_SERVER_PORT is set to 8001:
Image loading...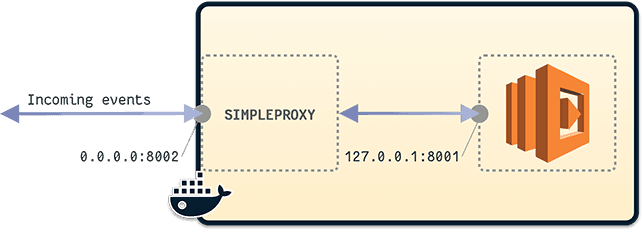
As you can see in the picture, simpleproxy is used to listen to 0.0.0.0:8002 and redirect all the TCP data to 127.0.0.1:8001 (Lambda handler).
Note that this is not the only way to dockerize a Lambda. There are projects like docker-lambda by LambCI that will go a step further and try to enforce the configuration and all the limitations of the Lambda runtime (timeout, memory and CPU limits, payload limits, pre-installed libraries, environment variables, etc). It might be a good exercise at the end of this tutorial to try and switch our simpler docker setup with docker-lambda to be able to run our tests in a more realistic local Lambda engine.
Connecting to a local S3 from our Lambda
Now our Lambda is dockerized and can receive events coming from other containers. We also know how to dockerize an S3 mock service by using localstack. But right now, how does our Lambda know that in our test environment it should connect to our local S3 mock, rather than the actual AWS service?
Well, it doesn't. We need to make some code changes to make our Lambda more configurable, so that we can specify the AWS endpoint for the S3 service. This requires some small code changes in our Lambda code.
In reality, we need to do 2 changes:
- Allow support for the force path style S3 API.
- Allow support for a configurable S3 endpoint.
The first change is necessary because, by default AWS S3 creates url of this kind:
https://mybucketname.s3.amazonaws.com/images/someimage.jpg
Which in a test case would require us to create subdomains to be able to identify buckets. The path style API will allow us to access the same object with the following URL:
https://s3.amazonaws.com/mybucketname/images/someimage.jpg
Of course, in our test case we will replace https://s3.amazonaws.com/ with http://container_name:someport/.
In order to make our Lambda configuration more flexible this is what we have to change:
diff// cmd/image-colors-lambda/main.go

func HandleRequest(ctx context.Context, event events.S3Event) error {
  // 1 - load default palette and initialize a new AWS session and an S3 client
  palette := utils.GetDefaultPalette()

  s3Endpoint := os.Getenv("AWS_S3_ENDPOINT")
  var s3ApiUsePathEndpoint bool
  if len(os.Getenv("AWS_S3_USE_PATH")) > 0 {
    s3ApiUsePathEndpoint = true
  }

  awsSession := session.New()
  s3Client := s3.New(awsSession)

  if len(s3Endpoint) > 0 {
    s3Client = s3.New(
      awsSession,
      &aws.Config{
        S3ForcePathStyle: &s3ApiUsePathEndpoint,
        Endpoint:         &s3Endpoint,
      },
    )
  }

  // ...
}
Here, we are exposing two new environment variables: AWS_S3_ENDPOINT (which will contain the endpoint to connect to when testing) and AWS_S3_USE_PATH (a boolean that, if set to true, will switch to the path style API).
Now, when the custom S3 endpoint is specified, we override the default S3 client with a new instance that uses the 2 configuration options coming from those environment variables.
By passing the proper environment variables to our Lambda container, now our Lambda will be able to connect to the local S3 instance.
Test runner container
Here we are writing the test runner container. Again, what we want to achieve is have a script that does the following things:
- Upload a set of sample images to our S3 container in a test bucket
- Trigger Lambda S3 PUT events against our dockerized Lambda
- Wait for all the events to be processed
- Check our images in the test bucket and verify that they all have color tags
For simplicity we are going to write these tests in a scripting language. In this case, I decided to go with Python.
We will need to use 2 libraries:
So let's start by creating a requirements.txt in tests/integration/images/runner/src/ that lists our dependencies:
boto3==1.9.37
requests==2.20.0
Now let's write 2 utility files.
The first one is going to be called tests/integration/images/runner/src/lambda_events.py and it allows us to generate S3 PUT object events:
pythondef create_s3_put(params):
    return """
{{
  "Records": [
    {{
      "eventVersion": "2.0",
      "eventTime": "1970-01-01T00:00:00.000Z",
      "requestParameters": {{
        "sourceIPAddress": "127.0.0.1"
      }},
      "s3": {{
        "configurationId": "testConfigRule",
        "object": {{
          "eTag": "0123456789abcdef0123456789abcdef",
          "sequencer": "0A1B2C3D4E5F678901",
          "key": "{key}",
          "size": 1024
        }},
        "bucket": {{
          "arn": "arn:aws:s3:::{bucket}",
          "name": "{bucket}",
          "ownerIdentity": {{
            "principalId": "EXAMPLE"
          }}
        }},
        "s3SchemaVersion": "1.0"
      }},
      "responseElements": {{
        "x-amz-id-2": "EXAMPLE123/5678abcdefghijklambdaisawesome/mnopqrstuvwxyzABCDEFGH",
        "x-amz-request-id": "EXAMPLE123456789"
      }},
      "awsRegion": "{region}",
      "eventName": "ObjectCreated:Put",
      "userIdentity": {{
        "principalId": "EXAMPLE"
      }},
      "eventSource": "aws:s3"
    }}
  ]
}}
""".format(**params)
Essentially this library exposes a function that, by using a template, allows us to generate events. We will need to pass parameters for bucket, region and key (object name).
The next utility library is called tests/integration/images/runner/src/utils.py
and contains a set of generic utilities that will be helpful while defining the main logic of our test runner.
pythonfrom time import sleep
import pprint
import subprocess
import lambda_events
import re


def pp(el):
    # Pretty print helper
    p = pprint.PrettyPrinter(indent=2)
    p.pprint(el)


def waitForS3(s3, max_wait=120):
    # Wait for the s3 service to be ready
    current_wait_exp = 0
    current_wait = 1
    while (current_wait < max_wait):
        try:
            s3.list_buckets()
            return True
        except Exception as e:
            print("Ignored error: {0}".format(str(e)))

        # exponential fallback
        current_wait_exp += 1
        current_wait = 1 << current_wait_exp
        sleep(current_wait)

    raise TimeoutError(
        "S3 did not bootstrap in time ({0} sec)".format(max_wait))


def waitForLambda(host, max_wait=180):
    # Wait for the lambda service to be ready
    current_wait_exp = 0
    current_wait = 1
    while (current_wait < max_wait):
        try:
            result = subprocess.Popen(["invok", "--ping", "--host", host])
            result.communicate()
            returncode = result.returncode
            if (returncode > 0):
                raise Exception('Lambda not ready yet')
            return True
        except Exception as e:
            print("Ignored error: {0}".format(str(e)))

        # exponential fallback
        current_wait_exp += 1
        current_wait = 1 << current_wait_exp
        sleep(current_wait)

    raise TimeoutError(
        "Lambda did not bootstrap in time ({0} sec)".format(max_wait))


def executeLambda(bucket, key, region, endpoint):
    # Executes a Lambda with a given S3 PUT event
    event = lambda_events.create_s3_put(
        {'bucket': bucket, 'key': key, 'region': region})
    proc = subprocess.Popen(["invok", "--host", endpoint],
                            stdout=subprocess.PIPE,
                            stdin=subprocess.PIPE,
                            stderr=subprocess.PIPE)
    out, err = proc.communicate(event.encode())
    if (proc.returncode > 0):
        print('Lambda stderr: {0}'.format(err.decode()))
        raise ValueError('Lambda execution failed')


def validateTags(s3, bucket, key, palette):
    # Validates that an object in S3 has Color tags
    response = s3.get_object_tagging(
        Bucket=bucket,
        Key=key
        )
    for tag in response['TagSet']:
        print(tag['Key'], tag['Value'])
        if re.search(r"^Color[1-4]$", tag['Key']):
            print("{}: {}".format(tag['Key'], tag['Value']))
            assert(tag['Value'] in palette)
The code here should be easy enough to understand. One important detail to call out is that we are using invok (the command line utility that allows us to seng RPC requests to Go code) to check if the Lambda server is already up and running and to trigger Lambda executions.
Finally we can write the code for our actual test runner logic in tests/integration/images/runner/src/runner.py:
python#!/usr/bin/env python3

import os
import sys
import json
import boto3
import utils
from timeit import default_timer as timer


def main():
    # environment variables
    S3_ENDPOINT = os.environ['S3_ENDPOINT']
    AWS_REGION = os.environ['AWS_REGION']
    AWS_ACCESS_KEY_ID = os.environ['AWS_ACCESS_KEY_ID']
    AWS_SECRET_ACCESS_KEY = os.environ['AWS_SECRET_ACCESS_KEY']
    BUCKET_NAME = os.environ['BUCKET_NAME']
    STORAGE_PATH = os.environ['STORAGE_PATH']
    LAMBDA_ENDPOINT = os.environ['LAMBDA_ENDPOINT']

    # initialize s3 client
    session = boto3.session.Session()
    s3 = session.client(
        service_name='s3',
        aws_access_key_id=AWS_ACCESS_KEY_ID,
        aws_secret_access_key=AWS_SECRET_ACCESS_KEY,
        endpoint_url=S3_ENDPOINT,
    )

    # test config
    print('\n--- Loading config')
    config_file = sys.argv[1]
    with open(config_file) as json_data:
        config = json.load(json_data)
        utils.pp(config)

    # wait for services to come up
    print('\n--- Waiting for environment to be up ---')
    print('\n---- 1. Lambda ----')
    utils.waitForLambda(LAMBDA_ENDPOINT)
    print('\n---- 2. S3 (localstack) ----')
    utils.waitForS3(s3)

    # copy files to virtual S3 (localstack)
    print('\n\n--- Initialize storage ---')
    print('\n---- 1. Create bucket ----')
    s3.create_bucket(Bucket=BUCKET_NAME)
    print('\n---- 2. Copy files to bucket ----')
    for file in config['files']:
        print(file)
        local_path = "{0}/{1}".format(STORAGE_PATH, file)
        s3.put_object(Bucket=BUCKET_NAME, Key=file,
                      Body=open(local_path, 'rb'))

    # trigger the lambda for every file and validate S3 tags
    print('\n\n--- Lambda test ---')
    print('\n---- 1. Trigger PUT events ----')
    for file in config['files']:
        print(file)
        utils.executeLambda(BUCKET_NAME, file, AWS_REGION, LAMBDA_ENDPOINT)

    print('\n---- 2. Validate Tags on all images ----')
    for file in config['files']:
        print(file)
        utils.validateTags(s3, BUCKET_NAME, file, config['palette'])


try:
    t_start = timer()
    main()
    print('All tests passed')
    sys.exit(0)
except Exception as e:
    print('Test failed: {0}'.format(e))
    sys.exit(1)
finally:
    t_end = timer()
    t_taken = t_end - t_start
    print('Time taken: {0} sec'.format(t_taken))
The code here is pretty easy to read as well. You can see that there are few quite distinctive pieces of logic happening here:
- Read the necessary environment variables.
- Initialize the test runner S3 client using
boto. - Print the current configuration (which we will see in a moment). The path of the config file is coming as a CLI argument passed to this script.
- Waiting for S3 and Lambda to become available.
- Copy all the test images (as specified in the configuration file) to the S3 bucket.
- Trigger the lambda execution for every single image copied to the S3 bucket.
- Validates that every image in S3 now has Color tags.
Now let's have a look at the configuration file in tests/integration/images/runner/test-config.json:
json{
  "files": [
    "1.jpg",
    "2.jpg",
    "3.jpg",
    "4.jpg",
    "5.jpg",
    "6.jpg",
    "7.jpg",
    "8.jpg",
    "9.jpg",
    "10.jpg",
    "11.jpg"
  ],
  "palette": [
    "red",
    "orange",
    "yellow",
    "green",
    "turquoise",
    "blue",
    "violet",
    "pink",
    "brown",
    "black",
    "white"
  ]
}
Essentially this file describes all the files we want to use for our testing and the color palette that we are using so that we can validate that Color tags have been applied correctly.
Images are stored in tests/integration/images/runner/fixtures. You can download them from the repository.
We are almost done here. All the code and fixtures are here already. We only ned to create a Dockerfile that brings everything together in the form of a Docker container. This file is saved under tests/integration/images/runner/Dockerfile:
dockerfileFROM golang:1.11.1-alpine

# install dependencies
RUN apk update \
    && apk add --no-cache --virtual .build-deps \
    && apk add bash make curl openssh git \
    && ln -sf /usr/share/zoneinfo/Etc/UTC /etc/localtime \
    && apk -Uuv add groff less vim \
    && apk add python3 \
    && python3 -m ensurepip \
    && rm -r /usr/lib/python*/ensurepip \
    && pip3 install --upgrade pip setuptools \
    && if [ ! -e /usr/bin/pip ]; then ln -s pip3 /usr/bin/pip ; fi \
    && if [[ ! -e /usr/bin/python ]]; then ln -sf /usr/bin/python3 /usr/bin/python; fi \
    && pip3 install awscli \
    && apk --purge -v del py-pip \
    && rm -rf /var/cache/apk/* \
    && go get github.com/lmammino/invok \
    && go install github.com/lmammino/invok

# copy test runner scripts
COPY ./src /opt/scripts/runner
COPY ./start.sh /opt/scripts/start.sh

# install python dependencies
RUN pip install -r /opt/scripts/runner/requirements.txt \
    && chmod +x /opt/scripts/runner/runner.py \
    && chmod +x /opt/scripts/start.sh

# copy test config
COPY ./test-config.json /etc/test-config.json

# copy fixtures
COPY ./fixtures/ /var/storage/

CMD [ "bash" ]
This docker file is quite simple but there's something worth mentioning. While most of the code is in Python, we are starting from a Go Dockerfile. This is because we are installing invok through go get and for than we need go.
The rest of the Dockerfile installs Python and few other dependencies and copies all the files from our fixtures and test runner Python script.
You might have noticed that we are also copying a file called start.sh that we haven't described just yet. This file is stored in tests/integration/images/runner/start.sh and contains the following code:
bash#!/usr/bin/env bash python3 /opt/scripts/runner/runner.py /etc/test-config.json$$$
Which is essentially running our test runner script and passing our configuration file.
Docker-compose setup
At this point we have docker containers for the 3 elements of our test (test runner, S3 and Lambda). Let's put everything together by using docker-compose.
The docker-compose.yml file is saved under tests/integration:
yamlversion: '3'

services:
  localstack:
    image:
draft: yes localstack/localstack:0.8.7
    environment:
      - SERVICES=s3:5000
      - DEFAULT_REGION=us-east-1
      - HOSTNAME=localstack

  image-colors:
    build: ./images/lambda/.
    command: /app/build/image-colors
    volumes:
      - "../..:/app"
    environment:
      - LAMBDA_EXTERNAL_PORT=8002
      - _LAMBDA_SERVER_PORT=8001
      - AWS_REGION=us-east-1
      - AWS_ACCESS_KEY_ID=foo
      - AWS_SECRET_ACCESS_KEY=foo
      - AWS_S3_ENDPOINT=http://localstack:5000
      - AWS_S3_USE_PATH=true

  test-runner:
    build: ./images/runner
    command: 'true' # no-op by default, redefined in run.sh
    environment:
      - STORAGE_PATH=/var/storage
      - S3_ENDPOINT=http://localstack:5000
      - AWS_REGION=us-east-1
      - AWS_ACCESS_KEY_ID=foo
      - AWS_SECRET_ACCESS_KEY=foo
      - BUCKET_NAME=sample-bucket
      - LAMBDA_ENDPOINT=image-colors:8002
Let's describe the configuration for our 3 services one by one.
Localstack S3
yamllocalstack:
  image:
draft: yes localstack/localstack:0.8.7
  environment:
    - SERVICES=s3:5000
    - DEFAULT_REGION=us-east-1
    - HOSTNAME=localstack
Here we are using the localstack image straight from the Docker Hub registry.
The only AWS service we want to mock is S3 and we want to expose that on the container port 5000. This is done through the SERVICES environment variable.
We also have to specify a dummy DEFAULT_REGION environment variable for the service to work properly and an HOSTNAME.
Lambda
yamlimage-colors:
  build: ./images/lambda/.
  command: /app/build/image-colors
  volumes:
    - "../..:/app"
  environment:
    - LAMBDA_EXTERNAL_PORT=8002
    - _LAMBDA_SERVER_PORT=8001
    - AWS_REGION=us-east-1
    - AWS_ACCESS_KEY_ID=foo
    - AWS_SECRET_ACCESS_KEY=foo
    - AWS_S3_ENDPOINT=http://localstack:5000
    - AWS_S3_USE_PATH=true
Here we are using the Dockerfile we previously defined in tests/integration/images/lambda. We are attaching all the files in our project by using a volume mounted at /app. This allows the container to be able to read all the files in the project.
The command we are running is /app/build/image-colors which is the last build of our Lambda code. This means that the container is not going to build the Lambda by itself and you are supposed to be doing that in a previous step in your CI pipeline.
This is convenient because you need to build your Lambda artifact once and then you can use the same artifact in all the steps where such artifact is required. In generally considered a bad practice to re-build an artifact multiple times in a CI/CD pipeline. You are supposed to build them once and promote them through all the various steps to production.
Then we define a bunch of environment variables. You should know what LAMBDA_EXTERNAL_PORT and _LAMBDA_SERVER_PORT are used for. If you don't remember have a look above where we described why we need simpleproxy in our Lambda container.
Other variables are needed to configure the AWS SDK client: AWS_REGION (set to same value as in the S3 container), AWS_ACCESS_KEY_ID and AWS_SECRET_ACCESS_KEY. These last two variables can have any value, but they shouldn't be left blank.
Finally, we define AWS_S3_ENDPOINT and AWS_S3_USE_PATH. We already talked about these variables before. What is important here is that we are setting the AWS_S3_ENDPOINT to the address of the S3 service in the localstack container. This allows our Lambda to interact with the local S3 instance rather than trying to reach out to AWS in the cloud.
Test runner
yamltest-runner:
  build: ./images/runner
  command: 'true' # no-op by default, redefined in run.sh
  environment:
    - STORAGE_PATH=/var/storage
    - S3_ENDPOINT=http://localstack:5000
    - AWS_REGION=us-east-1
    - AWS_ACCESS_KEY_ID=foo
    - AWS_SECRET_ACCESS_KEY=foo
    - BUCKET_NAME=sample-bucket
    - LAMBDA_ENDPOINT=image-colors:8002
This container describes our test runner, so we build from the Dockerfile we defined above saved in tests/integration/images/runner.
What's interesting now is command: 'true'. This is basically saying to the container: "DO NOTHING"!
The reason why we do this is because when we will start the services with docker-compose. All the services start at the same time and they keep running endlessly (our Lambda is a TCP server waiting for request and S3 is an endless service as well waiting for you to interact with the underlying file storage).
Since this is a test, we want to be able to keep the services running as long as needed for our tests to be performed and then shut everything down.
The only service that has this well defined lifecycle is the test runner which starts, waits for the other services to be ready, runs the tests and then exits.
Also, the return code of the test runner is what is going to inform us whether the tests have been completed successfully or not.
With command: 'true' we are essentially saying that this is just a placeholder service for now. We will take care to run it manually later in a way that allows us to monitor its execution and get its return code. More on this later.
In this container we also need to define some environment variables:
STORAGE_PATH: defines where the fixture images are saved.S3_ENDPOINT: how to locate the local S3 service to copy the files to.BUCKET_NAME: the name of the S3 bucket we need to create and then copy the fixture files into.LAMBDA_ENDPOINT: the endpoint of the local Lambda instance so that we can trigger S3 PUT events.AWS_REGION,AWS_ACCESS_KEY_ID,AWS_SECRET_ACCESS_KEY: AWS SDK configuration. Again you need to specify these values but you can use dummy values for the keys.
Running the test
Ok, we mentioned in the section above that we need some coordination to be able to observe the lifecycle of our test. We can do that with a script called run.sh that we can save in tests/integration:
bash#!/usr/bin/env bash DIR="$( cd "$( dirname "${BASH_SOURCE[0]}" )" >/dev/null && pwd )" cd $DIR # starts the services (test-runner will do nothing here) docker-compose up -d --build # we manually run the test runner with its own start script # this command will block until the test runner exits docker-compose run test-runner /opt/scripts/start.sh # we capture the return code of the test runner rc=$? # print result and clean up echo -e "Completed with Exit code: ${rc}" echo -e "Cleaning up docker..." docker-compose down # we exit with the same exit code as the test runner # If succeeded the test will be marked as succeeded, otherwise it will be marked as failed exit $rc$$$$$$$$$$$$$$$$$$$$$$$
I added some comments to explain what this script is doing and how we are observing the lifecycle of the test runner container. This is a neat docker-compose trick that you might see often in these kind of use cases.
At this point, we are finally ready to run our integration test. From our project folder we just need to run:
bashtests/integration/run.sh$
If we did everything correctly, you should see something like this:
--- Loading config
{ 'files': [ '1.jpg',
             '2.jpg',
             '3.jpg',
             '4.jpg',
             '5.jpg',
             '6.jpg',
             '7.jpg',
             '8.jpg',
             '9.jpg',
             '10.jpg',
             '11.jpg'],
  'palette': [ 'red',
               'orange',
               'yellow',
               'green',
               'turquoise',
               'blue',
               'violet',
               'pink',
               'brown',
               'black',
               'white']}

--- Waiting for environment to be up ---

---- 1. Lambda ----

---- 2. S3 (localstack) ----


--- Initialize storage ---

---- 1. Create bucket ----

---- 2. Copy files to bucket ----
1.jpg
2.jpg
3.jpg
4.jpg
5.jpg
6.jpg
7.jpg
8.jpg
9.jpg
10.jpg
11.jpg


--- Lambda test ---

---- 1. Trigger PUT events ----
1.jpg
2.jpg
3.jpg
4.jpg
5.jpg
6.jpg
7.jpg
8.jpg
9.jpg
10.jpg
11.jpg

---- 2. Validate Tags on all images ----
1.jpg
Color1 orange
Color1: orange
Color2 white
Color2: white
Color3 brown
Color3: brown
2.jpg
Color1 blue
Color1: blue
Color2 white
Color2: white
Color3 red
Color3: red
3.jpg
Color1 black
Color1: black
Color2 turquoise
Color2: turquoise
4.jpg
Color1 brown
Color1: brown
Color2 black
Color2: black
Color3 turquoise
Color3: turquoise
5.jpg
Color1 black
Color1: black
Color2 blue
Color2: blue
Color3 white
Color3: white
6.jpg
Color1 black
Color1: black
Color2 violet
Color2: violet
Color3 green
Color3: green
7.jpg
Color1 orange
Color1: orange
8.jpg
Color1 turquoise
Color1: turquoise
Color2 brown
Color2: brown
Color3 black
Color3: black
9.jpg
Color1 black
Color1: black
Color2 brown
Color2: brown
Color3 orange
Color3: orange
10.jpg
Color1 black
Color1: black
Color2 green
Color2: green
Color3 white
Color3: white
11.jpg
Color1 yellow
Color1: yellow
Color2 black
Color2: black
Color3 white
Color3: white
All tests passed
Time taken: 11.873922999977367 sec
Completed with Exit code: 0
Hooray!
Extending our Makefile
In our previous article we created a draft of Makefile to be able to build our Lambda and deploy it. Let's not extend it to add a bunch of commands that can be useful for testing:
makefile.PHONY: test
test: lint unit build integration

.PHONY: lint
lint:
    GO111MODULE=on go vet -mod=vendor ./...
    golint --set_exit_status cmd/...

.PHONY: unit
unit:
    GO111MODULE=on go test -mod=vendor -cover -v -short ./...

.PHONY: build
build:
    go mod tidy
    go mod vendor
    mkdir -p build
    GOOS=linux go build -mod=vendor -o build/image-colors ./cmd/image-colors-lambda
    cd build && zip image-colors.zip ./image-colors
    echo "build/image-colors.zip created"

.PHONY: integration
integration:
    tests/integration/run.sh

.PHONY: deploy
deploy:
    cd stack && \
    terraform plan -out plan && \
    terraform apply plan && \
    rm plan
With this setup, we can simply run make test and this will run linting, unit test, build the artifact and integration tests.
This should give you enough confidence that your Lambda is working as expected and you can easily test against any change as your code evolves.
Notice that I haven't added any unit test. It would make sense to write Unit tests for our utils library. This would be a great exercise for the reader! :)
Closing
In this article we saw how to add integration tests to a Lambda written in Go and why it's very convenient to do that.
We also saw briefly how to make our testing suite a little bit more comprehensive so that we can build a powerful CI.
We are actually not that far away from doing an additional step and turning this CI into a fully fledged Continuous Delivery lifecycle.
The missing steps here are:
- Adding a proper functional test that spins up the Lambda in a real testing environment on AWS
- If every test passes, running the
make deployscript directly from the CI.
If we add these steps, the CI will take care of you deployments and you only have to worry about writing proper tests and committing your code.
In those cases it's generally a good idea to work on feature branches and to have the CI perform the deployment only from the master branch.
This way, you will only merge features to master when they are ready to be shipped. The CI will release the changes for you if all your testing are passing.
I hope this article was interesting and useful and I look forward to receiving your feedback.
This is a very new field, so most likely you found other solutions to the same problem. I am really eager to compare my approach with yours.
A huge thank you goes to Eoin Shanaghy for carefully reviewing the content (and my English!) and providing invaluable Serverless pieces of advice.
Also thank you to my amazing colleagues Stefano Abalsamo and Domagoj Katavic for their precious review.
Until next time. Ciao :)