How to Connect MongoDB to a GraphQL Server?
This article is part 6 of the series on Exploring GraphQL. Check out the other articles:
- Part 1: What is GraphQL and why Facebook felt the need to build it?
- Part 2: Fundamentals of GraphQL
- Part 3: Building a GraphQL Server using NodeJS and Express
- Part 4: How to implement Pagination and Mutation in GraphQL
- Part 5: Introducing the Apollo GraphQL Platform for implementing the GraphQL Specification
- Part 7: GraphQL Subscriptions - Core Concepts
- Part 8: Implementing GraphQL Subscriptions using PubSub
The GraphQL layer sits between the data source and the client. It is data source agnostic and can be integrated with any of the popular databases like MySQL, MongoDB, PostgreSQL, etc. In this article, we're going to connect a MongoDB data source to the Apollo GraphQL server. We'll also be implementing resolvers to fetch or mutate data on the server.
In the last article, we set up our Apollo GraphQL server for the Food Ordering System. Let's recap all that we learned in the last article:
- GraphQL is a query language and a specification. It best describes how a certain functionality should be implemented. The
graphqlmodule is a reference implementation built by Facebook in JavaScript. It does the complex work of defining the type system, parsing, validating and executing the queries. - Many GraphQL platforms started using the core
graphqlimplementation and built a complete system on top of it. The Apollo GraphQL platform is one of them and is being used by many companies from startups to big shots. It includes the implementation for the GraphQL server, GraphQL client and the additional tooling for various other features. - The Apollo GraphQL server can be implemented in many popular NodeJs HTTP frameworks. We started on building it in
express. It can be integrated into the express server in a stand-alone or middleware approach. We built our Food Ordering System using the middleware approach (Putting the middleware thing in words to make it look human-friendly --- A middleware can listen to all the incoming requests, do some work on the request object to cook appropriate response and pass it on to the next middleware). - We're using the
apollo-server-expressmodule to implement our server. It exports anApolloServerfunction and agqltag. TheApolloServerfunction takes in thetypeDefs(Schema) andresolvers. - We also saw some of the advantages of the Apollo Client. It makes it super-easy to implement functionalities like Data Fetching, State Management, Caching, Authentication and many more.
You can read the complete article here
Side-Note: If you've not set up your server yet, I highly recommend to go through this article and get your server up and running!
Let's take a step ahead and integrate MongoDB to our Apollo GraphQL server.
Table of Contents
- MongoDB Refresher
- Setting-up the Mongo Cluster
- Connecting the MongoDB Cluster to the Apollo GraphQL Server
- MongoDB Models
- Implementing Resolvers
MongoDB Refresher
Don't worry if you don't know much about MongoDB. I'm going to cover its fundamentals in this section. After reading this, you'd be confident to ace the later part of the article.
Please note: This section is intended for beginners. You can skip this part if you're already familiar with MongoDB.
What is MongoDB?
MongoDB is a document-oriented database and is being used by many popular companies like Facebook, Google, etc. MongoDB is different from the traditional relational databases like MySQL. It does not store data in the form of rows and columns. Instead, it uses a flexible document-oriented approach to store data in the form of JSON-like objects. It is not a compulsion to have a fixed structure for each of these documents; the fields and their data structures may vary from document to document.
The database comprises of various collections and these collections store a set of documents. The documents are analogous to rows and you can think of collections as tables in a relational database.
Queries in MongoDB
MongoDB has support for the rich and powerful query language. You can easily filter and sort any of the fields using queries in JSON format.
Let's check out some of its basic queries. If you want to experiment along the way, you'll have to first install MongoDB as per your operating system from here. Please note: In this article, we'll be using MongoDB Atlas, which is managed in the cloud.
I'll help you understand some of the basic queries that will also be used while building the project.
If you've decided to install the local instance of MongoDB, you can start the server by using the command mongodb and use mongo in another terminal tab to start the mongo shell (The mongo shell is used for interacting with the database).
Fire up the below commands in the mongo shell:
shelldb
The above command is used for checking the current database. You can create a new database or switch to another database using the command:
shelluse dbName
dbName is the name of the database.
You can create collections as:
shelldb.createCollection('collectionName')
The createCollection method takes first the collection name as its first argument. You can also pass in the optional second parameter of type object, which is used for specifying the additional config options for a collection like size, autoIndexId, etc.
show collections shows the existing collections in the database.
CRUD Operations on MongoDB
You can insert a new record in MongoDB as:
shelldb.collectionName.insert({ firstName: 'James', lastName: 'Gosling' })
The insert method is used for inserting one or many documents in a collection.
You can read all the records from a collection as:
shelldb.collectionName.find()
You can also pass in values for different fields to the find method for fetching specific records as:
shelldb.collectionName.find({ firstName: 'James' })
The above query will fetch all the records with firstName as James. There is one more method findOne which comes in handy while fetching just the first matched record from the database. You can use it as:
shelldb.collectionName.findOne({ firstName: 'James' })
A Word on ObjectId
The ObjectId is usually the primary key for documents in MongoDB. It is a 12-byte binary BSON type and is generated by the MongoDB drivers and the server. It contains the following:
| Size | Description |
|---|---|
| 4 bytes | a 4-byte value representing the seconds since the Unix epoch |
| 3 bytes | a 3-byte machine identifier |
| 2 bytes | 2-byte process id |
| 3 bytes | 3-byte counter, starting with a random value |
I've covered most of the fundamentals required for getting started with MongoDB.
I hope you're now comfortable in using the basic operations on MongoDB. Now, let's connect MongoDB to our server and explore its potential.
Setting-up the Mongo Cluster
We'll be using MongoDB Atlas, the cloud solution for hosting the database instance. It is easy to set up and you can create your account in no time for free. Head over to the MongoDB Atlas and create your account. Once your account is created, you'll be redirected to the cluster page.
Creating a Cluster
Here, you can configure your MongoDB cluster as per your need. Select all the free options as for this project and give your cluster a name. I'm keeping all the defaults in my case!
And, my cluster is getting created!
Image loading...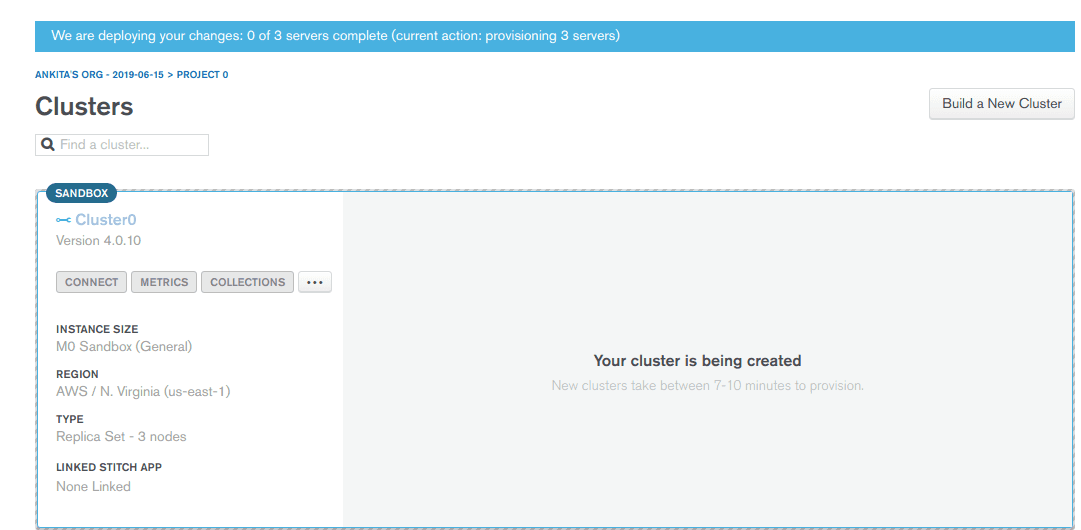
It will take some time to build your cluster. Once that is done, you need to go through a few simple steps as below.
Create your first database user
You'll have to create a database user to query on the database. On the left-hand side menu, click on the Database Access tab and add a new user. Here, you can create users with different access roles like the Atlas Admin, a user with read and write access and the one that has only read-access. For now, just create one Atlas Admin by adding a username and a password.
Network Access
You'll have to whitelist your IP address to let mongo cluster understand that the requests to the database are coming from a secure source. Just click on Add IP Address and select Add Current IP address. You can now access this cluster from your machine.
This is it! We're done with all the config related steps. Time to get to coding! We're all good to connect this cluster to our server. Let's do that right away!
Connecting the MongoDB Cluster to the Apollo GraphQL Server
On the main clusters page, you'll see a connect button. Select the option Connect your application and the driver should be Node.js. You'll see a connection string, keep that safe for now. We'll use that later to connect to our server.
If you get lost anywhere in the code below, refer to my GitHub repository to get to speed!
Getting Started With Mongoose
Mongoose provides a straight-forward, schema-based solution to model your application data. It includes built-in type casting, validation, query building, business logic hooks and more, out of the box. - Mongoose
Mongoose is a MongoDB object modeling tool. It is built on top of the official MongoDB driver and provides an elegant way to interact with the database. It uses Schemas to define the blueprint of a collection. Each Schema maps to its respective collection and is used to define the shape of documents in that collection. Let's install mongoose as:
shellnpm install mongoose --save
Go to the server.js to connect to the MongoDB cluster. The connect method defined in the mongoose module is used to connect to the database instance. It returns a promise. Let's write code for that:
javascriptconst mongoose = require('mongoose')
mongoose
    .connect(`mongodb+srv://<username>:<password>@cluster0-yhukr.mongodb.net/test?retryWrites=true&w=majority`)
    .then( () => {
        console.log('MongoDB connected successfully')
    })
    .error( () => {
        console.error('Error while connecting to MongoDB');
    })
Notice how I have passed the connection string to the connect method. You'll have to replace the <username> and the <password> strings with your username and password respectively.
The username, password, and the database will vary as per the environment (DEV, PROD). So, let's put them in a separate env file. As we're already using nodemon, we can fetch these environment-specific variables using the nodemon.json file. Create a nodemon.json file at the root level and dump in the following code:
javascript{
    "env": {
        "mongoDatabase": "fds"
        "mongoUserName": "<YOUR USERNAME>",
        "mongoUserPassword": "<YOUR PASSWORD>"
    }
}
Modify the connect method call in the server.js file to now use environment specific variables from the nodemon.json file.
javascriptmongoose
    .connect(`mongodb+srv://${process.env.mongoUserName}:${process.env.mongoUserPassword}@cluster0-yhukr.mongodb.net/${process.env.mongoDatabase}?retryWrites=true&w=majority`)
    .then( () => {
        app.listen({ port: 3000 }, () => {
            console.log('Your Apollo Server is running on port 3000')
        })
    })
    .error( () => {
        console.error('Error while connecting to MongoDB');
    })
I'm now using the environment specific values for databases, username and password. Please note: I've moved the app.listen method in the resolve method. The server will run on port 3000 once the MongoDB connection is successful.
The name of the database is fds. The MongoDB Atlas will automatically create the database if it doesn't already exist.
Restart your server. If everything is set up correctly, you should see no errors on the console. Head over to localhost:3000/graphql to see the shiny GraphiQL interface provided by Apollo.
Image loading...![]()
MongoDB Models
We'll have to write models to map to our MongoDB collections. Create a model.js file at the root-level.
Let's start adding some models for our Food Ordering project:
javascriptconst mongoose = require('mongoose')
const { Schema } = mongoose

const MenuSchema = new Schema({
    name: {
        type: String,
        required: true
    },
    price: {
        type: Number,
        required: true
    }
})

const RestaurantSchema = new Schema({
    name: {
        type: String,
        required: true
    },
    email: {
        type: String,
        required: true
    },
    location: {
        type: String,
        required: true
    },
    menu: {
        type: [MenuSchema]
    }
})

const Restaurant = mongoose.model('Restaurant', RestaurantSchema)
module.exports = {
    Restaurant
}
The Schema constructor is used for creating the models for MongoDB collections. The RestaurantSchema contains the fields name, email, location and menu. The field menu is of type Array of MenuSchema objects and it is not a required field. We're exporting the Restaurant model from here.
Let's add the models for Customer and Order collections as well:
javascriptconst CustomerSchema = new Schema({
    name: {
        type: String,
        required: true
    },
    email: {
        type: String,
        required: true
    },
    location: {
        type: String,
        required: true
    }
})

const OrderSchema = new Schema({
    customerId: {
        type: Schema.Types.ObjectId,
        ref: 'Customer',
        required: true
    },
    restaurantId: {
        type: Schema.Types.ObjectId,
        ref: 'Restaurant',
        required: true
    },
    order: {
        type: [Schema.Types.ObjectId],
        ref: 'Order',
        order: true
    }
})
The CustomerSchema is easy to understand! The OrderSchema has three fields customerId, restaurantId and order. The customerId and restaurantId are of type ObjectId. This is how lookups are performed in MongoDB. The ObjectId is used as a path to the actual document. You can check out this link if you're interested in reading more on how lookup or populate mechanism works in mongoose.
We've added all our models now and your model.js file should look like this
It's time to do interesting work! Let's implement resolvers to fetch or mutate data on the server.
Implementing Resolvers
As we've already seen in the last article, the ApolloServer method takes in a resolvers map as an input. The basic work of resolvers is to fetch data from the data source and perform computations (if any).
We'll have to first add the Mutation type in the schema.js file as:
javascripttype Mutation {
    addRestaurant (name: String, email: String, location: String, menu: [MenuItem]): Restaurant,
    addCustomer (name: String, email: String, location: String): Customer,
    addOrder (customerId: String, restaurantId: String, order: [String]): Order
}
The Mutation type contains three fields:
addRestaurant: It takes in name, email, location of type String and menu of type MenuItem. The argument menu is a complex object type. We cannot directly reference a complex object type as a parameter to the mutation field. It accepts object types as inputs. Add MenuItem in schema.js file as:
javascriptinput MenuItem {
    name: String,
    price: Float
}
This field returns an object of type Restaurant
addCustomer: It takes in name, email and location arguments and returns an object of type Customer.
addOrder: It takes in customerId, restaurantId of type String and order as an array of String. The fields customerId, restaurantId will have _id references of their respective models. It will become clear once we experiment this on graphiql after implementing the resolvers.
MongoDB automatically adds a unique ObjectId for each of the document. I've made some changes to the types in schema.js file to make room for _id. Please make sure, your schema.js should look like this.
Resolvers for the Mutation Fields
Let's first implement the resolvers for the mutation fields. The resolvers object in the resolvers.js file should have the Mutation key as:
javascriptconst resolvers = {
    Mutation: {
        addRestaurant (parent, args, context, info) {
            const { name, email, location, menu } = args
            const restaurantObj = new Restaurant({
                name,
                email,
                location,
                menu
            })
            return restaurantObj.save()
                .then (result => {
                    return { ...result._doc }
                })
                .catch (err => {
                    console.error(err)
                })
        }
    }
}
Let's try to understand what's happening in the addRestaurant resolver. The input arguments name, email, location and menu are available in the args object. We're first creating a Restaurant object by passing in these parameters. res.save() saves the restaurant document in the collection. The addRestaurant resolver returns a promise, which returns the document data once it is resolved. The result._doc object contains the restaurant document.
Let's add a restaurant using graphiql:
javascriptmutation {
  addRestaurant(
    name: "Daniel"
    email: "daniel@xyz.com"
    location: "Boston"
    menu: [
      { name: "Veg Sandwich", price: 25 }
      { name: "Cheese Pizza", price: 30 }
    ]
  ) {
    _id
    name
    email
    location
    menu {
      name
      price
    }
  }
}
Here's the output of the above query:
Image loading...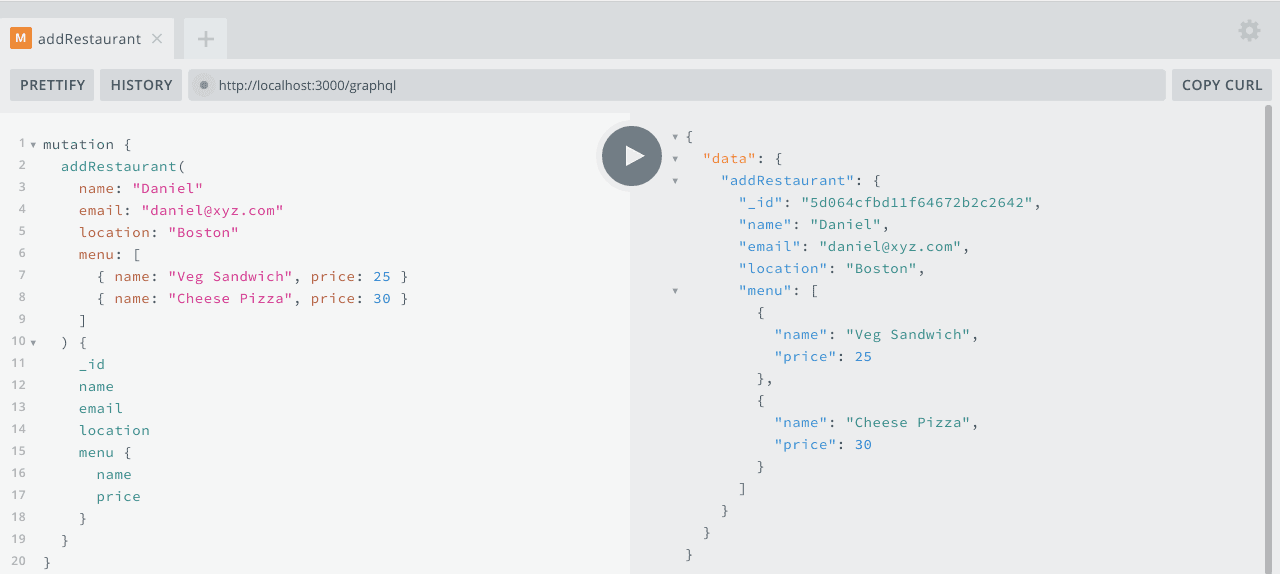
Notice the value of _id. It is automatically generated by MongoDB. Let's check this record in our cluster.
Click the Collections tab on the main cluster page. Check the restaurants collection in the fds database. It should contain the recently added record.
Image loading...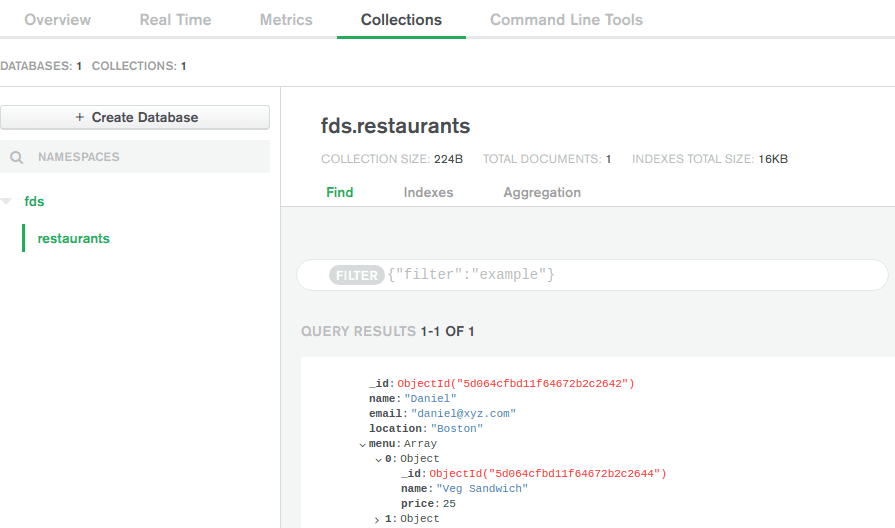
This is it! We've successfully created our first resolver. Let's take a step ahead and implement the remaining two mutation resolvers:
javascriptaddCustomer (parent, args, context, info) {
    const { name, email, location } = args
    const customerObj = new Customer({
        name,
        email,
        location
    })
    return customerObj.save()
        .then (result => {
            return { ...result._doc }
        })
        .catch (err => {
            console.error(err)
        })
},
addOrder (parent, args, context, info) {
    const { customerId, restaurantId, order } = args
    const orderObj = new Order({
        customerId,
        restaurantId,
        order
    })
    return orderObj.save()
        .then (result => {
            return { ...result._doc }
        })
        .catch (err => {
            console.error(err)
        })
}
The above code is similar to the addRestaurant resolver.
Hit the below query to add a customer in the database:
javascriptmutation {
  addCustomer(
    name: "Alexander"
    location: "Boston"
    email: "alexander@xyz.com"
  ) {
    _id
    name
    location
    email
  }
}
Here's the query for a Veg Sandwich order placed by Alexander from Daniel restaurant:
javascriptmutation {
  addOrder(
    customerId: "5d0623c892bed95a0db1cd9a"
    restaurantId: "5d0620f2a7c5a658e2523dda"
    order: ["5d0620f2a7c5a658e2523ddc"]
  ) {
    _id
  }
}
The ObjectIds will be different in your case. Please verify the ObjectIds from the database. This will be an easy job once we build the front-end in React. Stay tuned for the next set of articles!
Resolvers for the Query Fields
Let's do the last bit. We'll have to implement resolvers for fetching data from the database. Let's start with the restaurants field:
javascriptQuery: {
    restaurants (parent, args, context, info) {
        return Restaurant.find()
            .then (restaurant => {
                return restaurant.map (r => ({ ...r._doc }))
            })
            .catch (err => {
                console.error(err)
            })
    }
}
Notice how we're using the find method on the Restaurant model to fetch all the restaurants from the database. Let's check this out in the graphiql:
Image loading...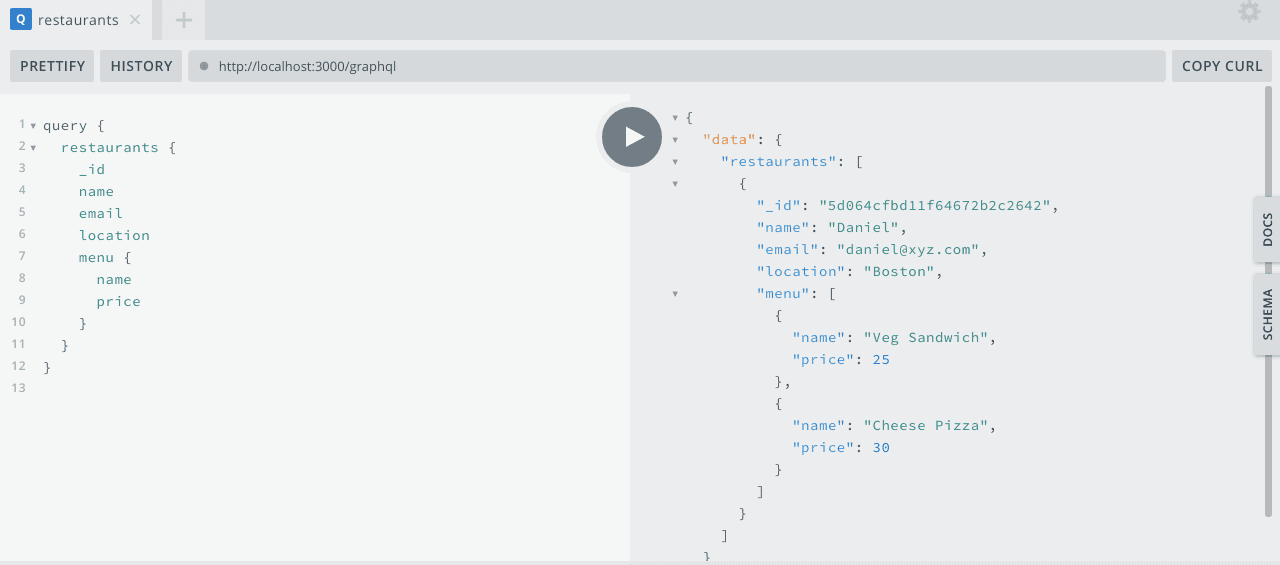
The resolver for the restaurant field should be easy to implement now. It will take in the unique identifier for a restaurant and fetch its details. You can also use it as a filter and pass in the name, location or email of a particular restaurant. I'm using _id for simplicity. Let's implement the restaurant resolver right away!
javascriptrestaurant (parent, args, context, info) {
    return Restaurant.findOne({ _id: args.id })
        .then (restaurant => {
            return { ...restaurant._doc }
        })
        .catch (err => {
            console.error(err)
        })
}
Here's the restaurant query in action:
Image loading...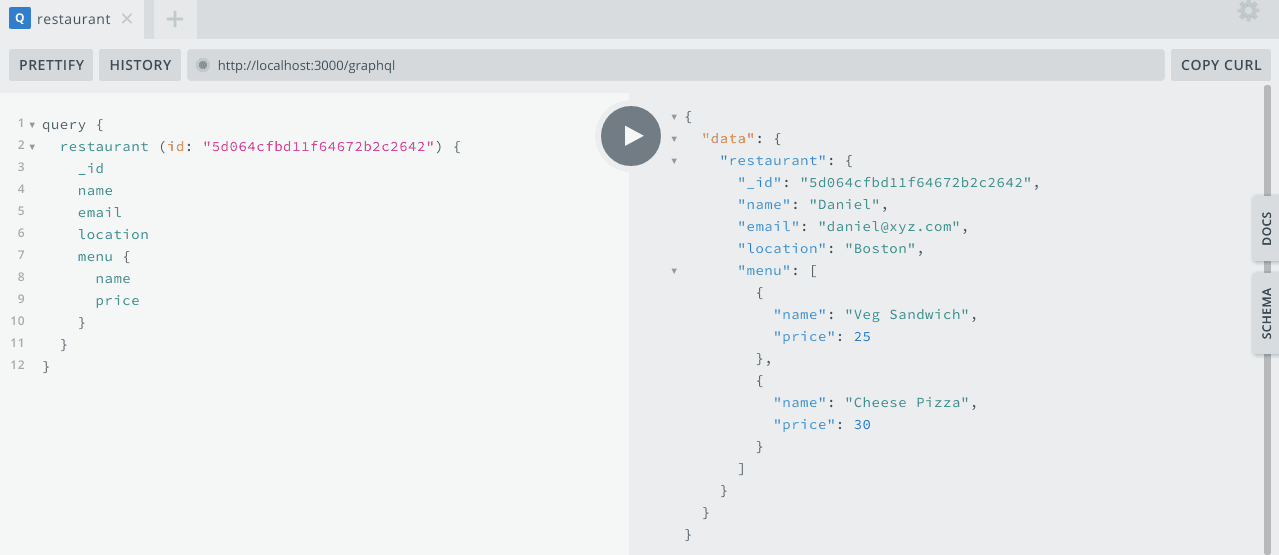
The other resolvers customers, customer, orders and order are pretty easy to implement. Once you are done with your implementation of these resolvers, you can verify your code from here
Conclusion
We've learned a lot many new things in this article. We started with the MongoDB fundamentals and then moved onto implementing the resolvers for the GraphQL server. Let's recap all that we've learned from this article:
- MongoDB is a document-oriented database and stores documents in collections. The models define the structure of a collection and are mapped to documents within that collection.
- We used the MongoDB Atlas Cloud solution to host our MongoDB instance. The
mongoosemodule is a wrapper built on top of themongodbdriver. Theconnectmethod defined onmongoosetakes in the connection string and returns a promise. - The
Schemamethod inmongooseis used for creating schemas for various types and mapping them to the models. - These models are then used by the resolvers to fetch or mutate data on the server. The resolvers return a promise and the promise returns the relevant data once it is executed successfully.