Build a Cross Platform Mobile App with Ionic 4 and Angular
In this tutorial, we’ll learn how to use Ionic 4 and Angular to build a cross platform hybrid mobile application.
Unlike native apps, a hybrid mobile application makes use of web technologies such as JavaScript, HTML and CSS (and their related technologies like TypeScript, Angular and Sass etc.) to build mobile applications. This works thanks to native containers like the popular Cordova tool and more recently Capacitor by the Ionic team. Both of these tools allow developers to call native SDKs on iOS, Android with one code base. The difference is that Capacitor is optimized for the Ionic framework and target desktop apps (using Electron) and Progressive Web Apps.
Ionic 4 is the latest version of the popular Ionic framework which is one of the most powerful and mature hybrid mobile frameworks. It’s tightly integrated with Angular, a popular platform for building client side web apps created by Google but starting with version 4, Ionic is framework agnostic. This means, developers can use it with plain JavaScript/TypeScript or other popular libraries like React or Vue.
Ionic 4 makes use of modern browser technologies such as:
- Web components: A set of standards defined by the W3C which allow developers to build native components that can be used in modern web browsers.
- Custom Elements: Used to extend HTML with new tags and components using JavaScript. It’s the base of web components.
- Shadow DOM: Shadow DOM allows developers to independently encapsulate the DOM elements and CSS styles from the rest of elements in the HTML document.
- CSS variables: They allow developers to use custom properties in CSS to store and reuse values such as colors and font widths similar to how we can use variables in programming languages.
Prerequisites
In order to follow this tutorial, you will need to have a few prerequisites such as:
- A recent versions of Node.js and NPM (or Yarn) installed on your development machine. The straightforward way to install both of them is through the official website by simply downloading the binaries required for your system. You can also use nvm (Node Version Manager) which allows you to install and manage multiple versions of Node in your system without conflicts.
- Java and the Android SDK installed on your system if you intend to build the final release for Android devices. You can get JDK from its official website and Android Studio from its official website. Android Studio is required to download and install the Android SDK.
- For building iOS apps, you need to work under a macOS with the Xcode IDE. You can get Xcode from its official website or from the Apple Store.
- You need to be familiar with web technologies like JavaScript, HTML and CSS.
- Since we’ll be using Ionic with Angular, you also need to have some working experience of TypeScript and Angular.
If you have the above prerequisites, let’s get started!
Installing Ionic CLI
Ionic CLI is the official tool for creating and working with Ionic projects. Let’s install the latest version.
Open a new terminal and execute the following command:
```bash
npm install -g ionic
```
Note: Please note that you may have to use
sudobefore your command in debian based systems or macOS since we are installing the package globally on the system. For Windows, you may need to run the command prompt or PowerShell as administrator. In case, you get any EACCESS errors, another alternative is to fix your npm permissions. See the docs for how you can resolve EACCES permissions errors when installing packages globally. If you install Node through NVM, this will be automatically resolved for you.
At the time of this writing ionic@4.12.0 is installed.
Creating your Ionic Project
After installing the CLI, you can proceed to create your Ionic project by invoking the ionic utility with the start command.
You can either specify the other options, such as the project name and the template and type of project, immediately after the command or after being prompted by the CLI.
Go back to your terminal, navigate to your working directory and run the following command:
bashcd ~ ionic start$$
You will be prompted for the name of your project — Enter ionic-todos-app, the base template — Choose sidemenu (which generates a base project with a side menu with navigation in the content area).
The CLI will create the necessary project structure and files and will start installing the dependencies from npm:
Image loading...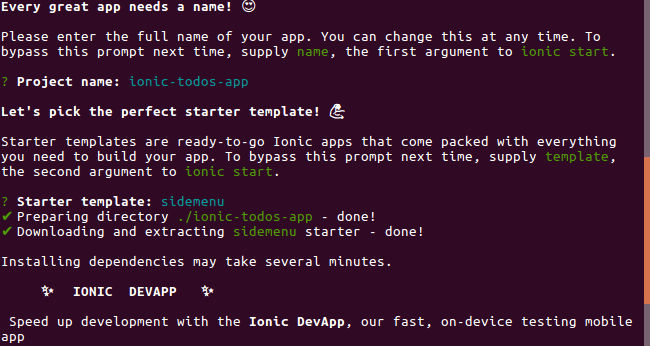
After that, the CLI will ask you if you Install the free Ionic Appflow SDK and connect your app? (Y/n). You can type n as we will not use any cloud services from Ionic in our example.
Ionic Appflow is a cloud service that allows you to continuously build, deploy and ship Ionic mobile apps.
Serving your Application
After creating your project, you can now serve the application locally and play with it using your web browser. You don’t need a native mobile device or an emulator unless you want to use native device features like the camera or SQLite database. In fact, you can even mock native plugins to provide a fake class that has the same API as the native wrapper which allows you to work entirely in the browser when developing your mobile application.
Go back to your terminal, navigate to your project’s folder and run the ionic serve command to start a live-reload development server:
```bash
cd ./ionic-todos-app
ionic serve
```
The server will be listening from the http://localhost:8100 address and your default web browser will be automatically opened and navigated to your app. If that’s not the case, just open your browser and go to that address to see your app up and running.
This is a screenshot of our app before doing any development:
Image loading...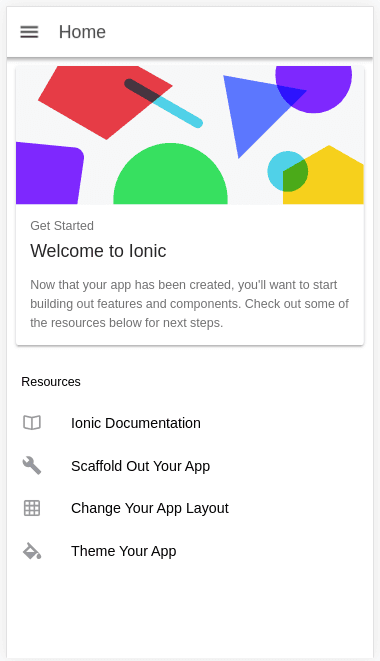
Building and Theming the UI
At this point, we already have a home and list pages and a side menu. Let’s remove the list page because we don’t need it.
First, remove the list folder with its contents from the src/app folder. Also, open the src/app/app.component.ts file, locate the appPages array:
jsexport class AppComponent { public appPages = [ { title: 'Home', url: '/home', icon: 'home' }, { title: 'List', url: '/list', icon: 'list' } ];
Next, remove the entry that references the list page:
jsexport class AppComponent { public appPages = [ { title: 'Home', url: '/home', icon: 'home' } ];
This will remove the link to the list page from the side menu:
Image loading...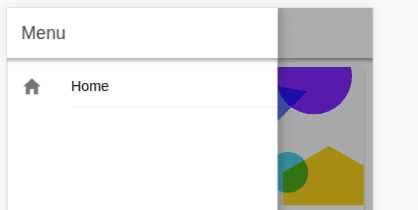
You also need to remove the reference to the list page from the Angular router configuration. Open the src/app/app-routing.module.ts file, locate the routes array:
jsconst routes: Routes = [ { path: '', redirectTo: 'home', pathMatch: 'full' }, { path: 'home', loadChildren: './home/home.module#HomePageModule' }, { path: 'list', loadChildren: './list/list.module#ListPageModule' } ];
Next, remove the route for the list page:
jsconst routes: Routes = [ { path: '', redirectTo: 'home', pathMatch: 'full' }, { path: 'home', loadChildren: './home/home.module#HomePageModule' } ];
Note: In an Ionic 4 project based on Angular, the official Angular Router is used to implement routing and navigation instead of the Ionic built-in routing mechanism.
Adding an About Page
Now, let’s generate an about page. Leave the development server running in the first terminal and open a new terminal, navigate to your project’s folder and use the ionic generate command to generate a page:
bashcd ./ionic-todos-app ionic generate page about$$
This will generate an about folder in the src/app folder with the following files:
src/app/about/about.module.tssrc/app/about/about.page.scsssrc/app/about/about.page.htmlsrc/app/about/about.page.spec.tssrc/app/about/about.page.ts
And will also update the src/app/app-routing.module.ts file to include a route for the about page:
jsconst routes: Routes = [ { path: '', redirectTo: 'home', pathMatch: 'full' }, { path: 'home', loadChildren: './home/home.module#HomePageModule' }, { path: 'about', loadChildren: './about/about.module#AboutPageModule' } ];
The [loadChildren](https://angular.io/api/router/Route#loadChildren) property of the Route interface is used to lazy load modules.
Ionic pages are implemented as Angular modules and they are lazy-loaded by the Angular Router.
Let’s now add an entry for the about page in the side menu. Open the src/app/app.component.ts file and add:
jspublic appPages = [ { title: 'Home', url: '/home', icon: 'home' }, { title: 'About', url: '/about', icon: 'information-circle' }, ];
For the icon, we use an information-circle icon. You can see the list of available icons from the official website.
Next, open the src/app/about/about.page.html file and update it with the following content:
js<ion-header> <ion-toolbar color="primary"> <ion-title> About </ion-title> <ion-buttons slot="start"> <ion-back-button defaultHref="home"></ion-back-button> </ion-buttons> </ion-toolbar> </ion-header> <ion-content color="primary" padding> <h2> Todo app v1.0 </h2> <p> This is a simple todo app for managing your todos </p> </ion-content>
We used a ion-back-button component to create a back button that takes us to the previous page or the to the home route if the navigation stack is empty. we also added a primary color for the toolbar and the content area.
This is a screenshot of the about page at this point:
Image loading...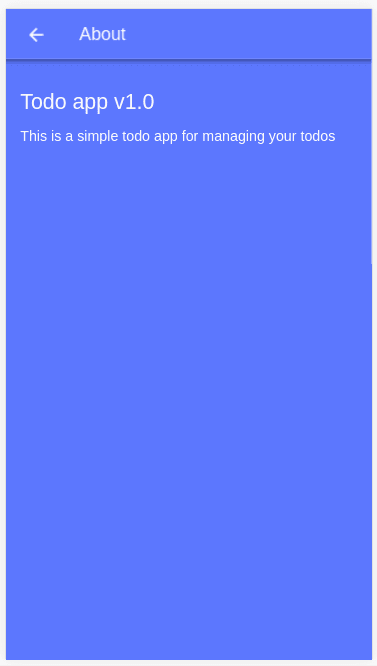
Building and Theming the Home Page
Open the src/app/home/home.page.html file and add the following code:
js<ion-header> <ion-toolbar color="primary"> <ion-buttons slot="start"> <ion-menu-button></ion-menu-button> </ion-buttons> <ion-buttons slot="end"> <ion-button> <ion-icon name="add-circle" slot="start"></ion-icon> </ion-button> </ion-buttons> <ion-title> Home </ion-title> </ion-toolbar> </ion-header> <ion-content color="primary" padding> <ion-list style="background: var(--ion-color-primary);"> <ion-item color="primary" *ngFor="let todo of todos"> <ion-icon [name]="isCompleted(todo)" slot="start"> </ion-icon> {{todo.title}} <div slot="end"> {{todo.note}} </div> </ion-item> </ion-list> </ion-content>
Next, open the src/app/home/home.page.ts file and update is accordingly:
jsimport { Component } from '@angular/core'; @Component({ selector: 'app-home', templateUrl: 'home.page.html', styleUrls: ['home.page.scss'], }) export class HomePage { public todos: Array<{ title: string; note: string; completed: boolean}> = []; isCompleted(todo){ if(todo.completed) return 'checkmark-circle'; else return 'stopwatch'; } constructor() { for (let i = 0; i < 9; i++) { this.todos.push({ title: 'Todo ' + i, note: 'This is todo #' + i, completed: !!i }); } } }
We add a todos array that holds our todos and we use a for loop to fill the array with nine fake todos.
We also define the isCompleted() method which returns either the checkmark-circle icon if the todo is completed or a stopwatch icon if the todo is not completed.
Each todo has a title, note and completed flag.
This is a screenshot of the home page:
Image loading...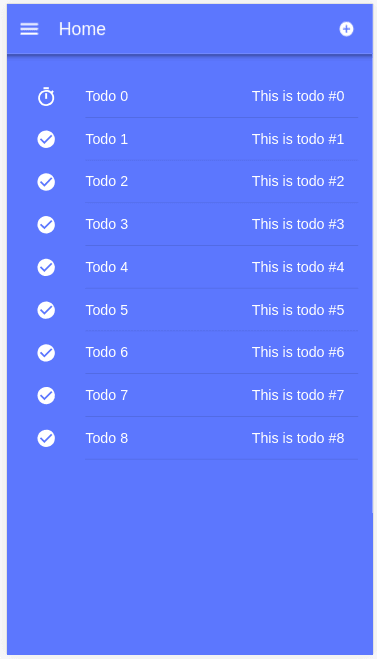
Theming the Side Menu
Let’s now theme the side menu. Open the src/app.component.html file and update it as follows:
js<ion-app> <ion-split-pane> <ion-menu> <ion-header> <ion-toolbar color="primary"> <ion-title>Menu</ion-title> </ion-toolbar> </ion-header> <ion-content color="primary"> <ion-list style="background: var(--ion-color-primary);" color="primary"> <ion-menu-toggle auto-hide="false" *ngFor="let p of appPages"> <ion-item color="primary" [routerDirection]="'root'" [routerLink]="[p.url]"> <ion-icon slot="start" [name]="p.icon"></ion-icon> <ion-label> {{p.title}} </ion-label> </ion-item> </ion-menu-toggle> </ion-list> </ion-content> </ion-menu> <ion-router-outlet main></ion-router-outlet> </ion-split-pane> </ion-app>
We simply add color="primary" to the <ion-toolbar>, <ion-content> and <ion-item> components. We also set the background of the <ion-list> component to var(--ion-color-primary). --ion-color-primary is a CSS variable that holds the value of the primary color.
This is a screenshot of our side menu:
Image loading...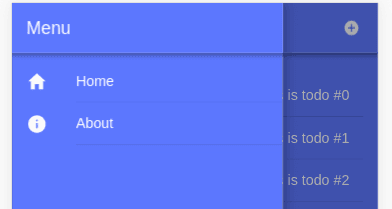
Adding an Angular Service
Until now we just hardcoded a set of fake todos, let’s add the code for actually creating todos.
Go back to your terminal and run the following command:
bashionic generate service todos$
Next, let’s install Ionic Storage which will be used to save todos in the local storage of the Ionic app:
bashnpm install --save @ionic/storage$
As the time of this writing @ionic/storage@2.2.0 is installed.
Next, import the src/app/app.module.ts file and import IonicStorageModule:
js// [...] import { IonicStorageModule } from '@ionic/storage'; @NgModule({ declarations: [AppComponent], entryComponents: [], imports: [ // [...] IonicStorageModule.forRoot(), ], // [...] }) export class AppModule {}
Open the src/app/todos.service.ts file then import and inject the Storage service:
jsimport { Injectable } from '@angular/core'; import { Storage } from '@ionic/storage'; @Injectable({ providedIn: 'root' }) export class TodosService { constructor(private storage: Storage) { } }
Next, add the following interface:
jsinterface Todo{ title: string; note: string; completed: boolean; }
Next, define the following methods:
jspublic async generateNewKey(): Promise<string>{ let key = `todo${ parseInt(`${Math.random() * 100}`)}`; let ret = await this.storage.get(key); while(ret){ key = `todo${ parseInt(`${Math.random() * 100}`)}`; ret = await this.storage.get(key); } return key; } public async getTodos(): Promise<Todo[]>{ let todos: Array<Todo> = []; await this.storage.forEach((v, key, i)=>{ if(key.startsWith("todo")){ todos.push(v); } }); return todos; } public async createTodo(key: string , todo: Todo){ console.log("Creating todo: ", todo); return await this.storage.set(key, todo); }
Now, let’s update the home page to use TodosService. Open the src/app/home/home.page.ts file and add the following imports:
jsimport { OnInit } from '@angular/core'; import { TodosService } from '../todos.service';
Next, inject TodosService via the constructor and implement the OnInit interface:
jsexport class HomePage implements OnInit { constructor(private todosService: TodosService) {}
Next, define the ngOnInit() hook and fetch the todos from the local storage:
jsasync ngOnInit(){ this.todos = await this.todosService.getTodos(); }
We store the fetched todos in the todos array.
Next, add the following method to create a random todo:
jspublic async createTodo(){ let key = await this.todosService.generateNewKey(); let todo = { title: `${key}`, note: "A new todo", completed: true }; await this.todosService.createTodo(key,todo); this.todos = await this.todosService.getTodos(); }
Now, we need to bind this method to the button for creating todos in the toolbar of the home page. Open the src/app/home/home.page.html file and add a click event with "createTodo()" as value :
js<ion-buttons slot="end"> <ion-button (click)="createTodo()"> <ion-icon name="add-circle" slot="start"></ion-icon> </ion-button> </ion-buttons>
If you now click on the button, a new todo with a random title will be created.
In this simple example, we create random todos but in a real world situation you need to add a form to get the todo information from the user before calling the createTodo() method to persist it in the local storage.
You can find the source code of this project from this GitHub repository.
Conclusion
After developing your application (which can be done entirely in the browser unless you need to use a device feature that’s not available in the browser and can’t be mocked), you can either host your application in the web as a Progressive Web App or build your application to target native devices like Android or iOS.
In this tutorial, we’ve seen how you can get started with Ionic 4 to create cross platform mobile apps with web technologies such as TypeScript, SCSS and Angular.