Your Playwright Tests Pass. Your UI Is Still Broken
Your Playwright end-to-end tests pass. The pipeline is green, so you deploy with confidence, only to discover that the UI is broken. In this guide, you will configure Visual Tests once, then add a single visual checkpoint to an existing test. You can then catch visual regressions with the same test command, without rewriting scenarios, adding pixel assertions, or adopting another testing framework.
When green tests lie
Meet Nimbus, a small deployment SaaS. It has two views: a landing page and a
dashboard, both built from the same Button, Card, Badge, and Table components.
Both views also share one design token file.
Image loading...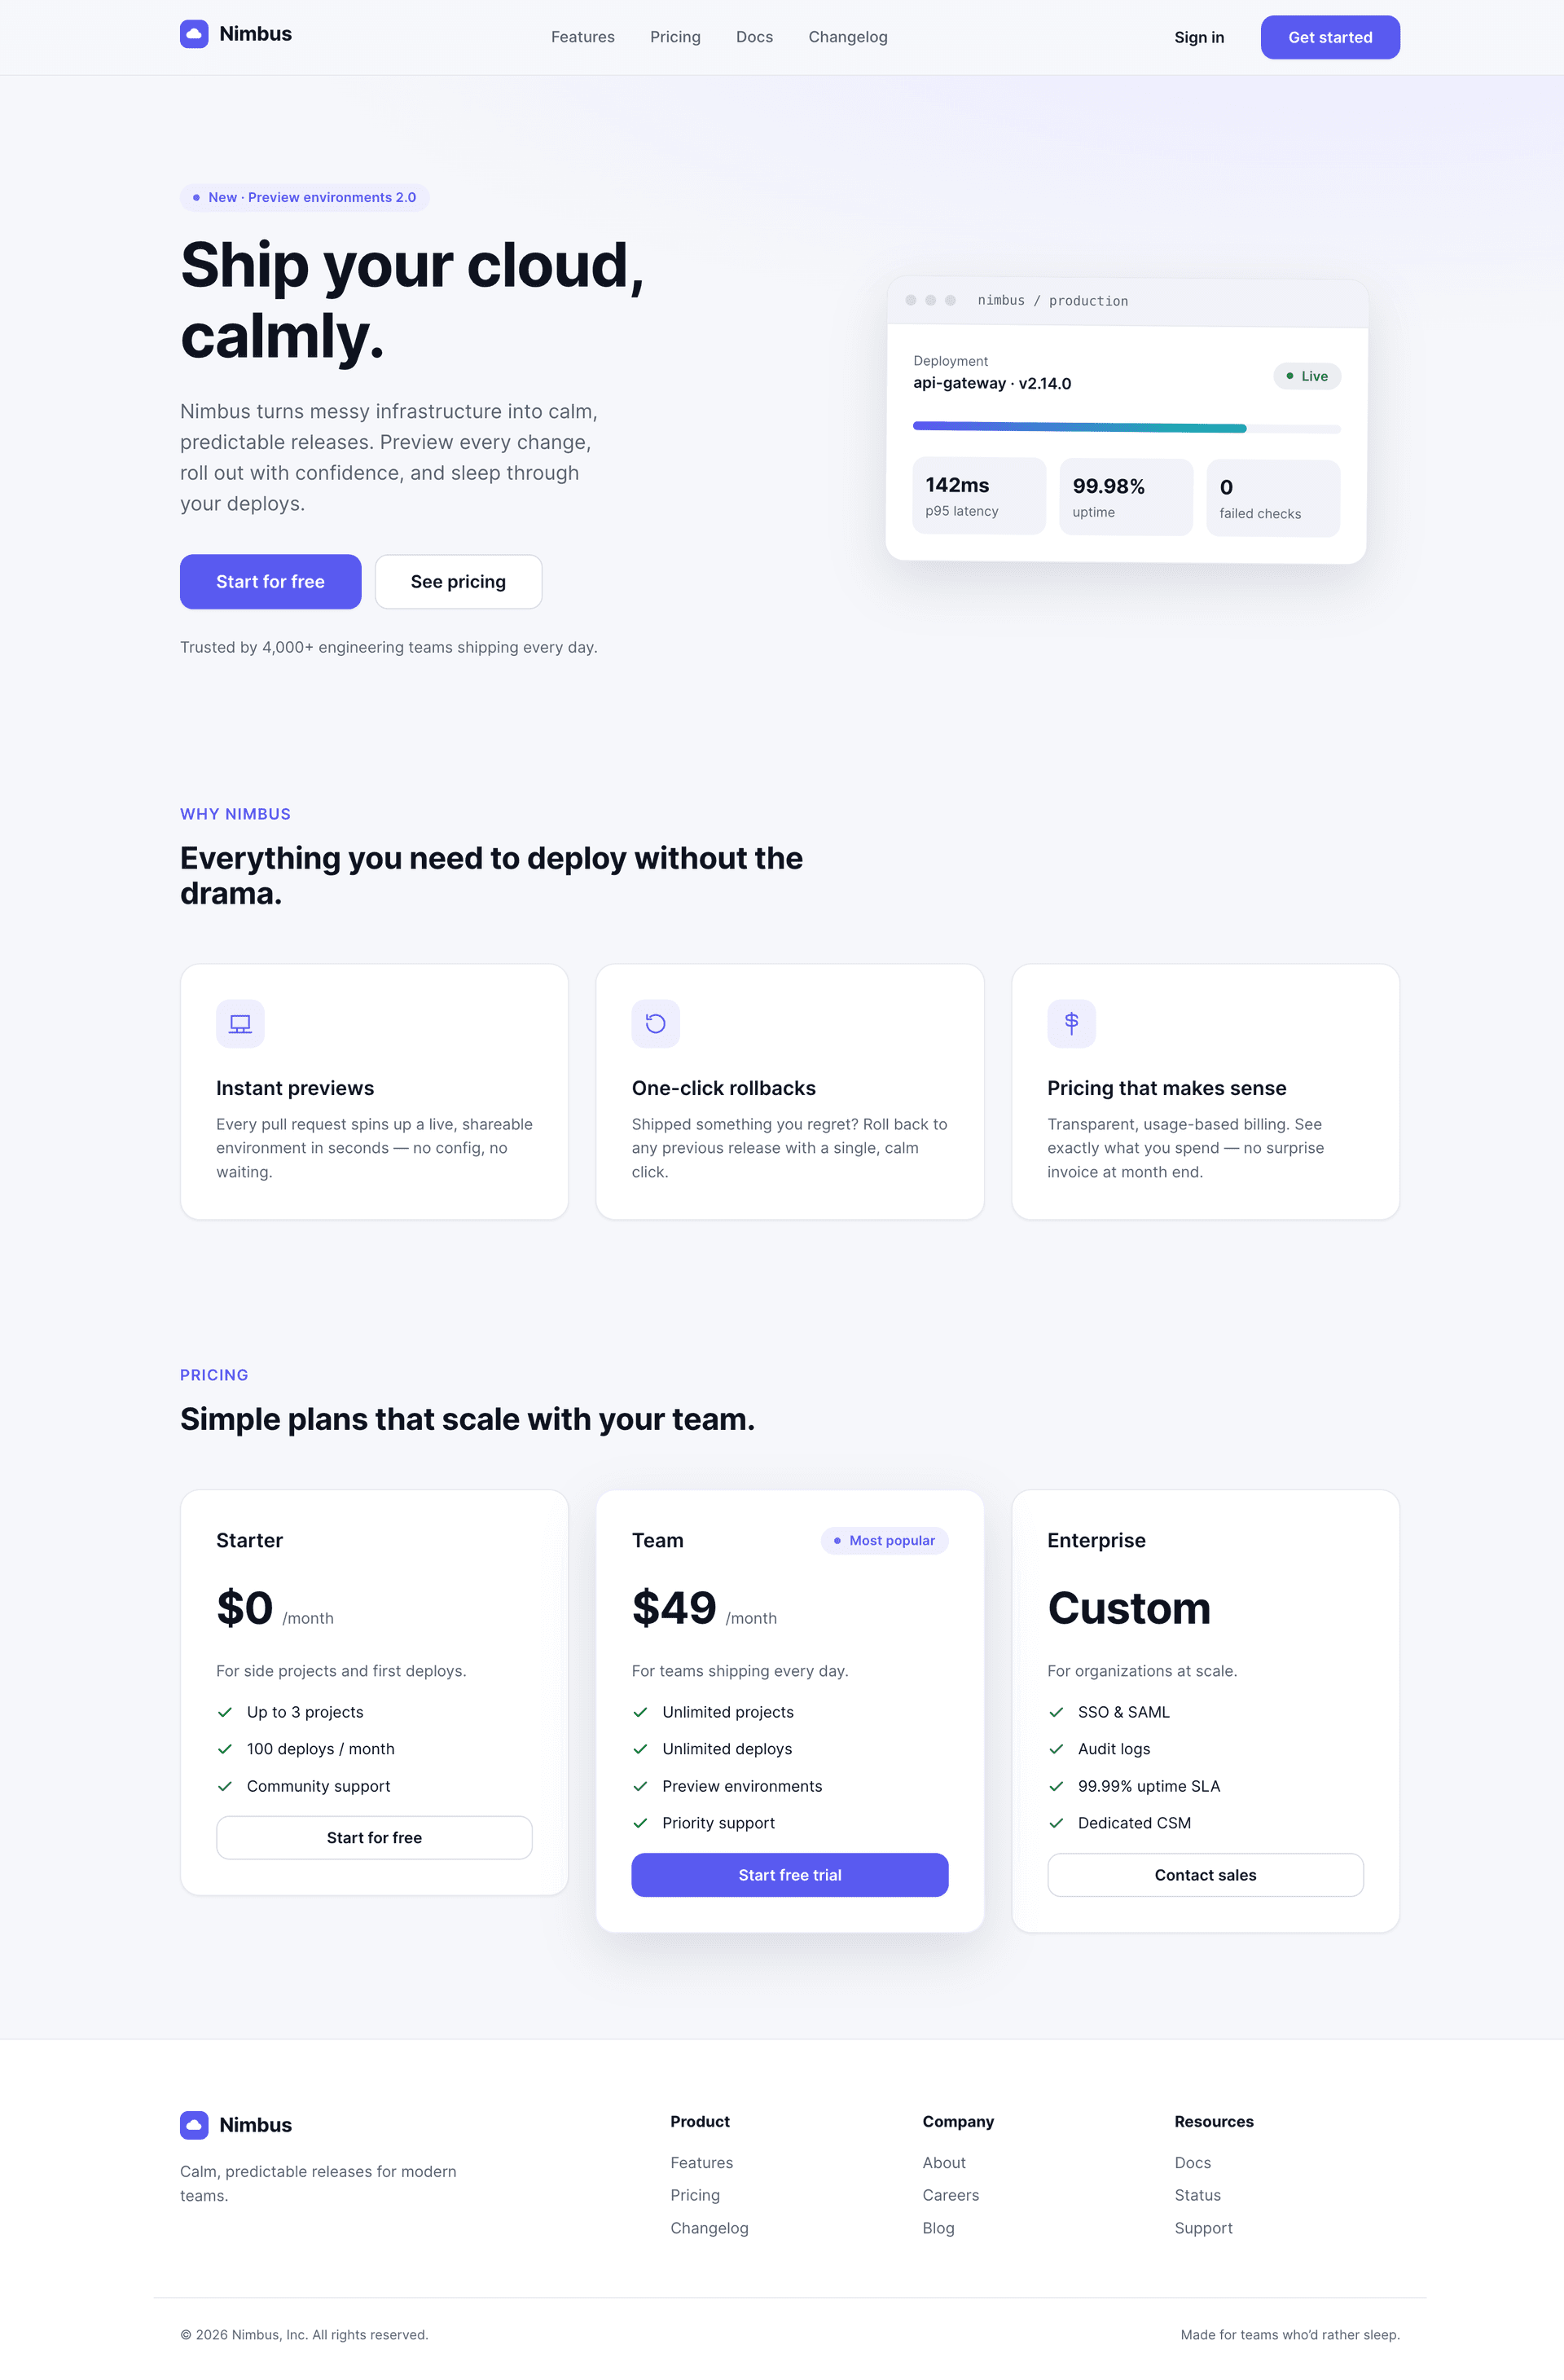
Image loading...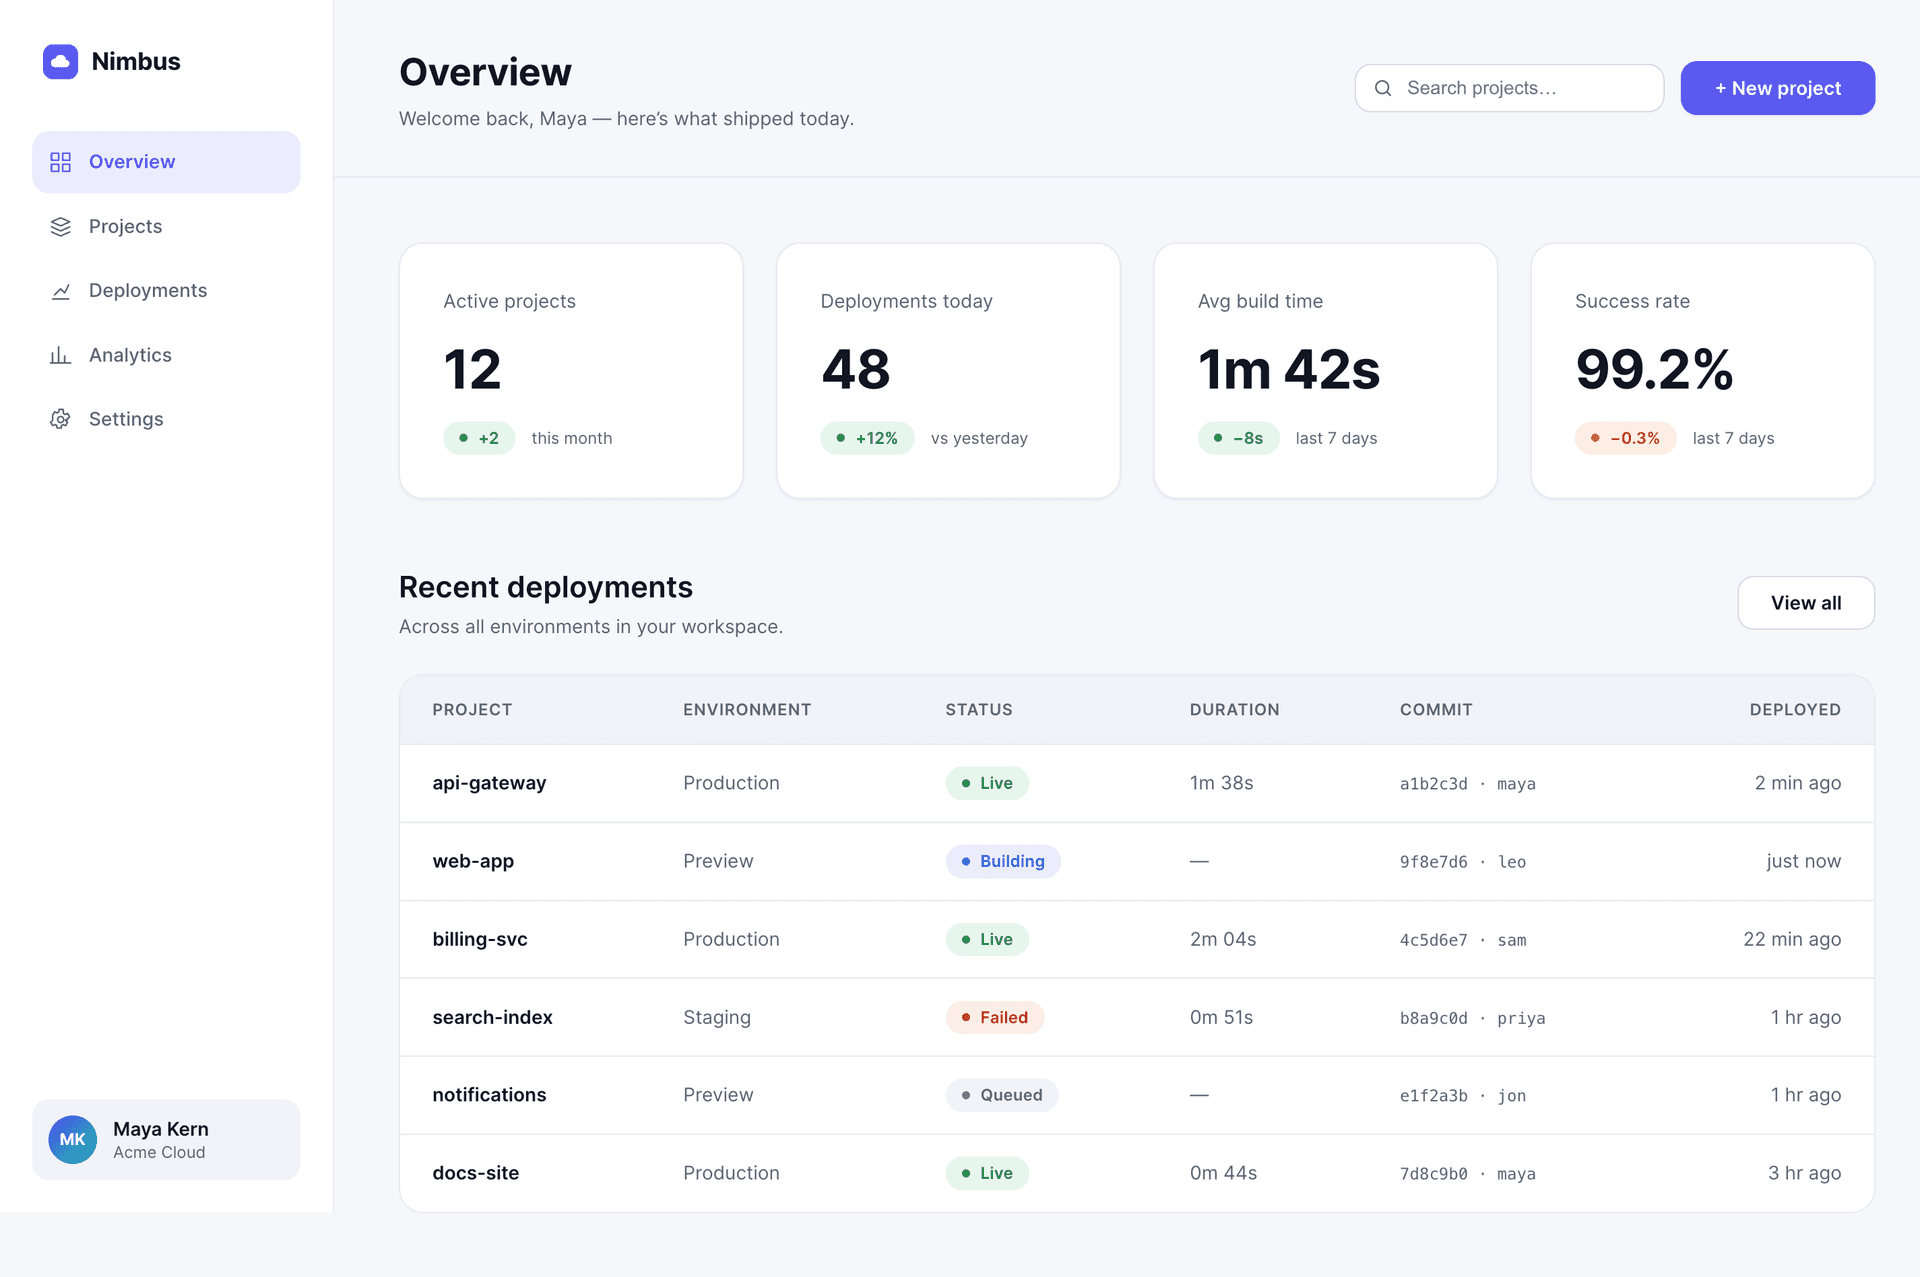
The application has 12 Playwright tests covering navigation, hero content, pricing plans, the deployments table, and user actions. Run them with:
bashnpx playwright test$
Two days later, a bug report appears in Slack:
Image loading...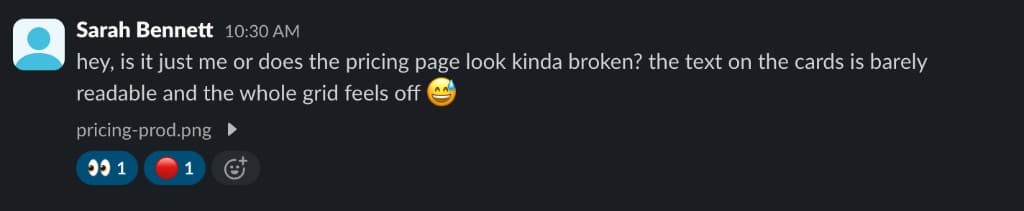
You open production and confirm the report. The card text is barely readable, while huge gaps have squeezed the cards and pushed the pricing layout out of alignment:
Image loading...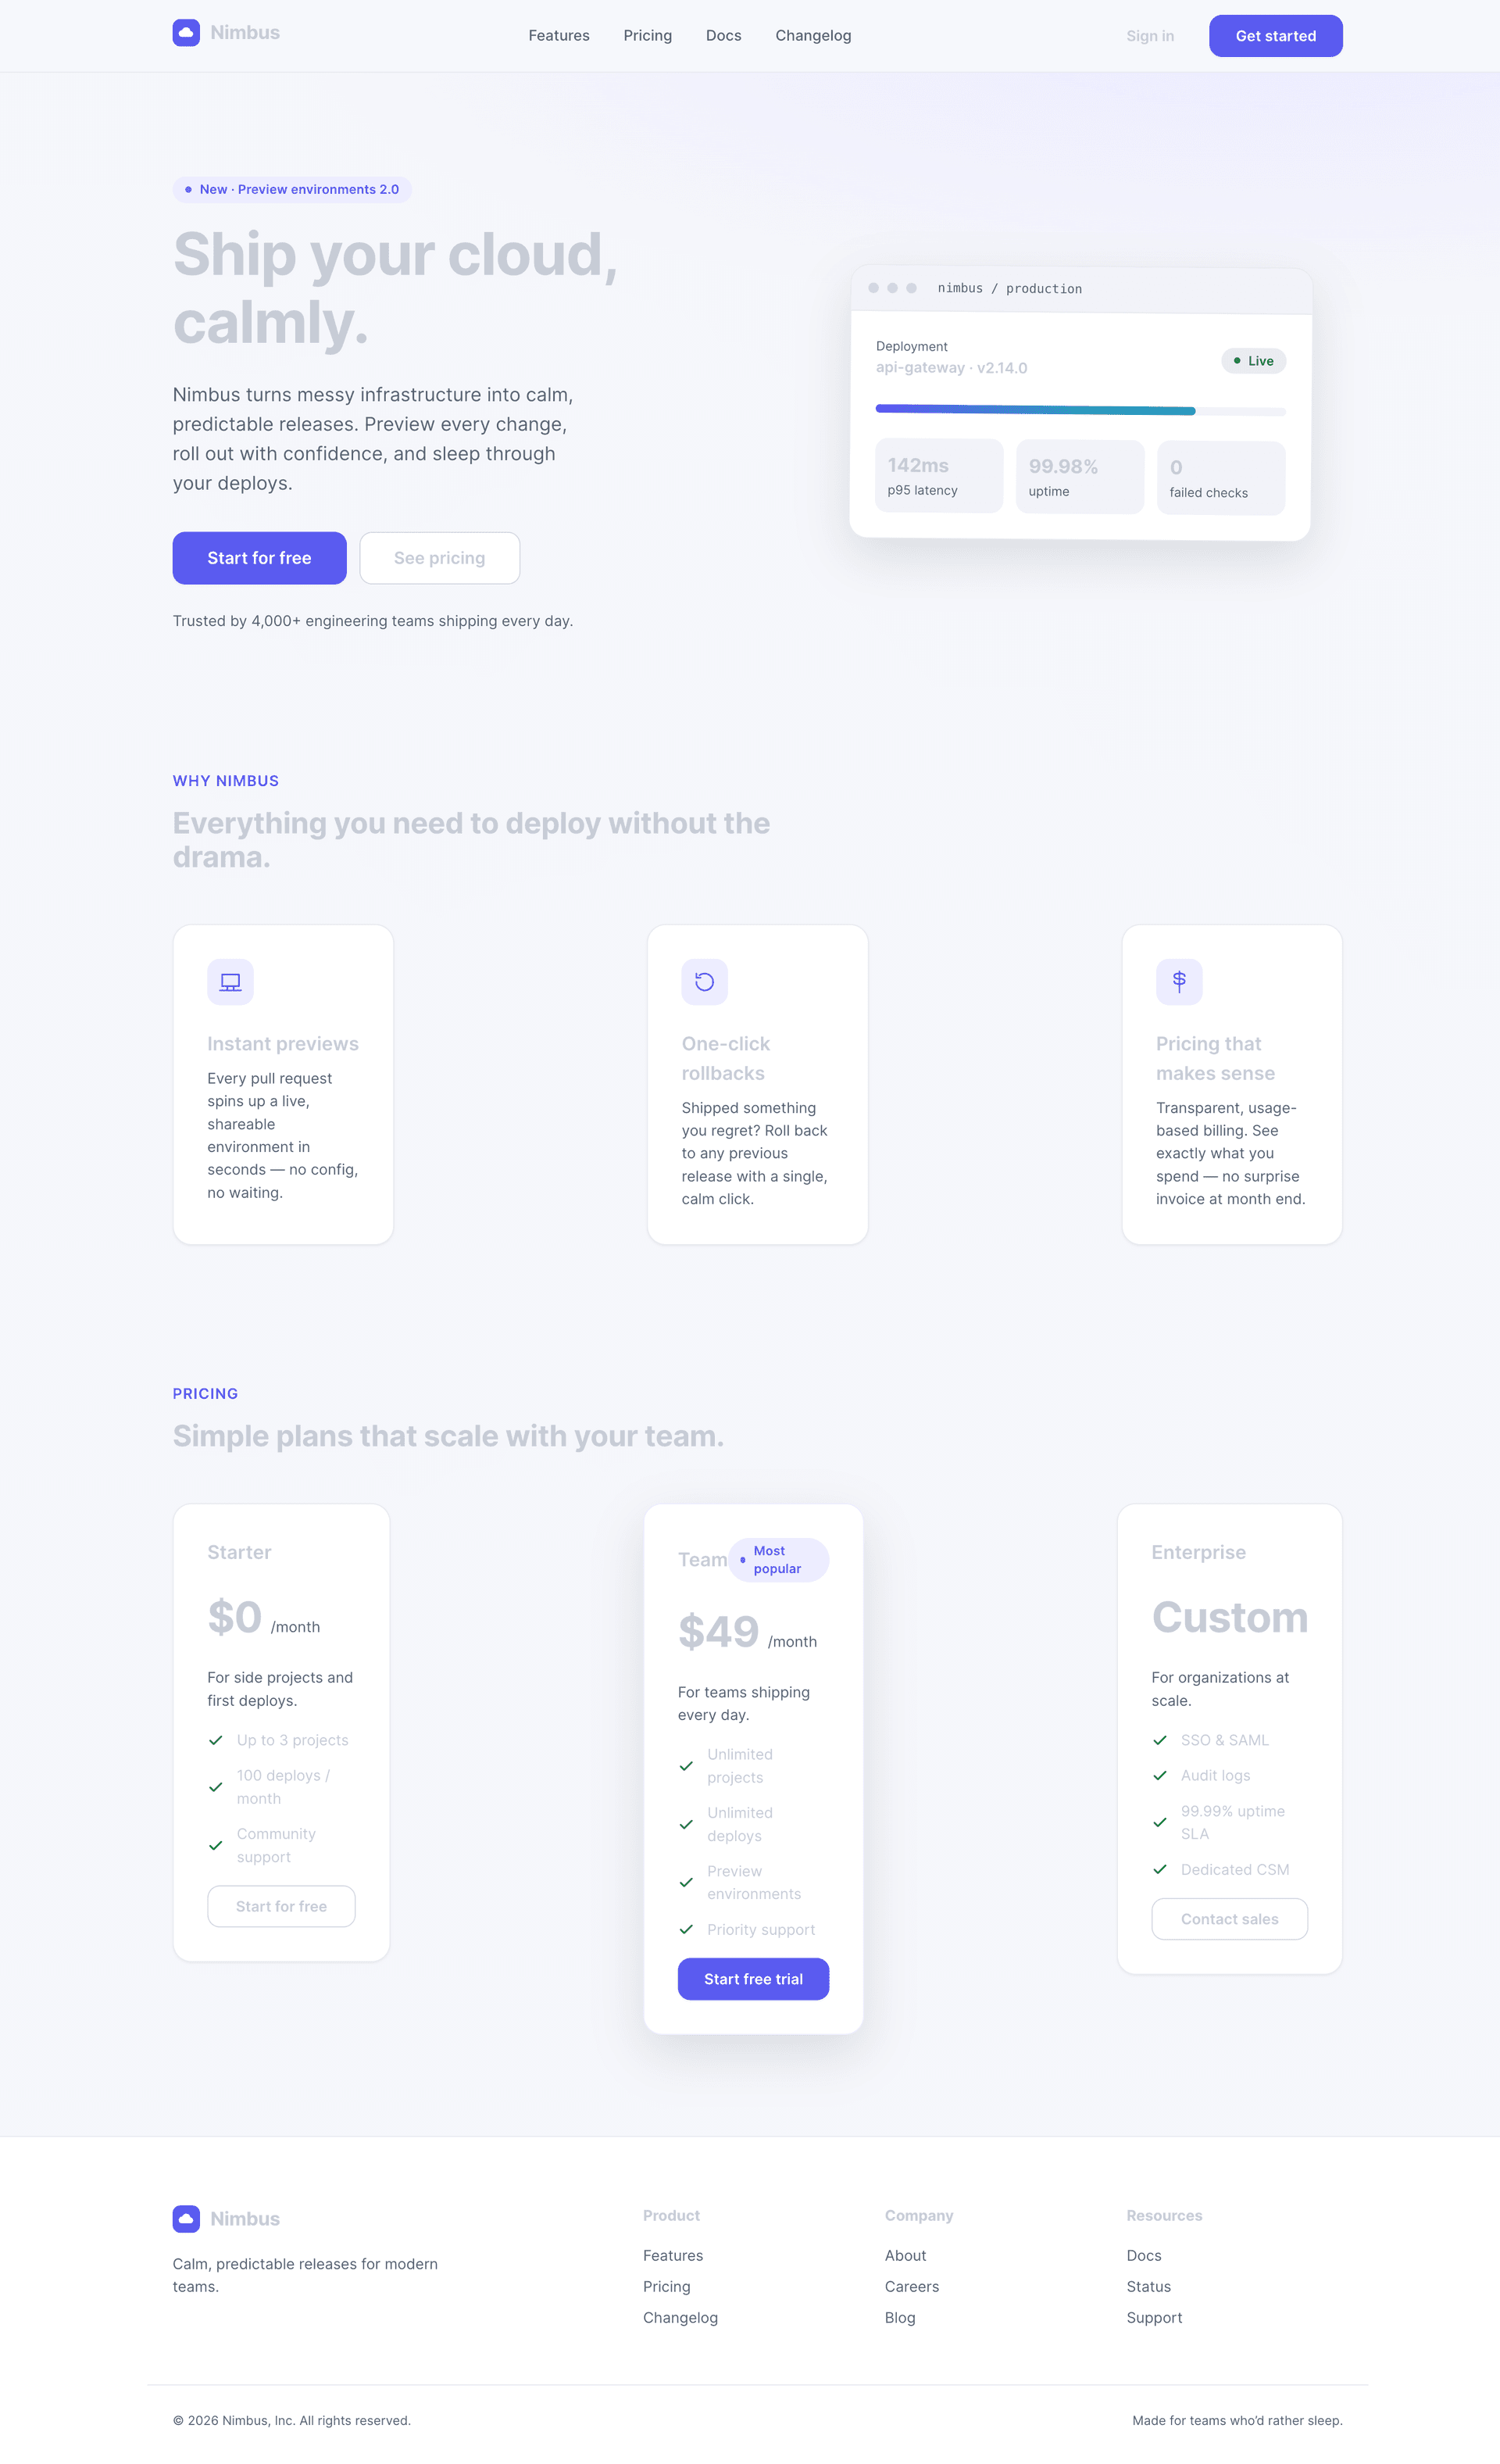
Yet all 12 Playwright tests still pass:
Image loading...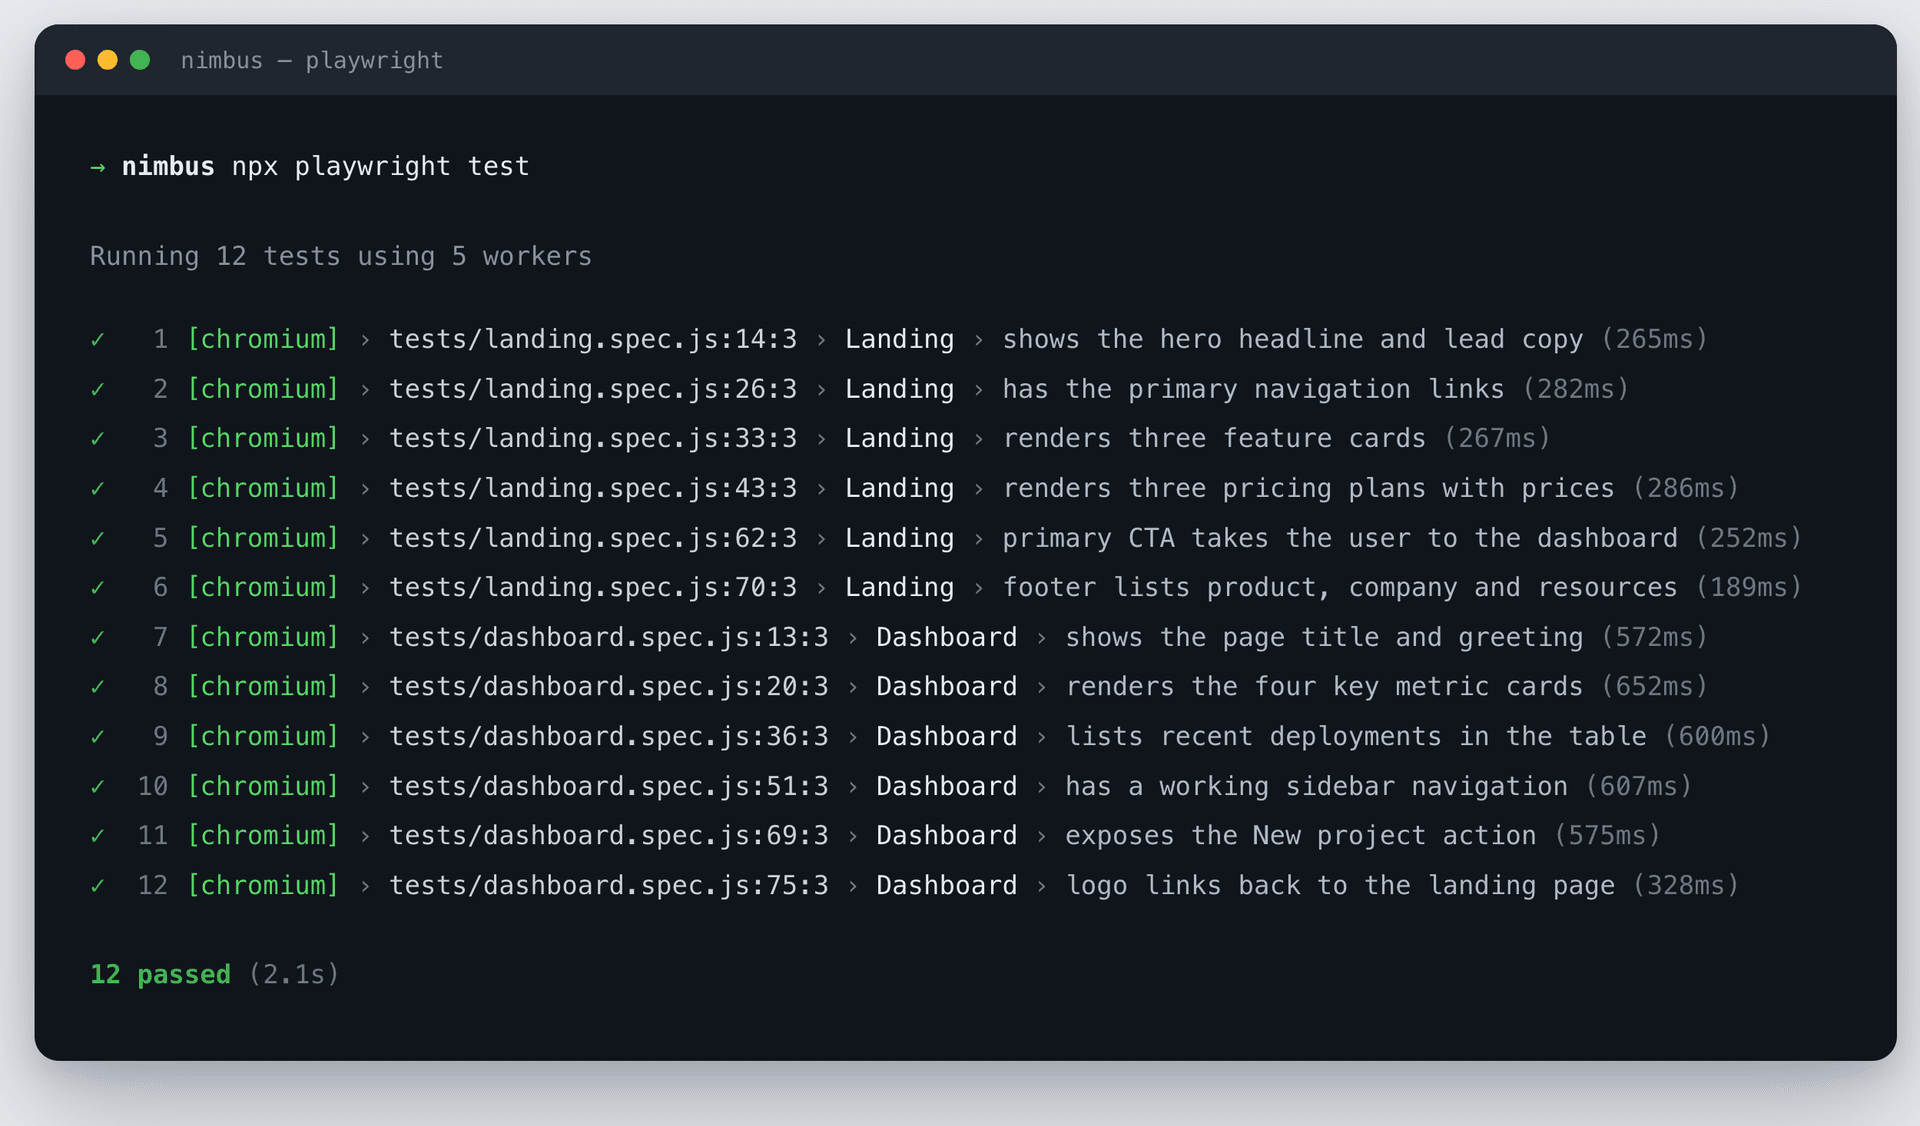
Why functional tests do not catch visual regressions
A functional test checks what a page says and does, not how it looks. Here is the pricing test before adding a visual checkpoint:
jstest("renders three pricing plans with prices", async ({ page }) => {
  const plans = [
    { name: "Starter", price: "$0" },
    { name: "Team", price: "$49" },
    { name: "Enterprise", price: "Custom" },
  ];

  for (const plan of plans) {
    await expect(page.getByRole("heading", { name: plan.name, exact: true })).toBeVisible();
    await expect(page.getByText(plan.price, { exact: true })).toBeVisible();
  }

  await expect(page.getByText("Most popular")).toBeVisible();
});
- Is the "Team" heading in the DOM? Yes.
- Is
$49visible? Yes. - Is the "Most popular" badge present? Yes.
The test passes.
The fact that the grid extends beyond the viewport, the cards are too narrow, and
the text blends into the background is outside the scope of this test.
Playwright's toBeVisible() checks conditions such as a non-empty bounding box and
the absence of visibility: hidden. It does not check contrast, readability, or
whether an element is positioned correctly relative to its neighbors.
This is not a flaw in Playwright. Functional tests should be insensitive to appearance. Otherwise, every minor pixel shift could break the suite. The problem is that this leaves the visual layer without a safety net.
Manual pixel assertions such as expect(box.width).toBe(320) are brittle,
time-consuming, and still cannot detect text blending into the background. What you
need is a way to compare the rendered image, not assumptions about that image.
Add a visual checkpoint to Playwright
Buddy Visual Tests lets you reuse the navigation already present in your tests. You only add a checkpoint where an existing test has reached the state you want to capture.
First, install the official Playwright helper:
bashnpm install --save-dev @buddy-works/visual-tests-playwright$
The helper extends Playwright's test with a visualTestPlugin fixture. Create a
small bridge file at tests/visual.js:
jsimport { test as base, expect } from "@playwright/test";
import withVisualTestPluginFixture from "@buddy-works/visual-tests-playwright";

// Standard Playwright test extended with the visualTestPlugin fixture.
export const test = withVisualTestPluginFixture(base);
export { expect };
Next, replace the import in your spec with the bridge and add one checkpoint to the existing test:
Image loading...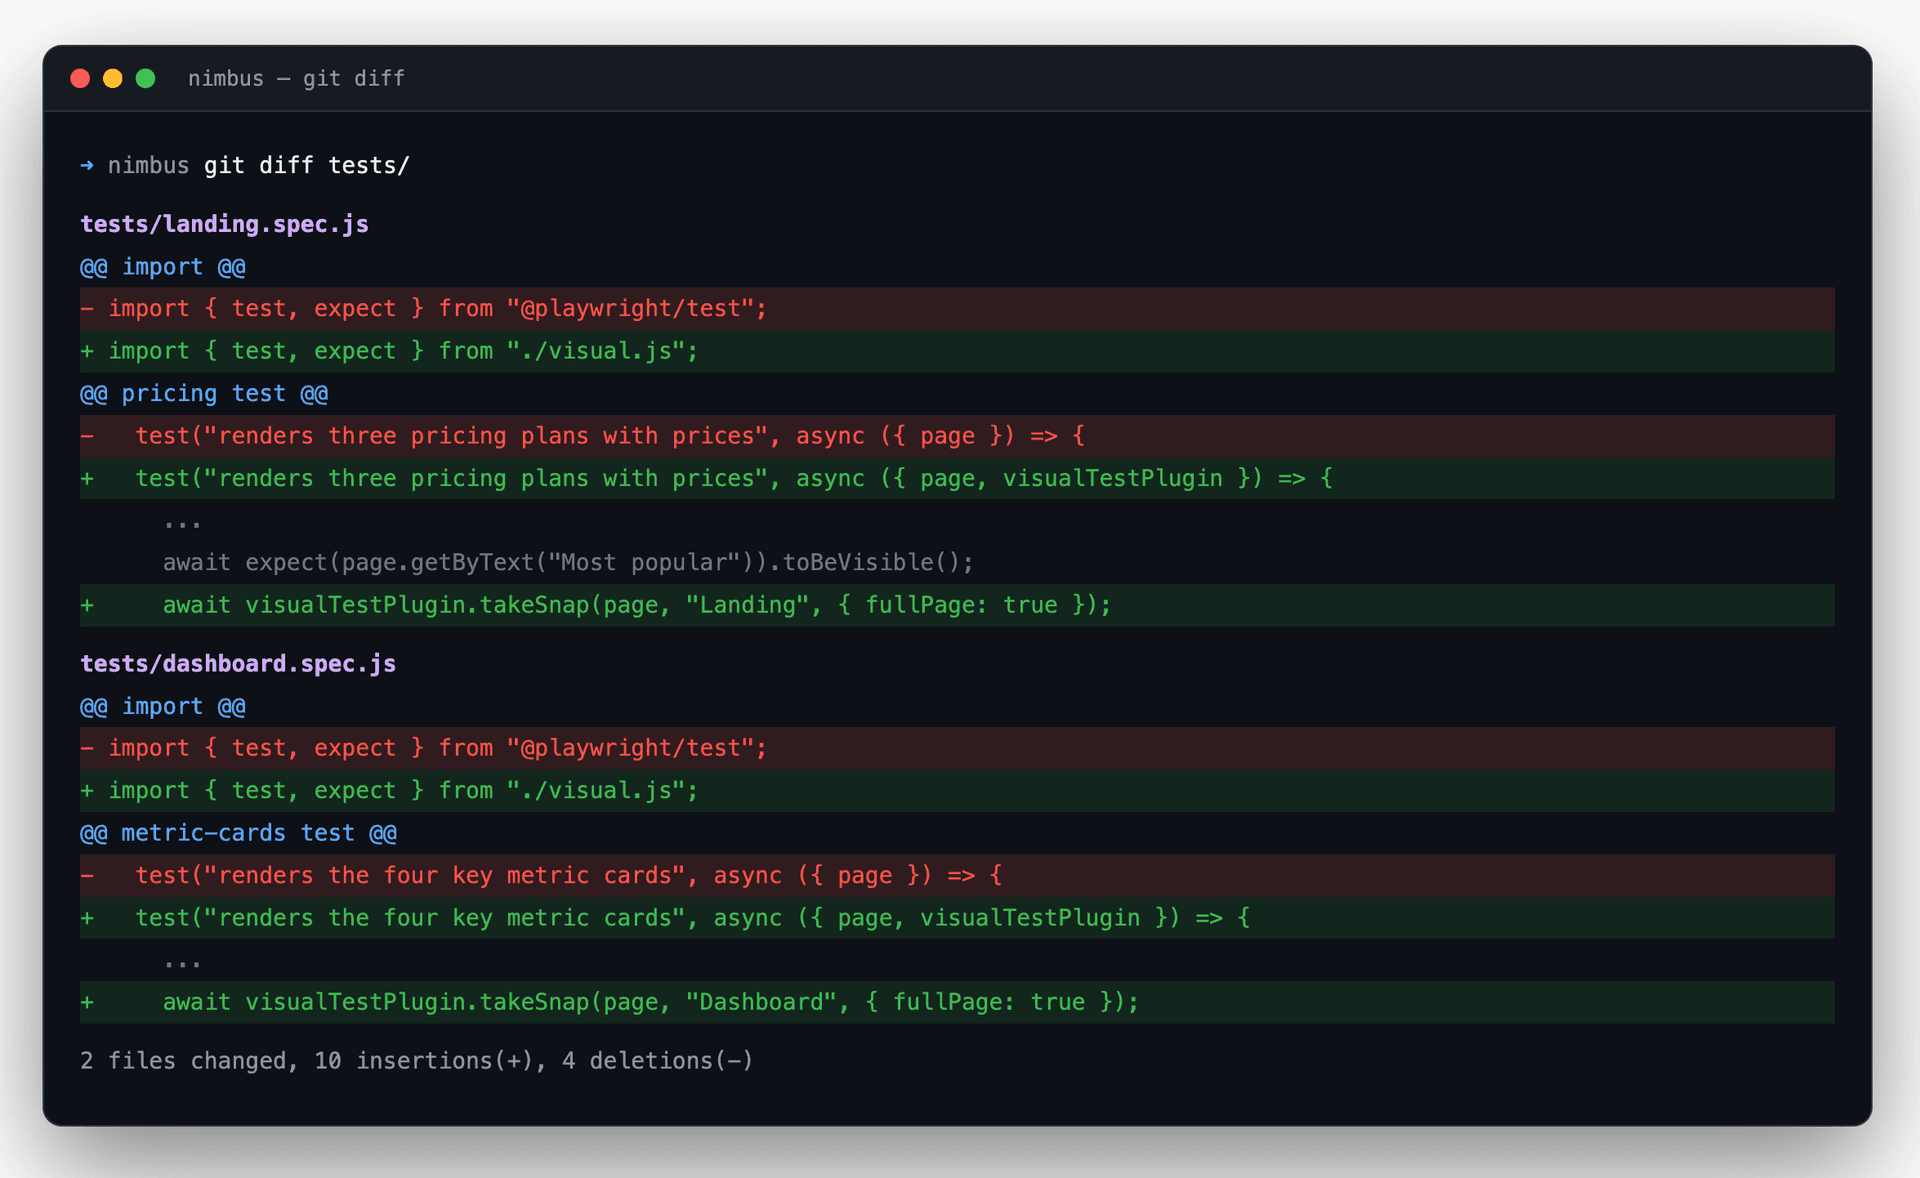
Outside a Visual Tests session, takeSnap() is a silent no-op when errors are
suppressed. Your regular npx playwright test command still reports 12 passing
tests. The checkpoint becomes active when the suite runs inside a Buddy Visual
Tests session.
Create the first baseline
Visual Tests needs a baseline: the first accepted rendering against which future snapshots are compared.
Sign in to the bdy CLI and link this directory to a Visual Tests suite. Linking with the CLI authenticates the suite for you, so no separate suite token is needed:
bash# Prepare a browser and connect this directory to a Visual Tests suite. bdy tests visual setup bdy tests visual link -w <workspace> -p <project> -s <suite-identifier> # Run the same test command inside a Visual Tests session. bdy tests visual session create "npx playwright test"$$$$$$
Replace the placeholders with values from the Connect screen.
Behind the scenes, session create performs three steps:
- Buddy starts a local plugin server, and Playwright runs the tests as usual.
takeSnap()serializes the DOM, while resource discovery attaches CSS and images.- Buddy receives the self-contained snapshot, renders it, and calculates the diff.
localhost
for the duration of the session, so it does not need hosting or a public address.
The Connect screen presents the same setup step by step:
Image loading...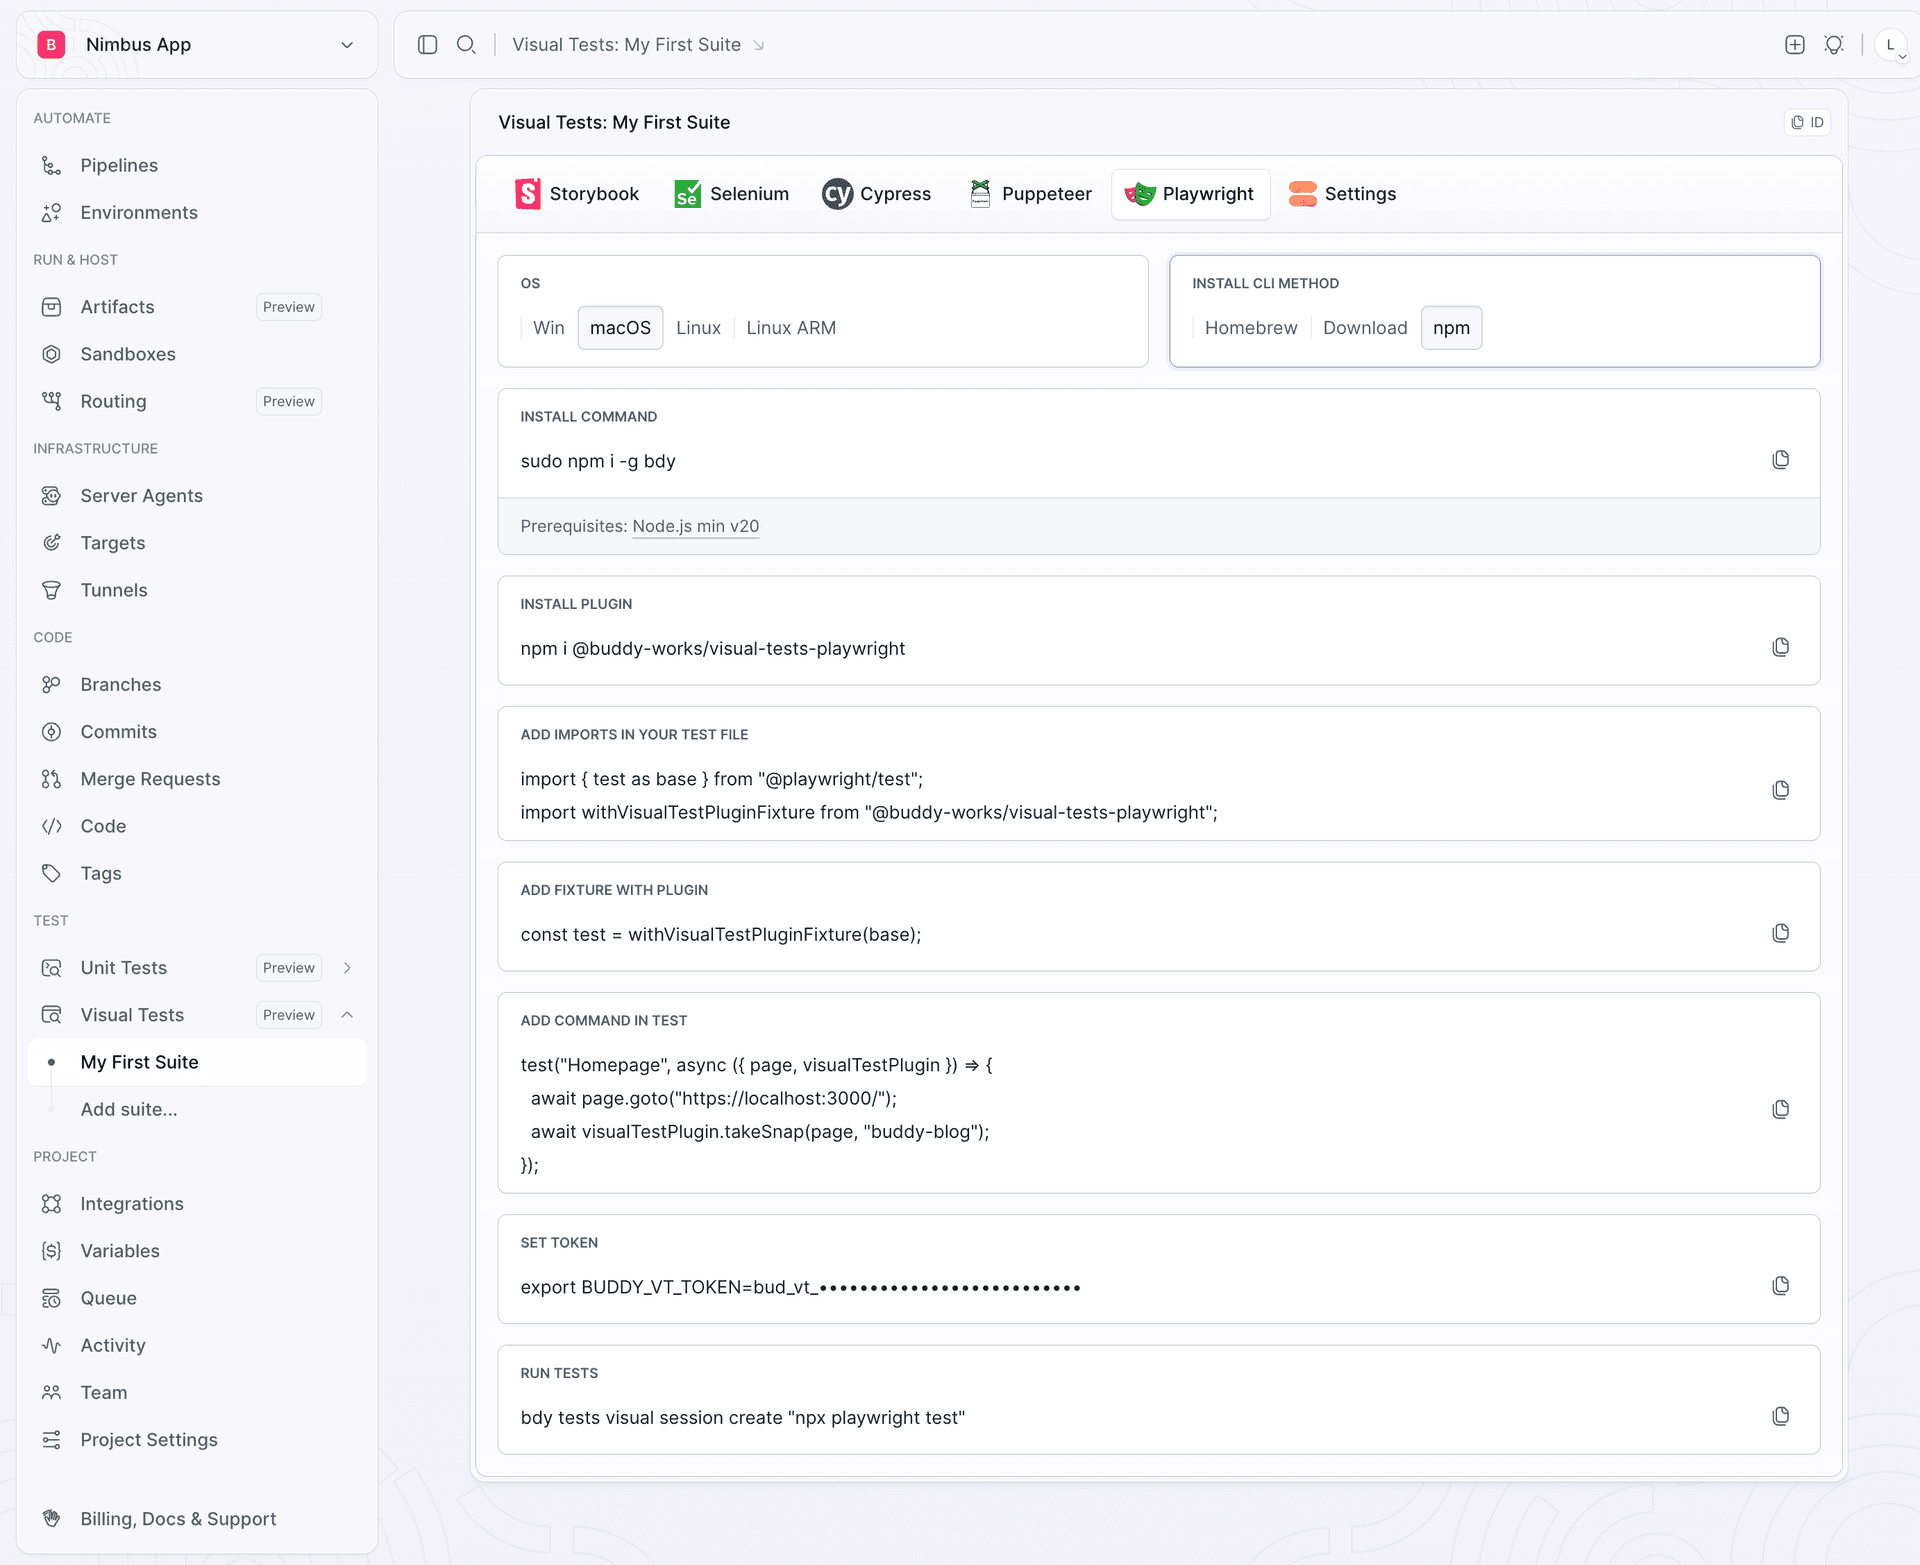
The first session adds snapshots to the suite and marks them for review:
Image loading...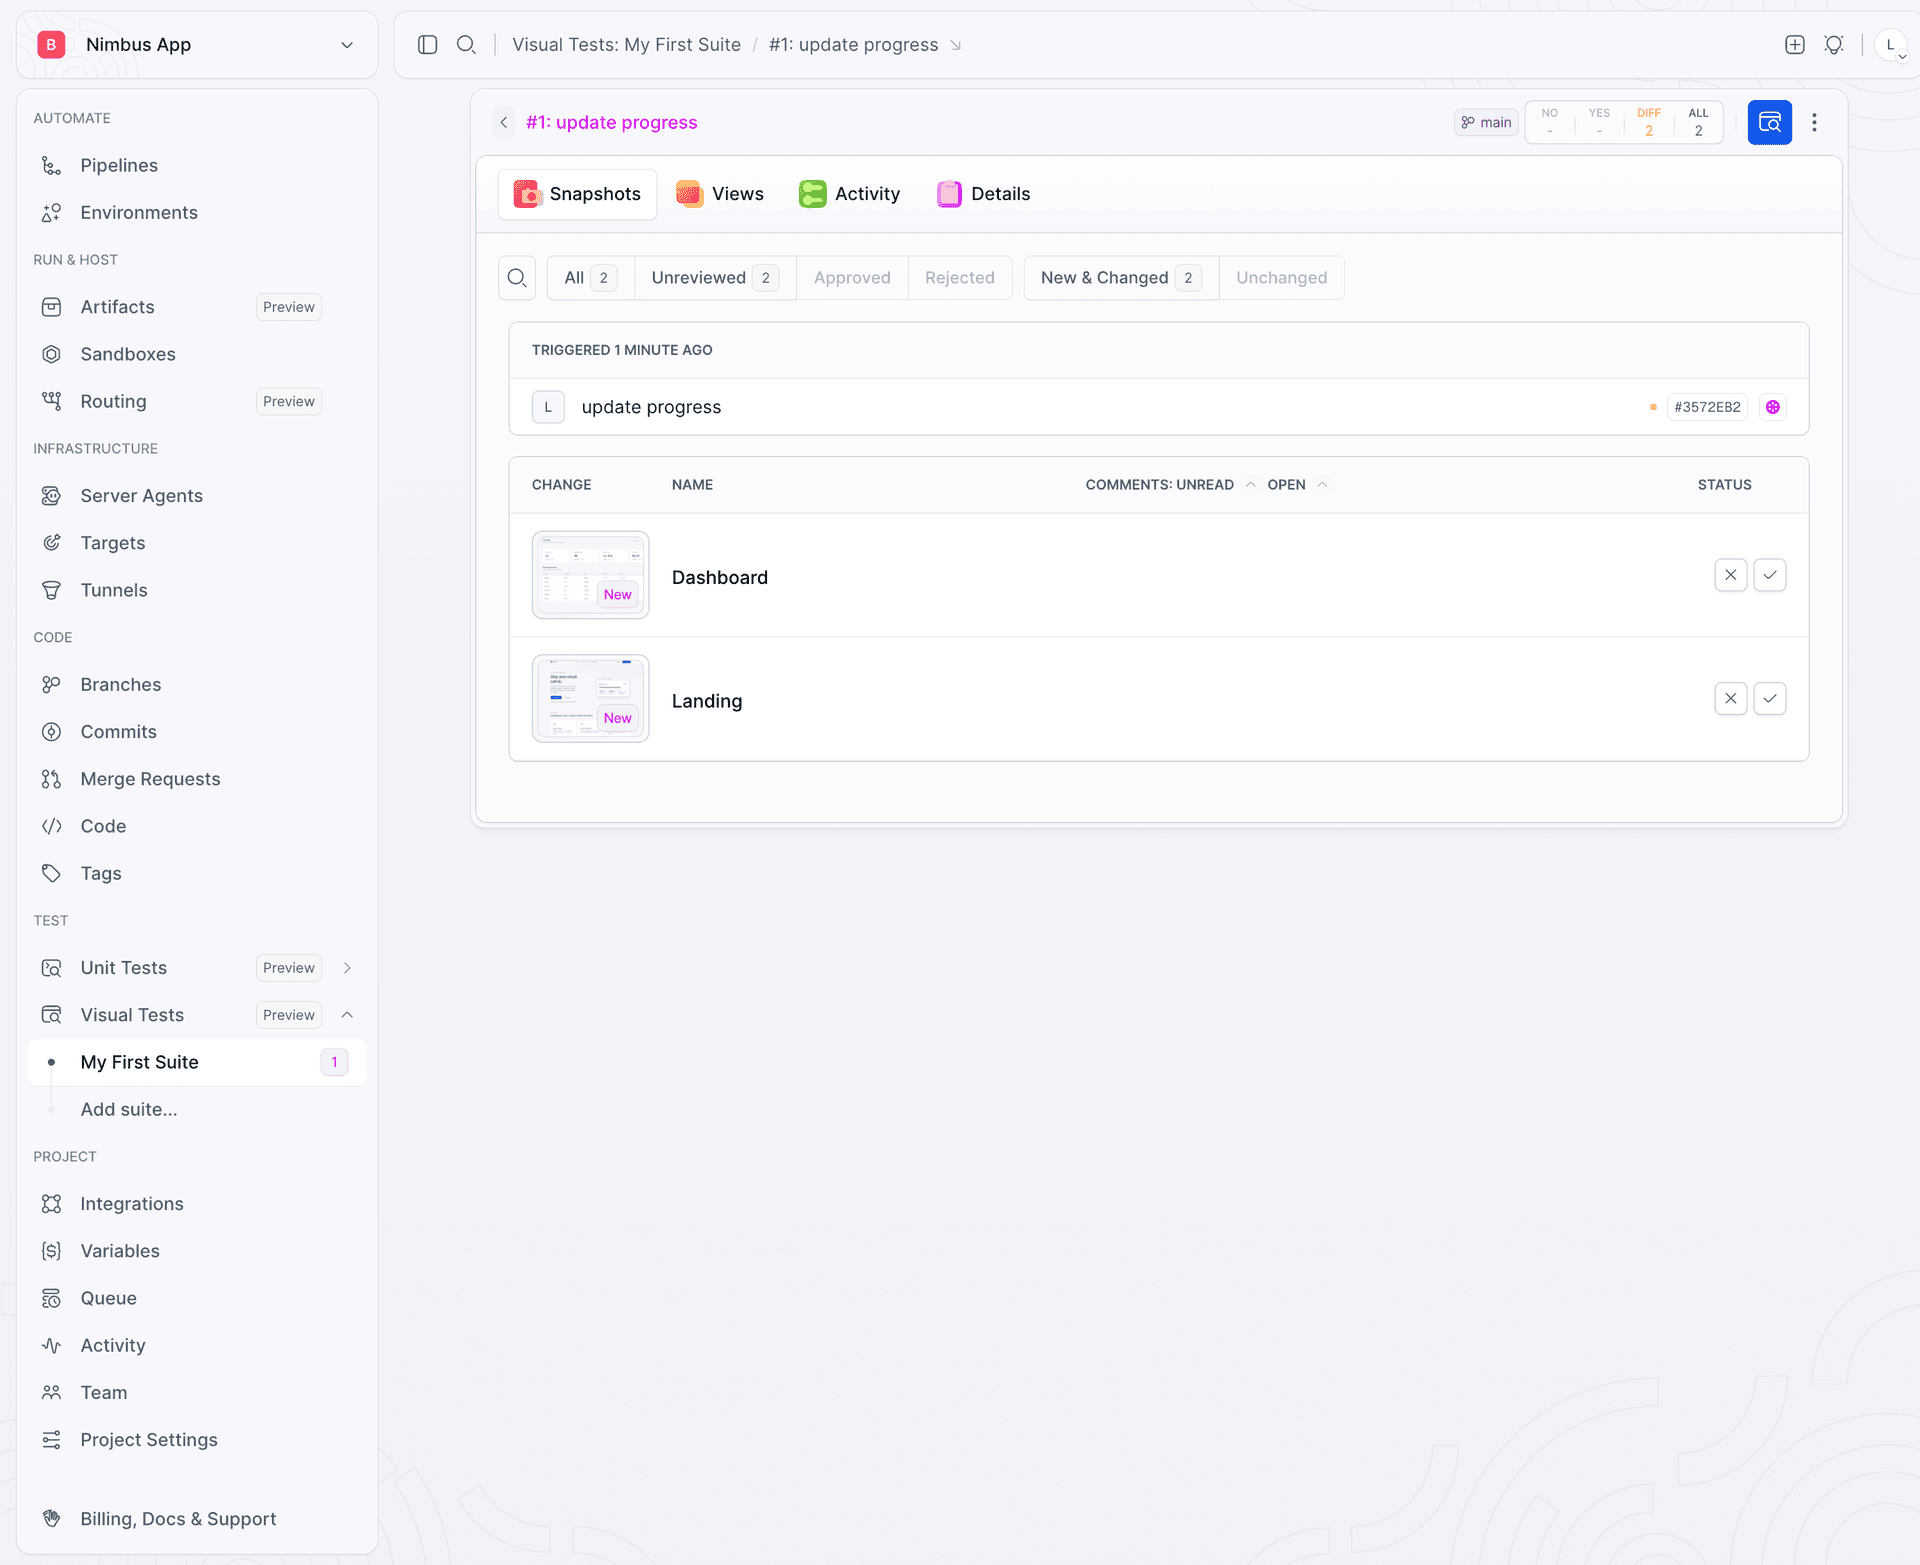
Approve them to establish the baseline:
Image loading...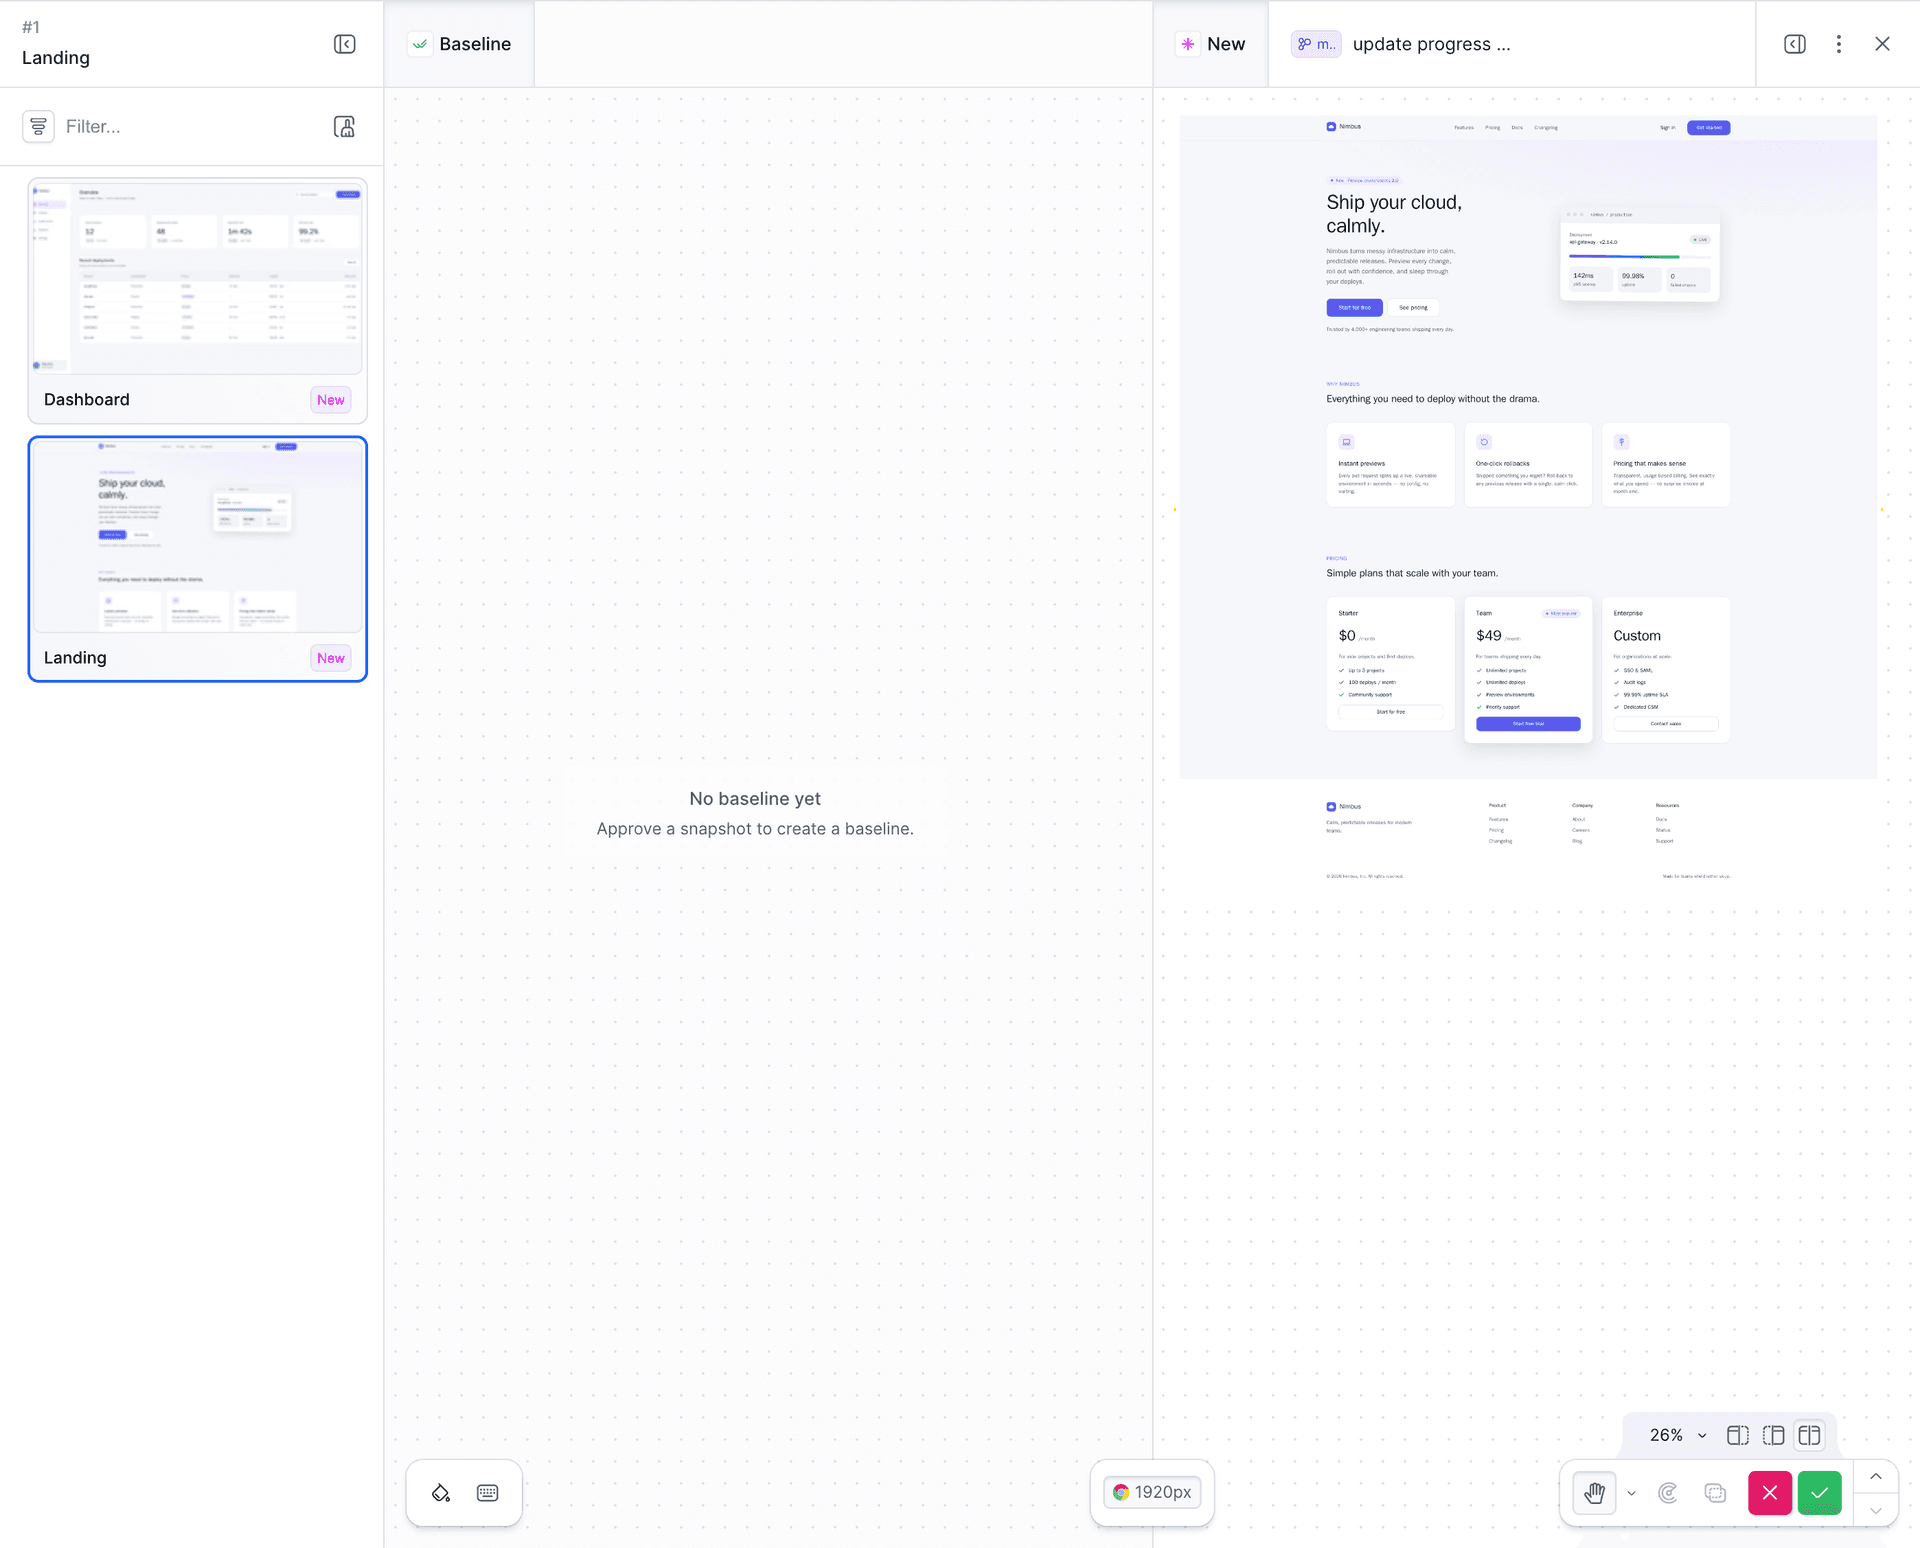
Image loading...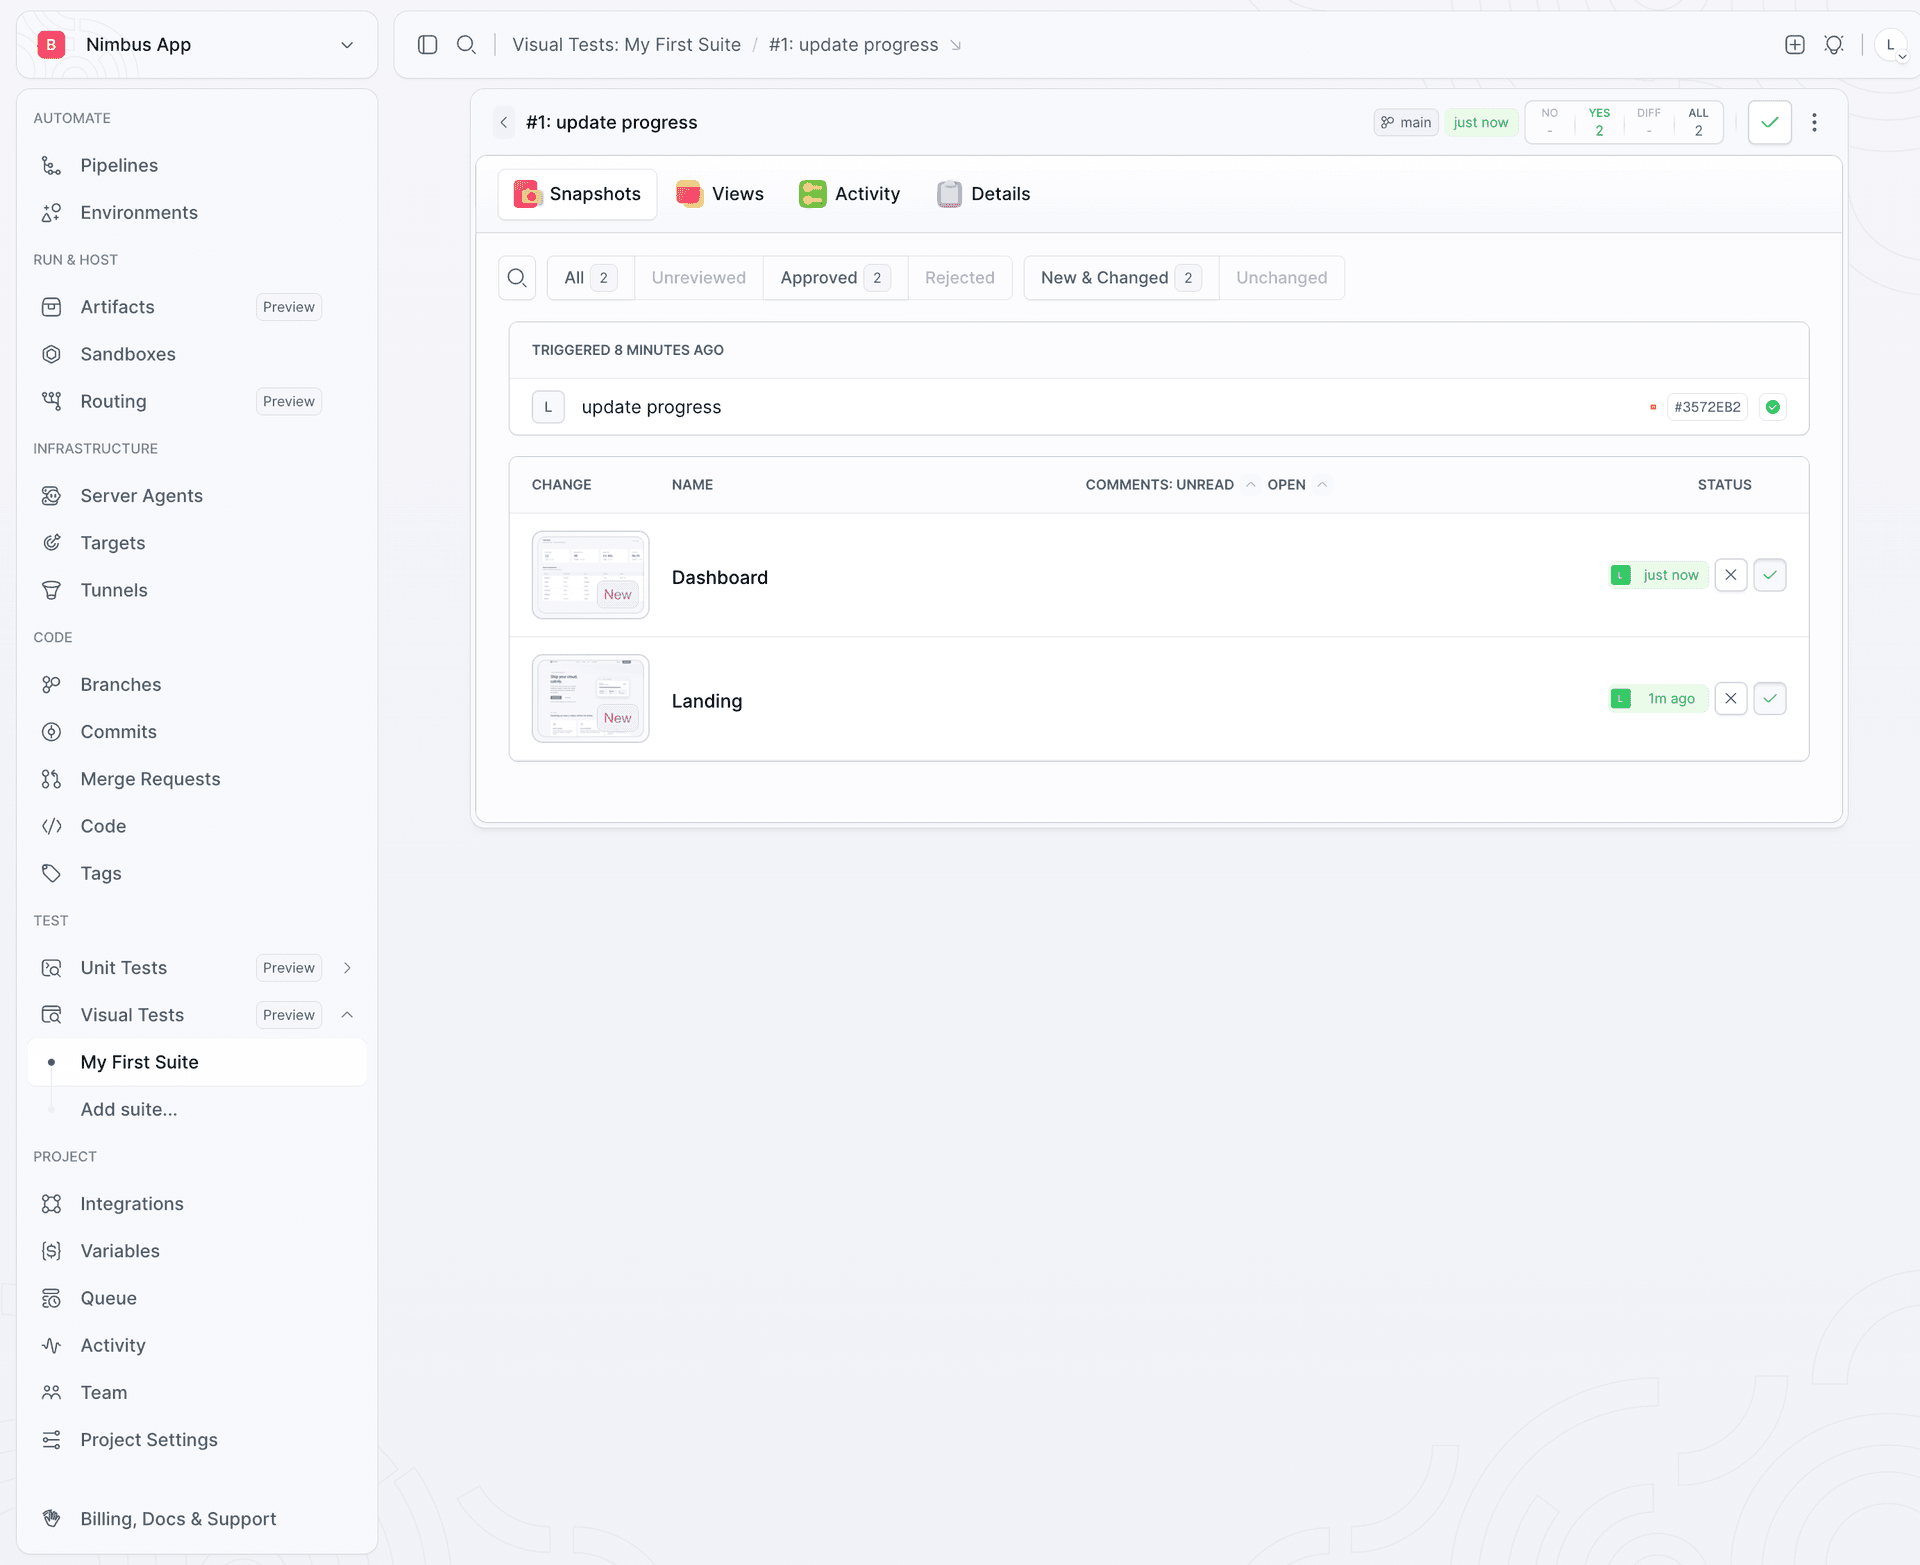
0.1 filters out rendering noise, such as
anti-aliasing and minor browser rendering differences, while still catching real
color changes. Avoid setting it to 0 - that surfaces pixel-level noise as false
positives.
Catch the regression - and the one nobody reported
Now return to the visual regression. The culprit is an innocent-looking
refactor: consolidate design tokens commit that changed two values in
tokens.css:
diff- --color-text: #111521; /* High-contrast card text. */
+ --color-text: #c7ccd6; /* Faded and barely readable. */

- --card-gap: 24px;
+ --card-gap: 240px;     /* A typo that breaks every grid. */
Run the Visual Tests session again using the same tests and command. Because the suite now has a baseline, start with a side-by-side comparison:
Image loading...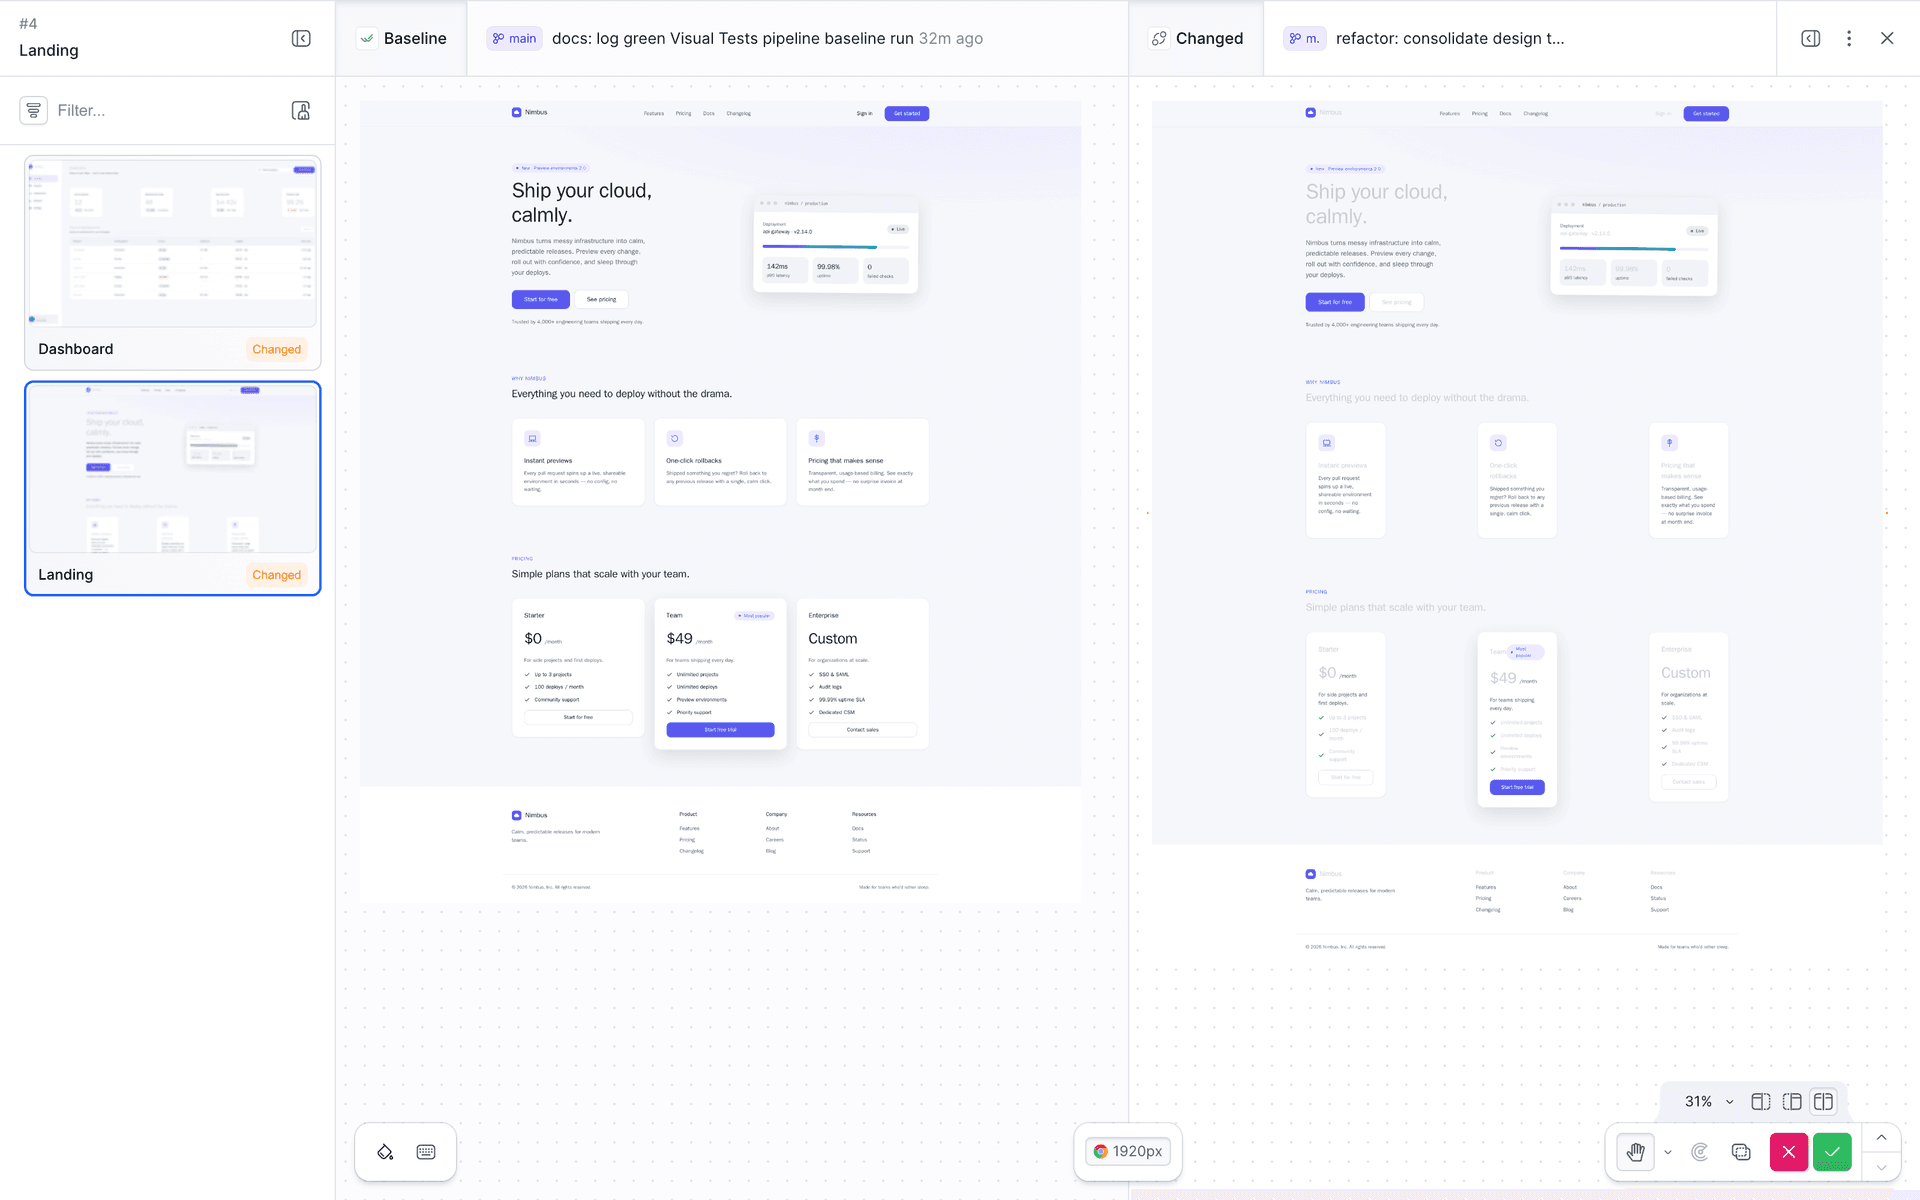
The real surprise appears in the second view, which nobody reported and which you might not have checked manually:
On the Dashboard, enable Show differences. Buddy dims unchanged areas and highlights differences in red:
Image loading...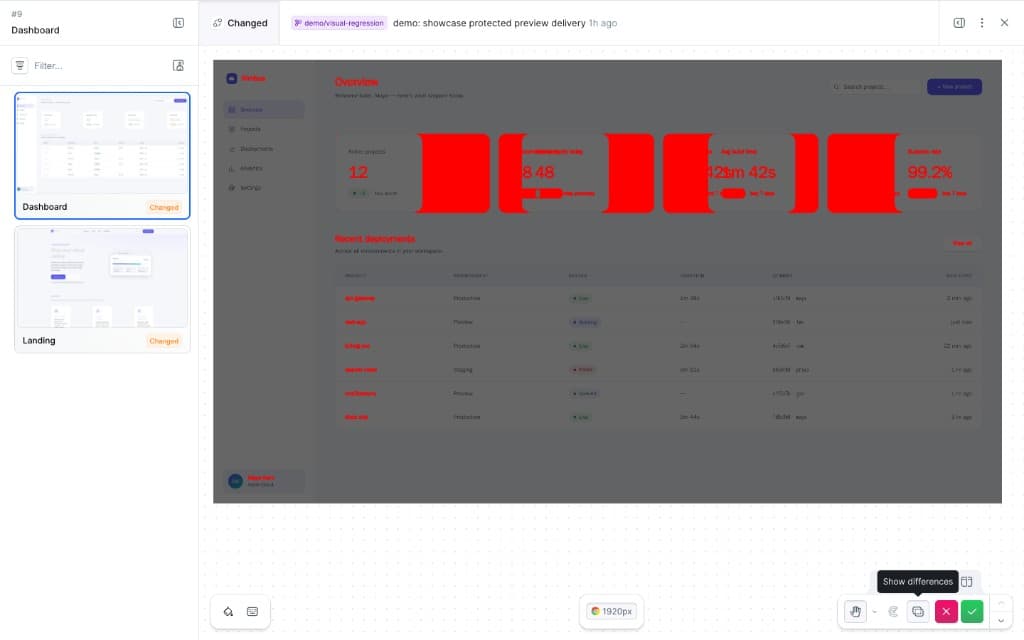
That is the key benefit: one design token change affected both views that share the same components. Their functional tests stayed green. Visual Tests caught both regressions, including the one you did not know about.
The final step is review. Reject an accidental regression, or approve an intentional change to make it the new baseline:
Image loading...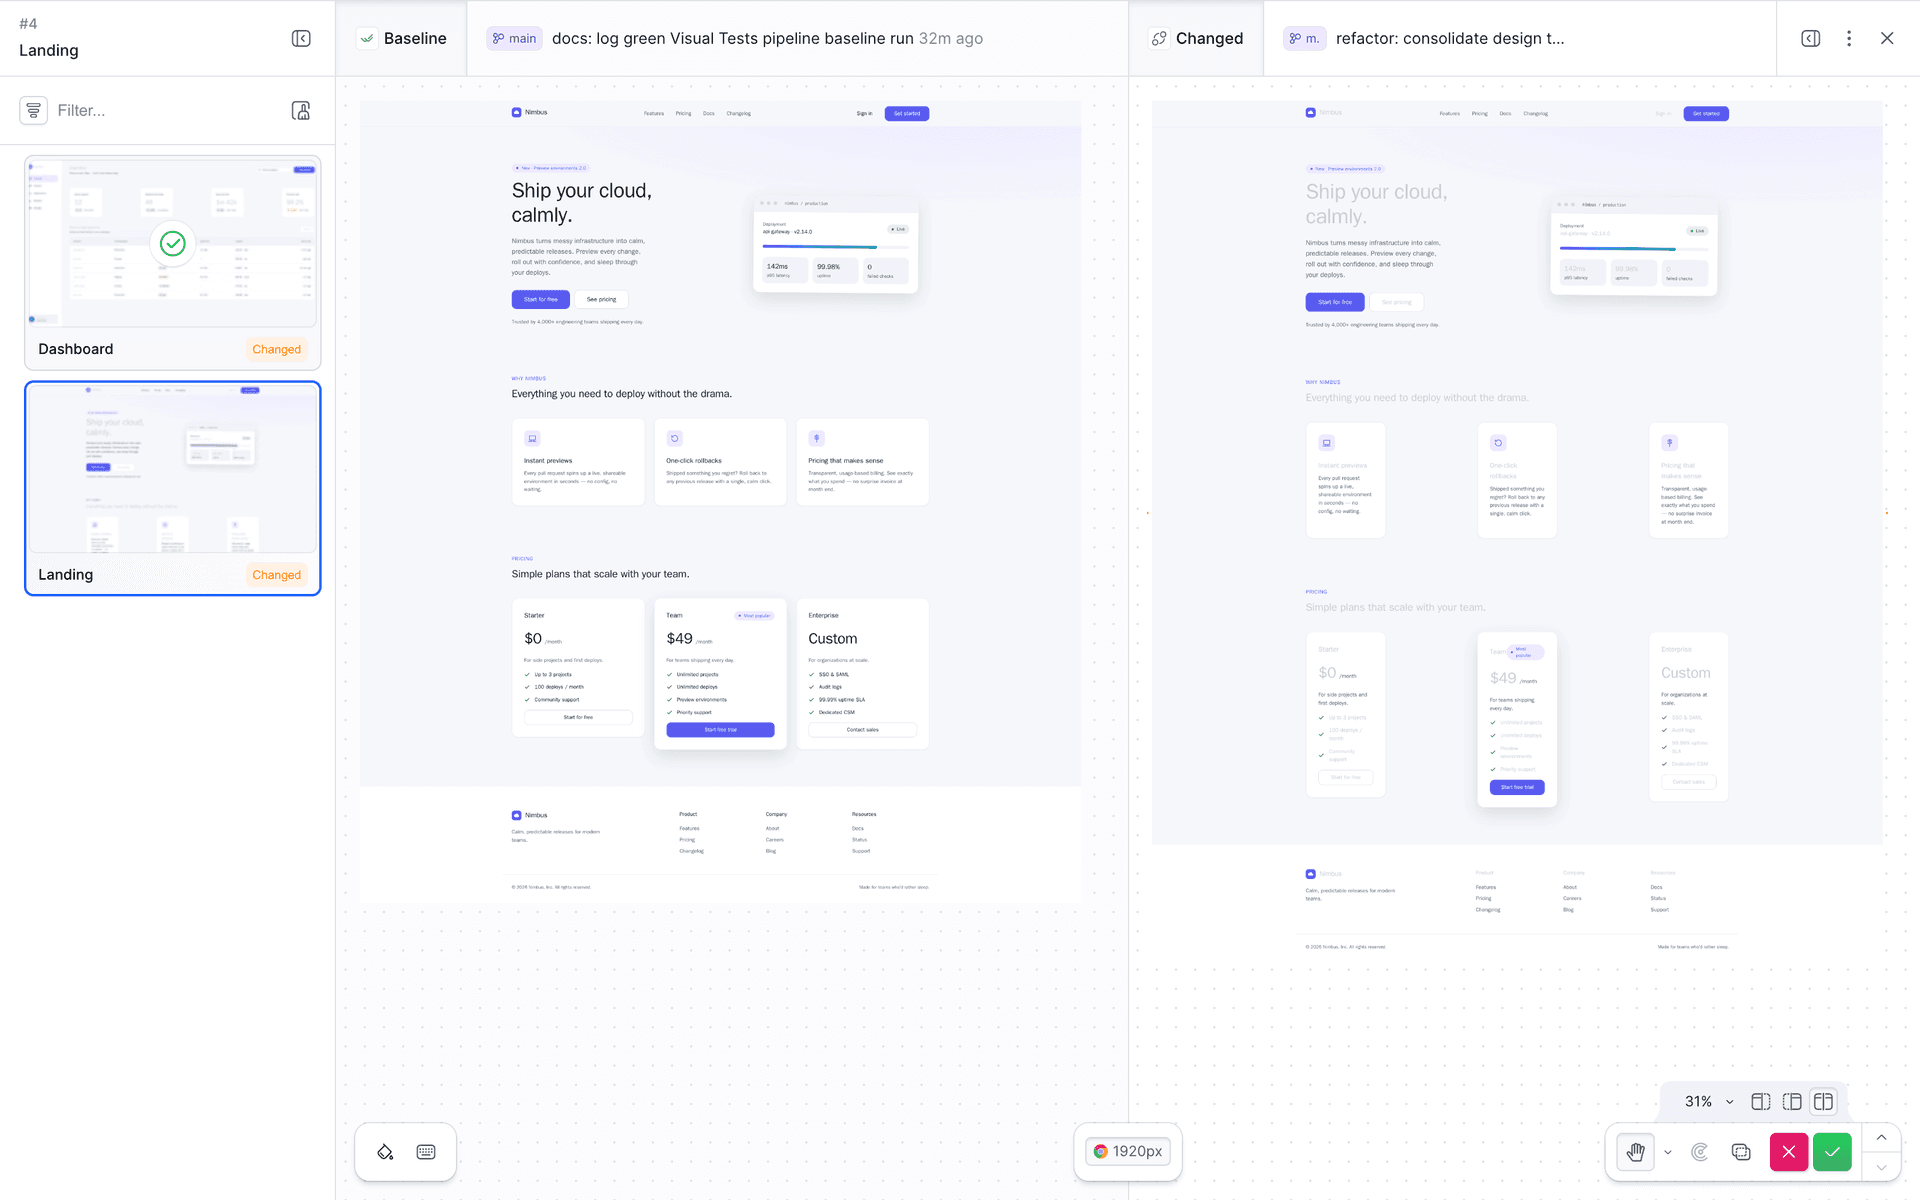
Add a branch quality gate
A manual check is easy to skip, so the next step is to enforce visual review in CI. A push to a feature branch starts a Visual Tests session, and a detected diff pauses the actions that follow it. In this example, an FTPS preview deployment and a Slack notification wait behind the gate.
Start with a Playwright action:
Image loading...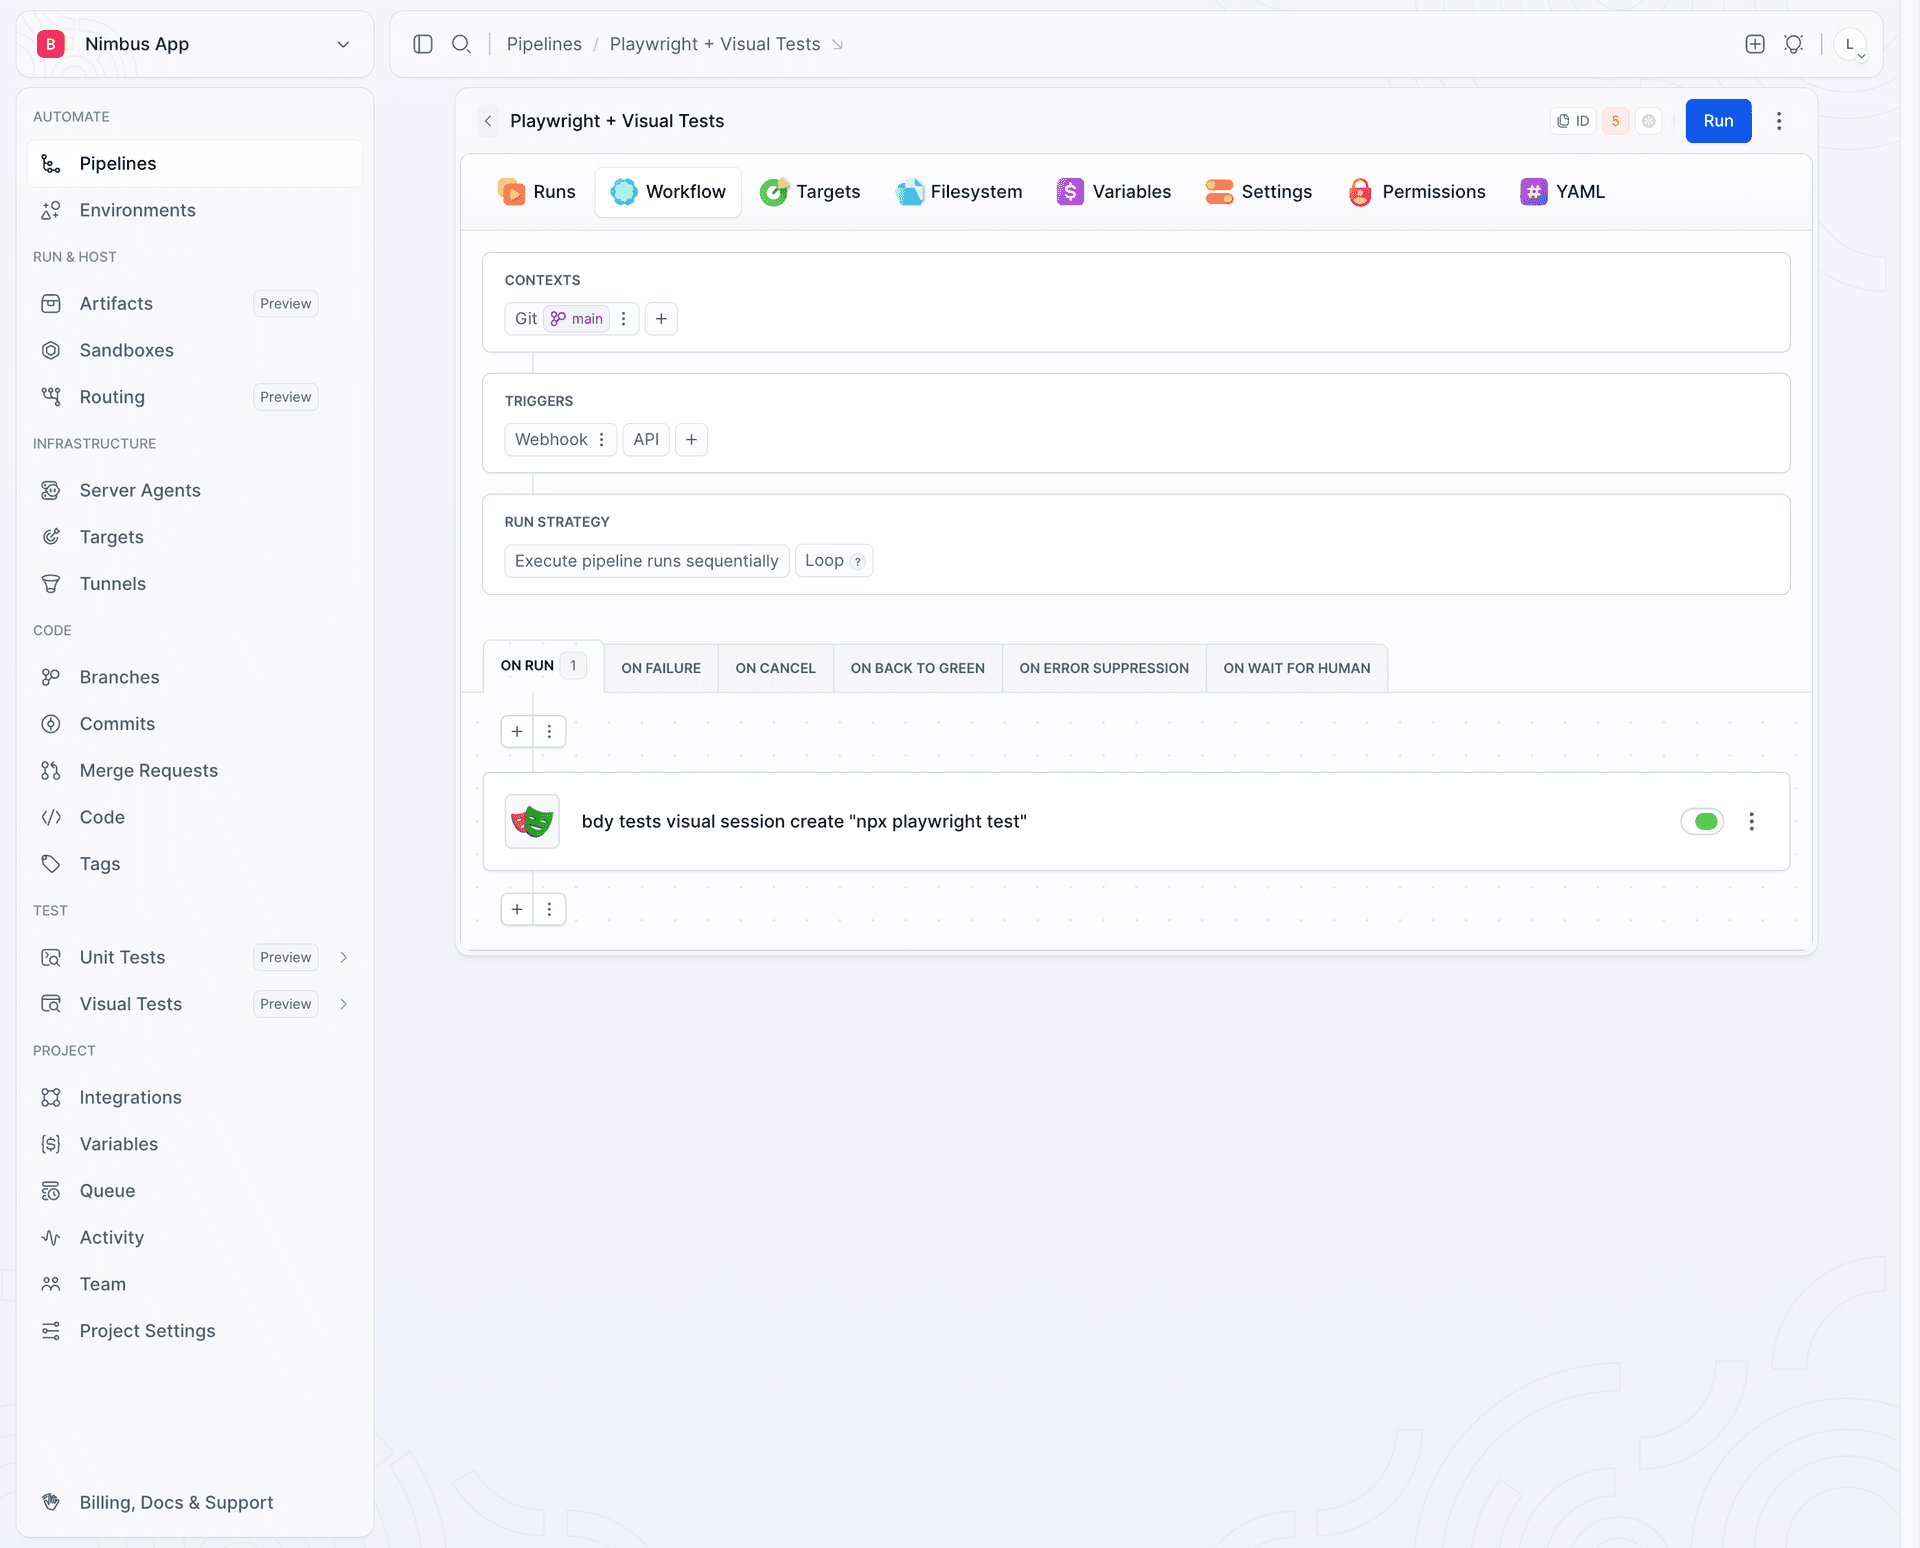
Click Configure Visual Tests to connect the action to your suite:
Image loading...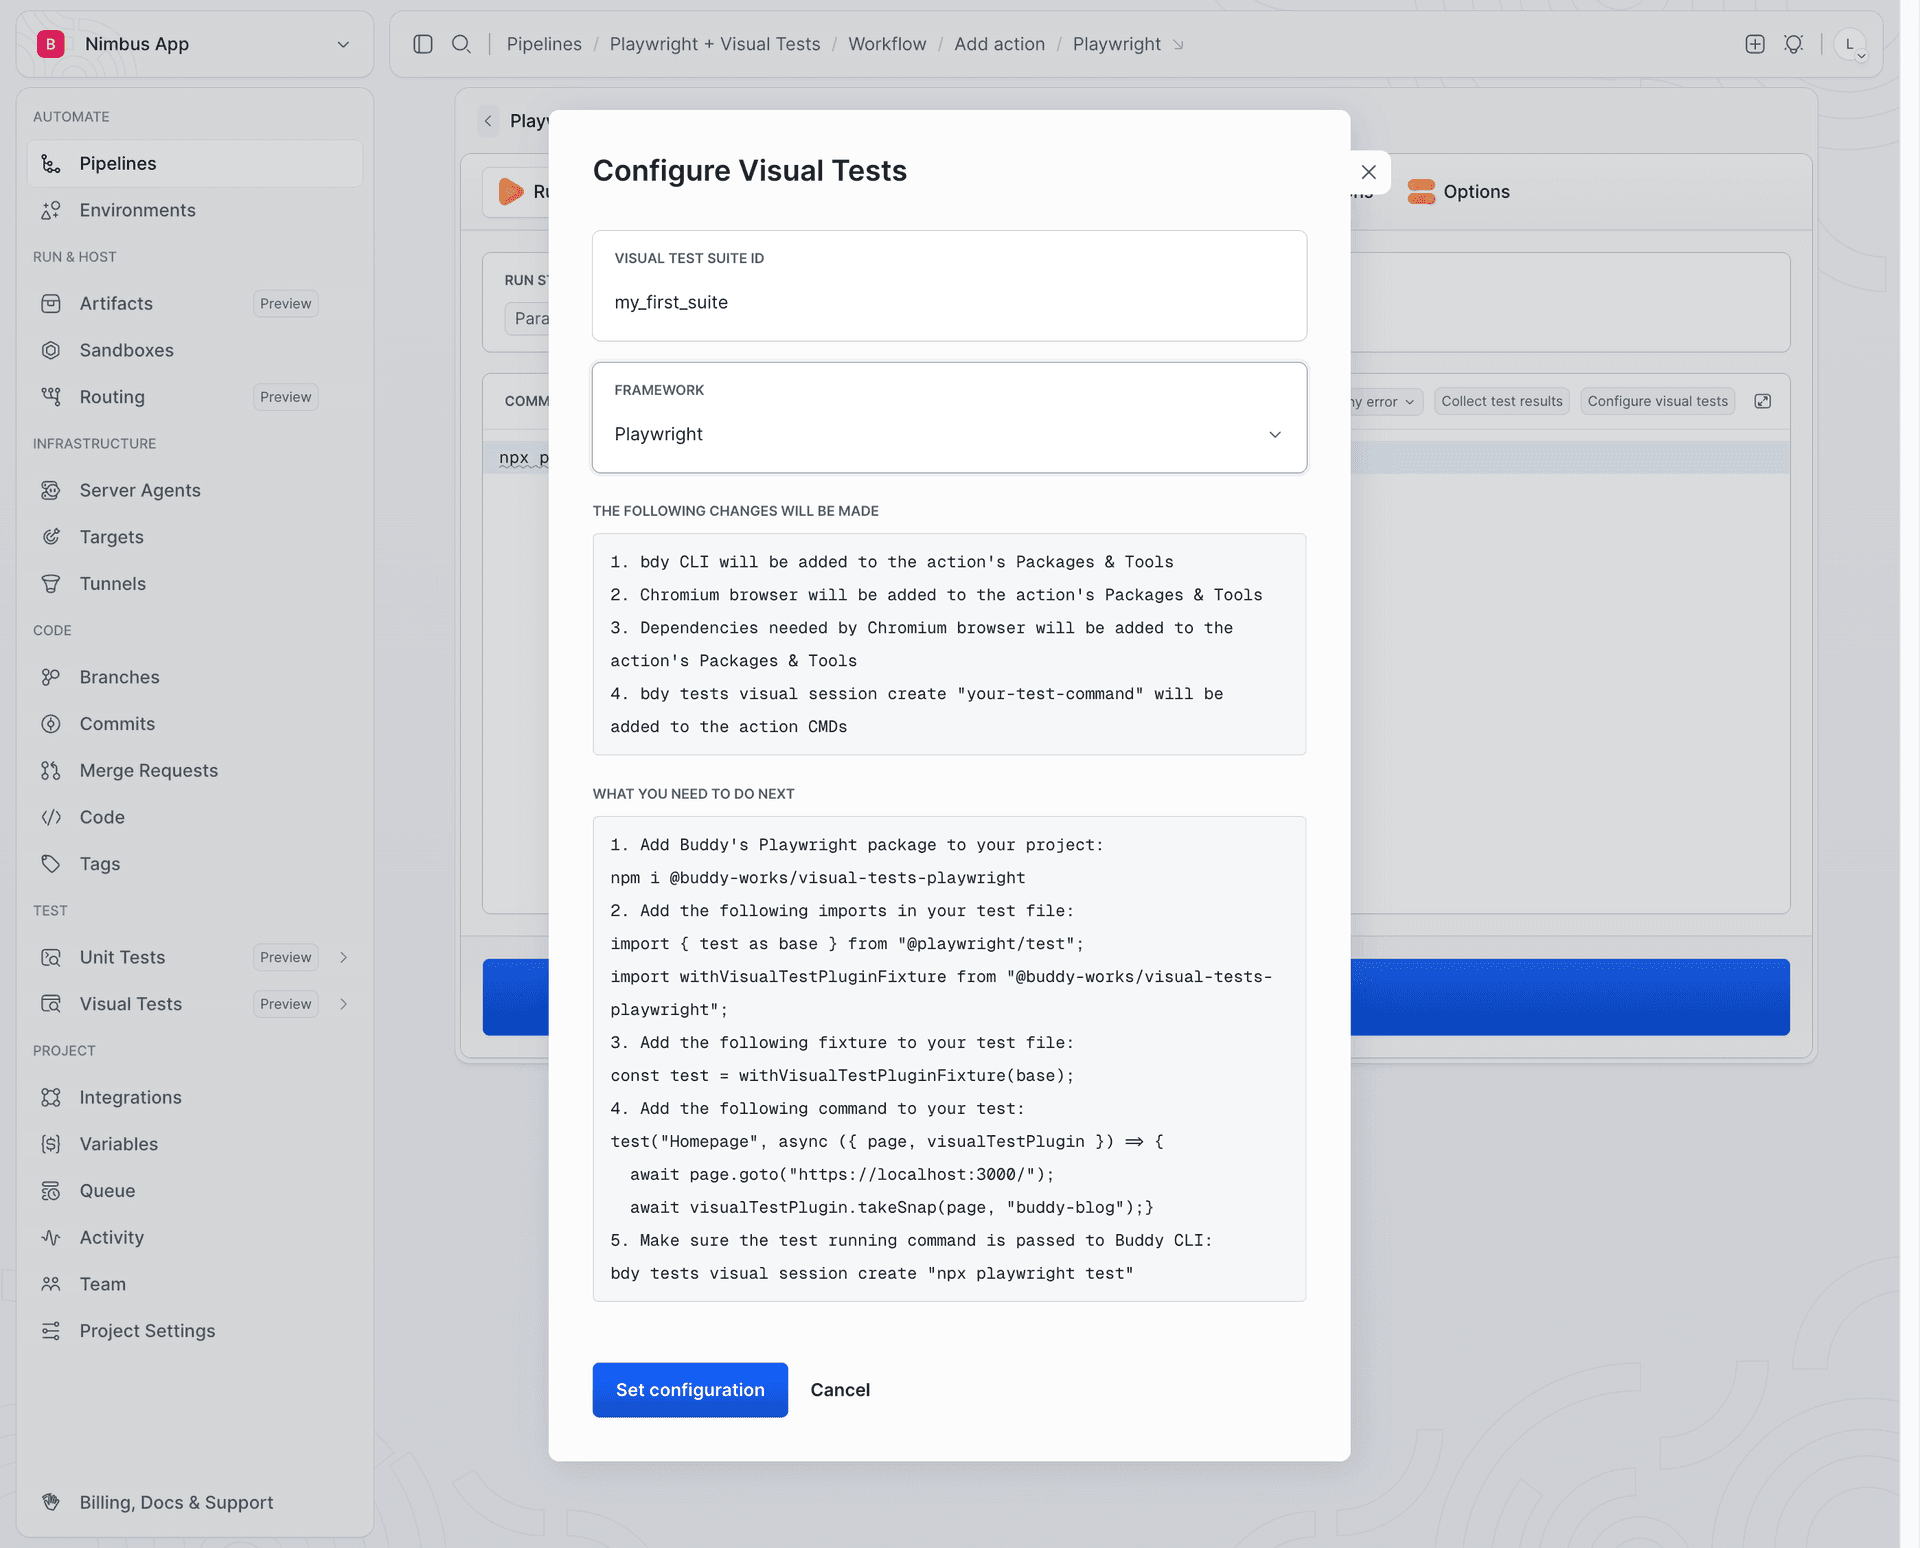
The resulting buddy.yml configuration looks like this:
yaml- pipeline: playwright---visual-tests
  events:
  - type: PUSH
    refs:
    - "refs/heads/*"
  actions:
  - action: Run Playwright + Visual Tests
    type: PLAYWRIGHT
    commands: |-
      npm ci
      npm run dev &
      # Add a health check that waits for the application to become ready.
      bdy tests visual session create "npx playwright test"
    visual_tests_suite: my_first_suite
  - action: Visual Test Session
    type: APPROVE_VT
  - action: Deploy preview via FTPS
    type: TRANSFER
  - action: Notify #releases on Slack
    type: SLACK
Image loading...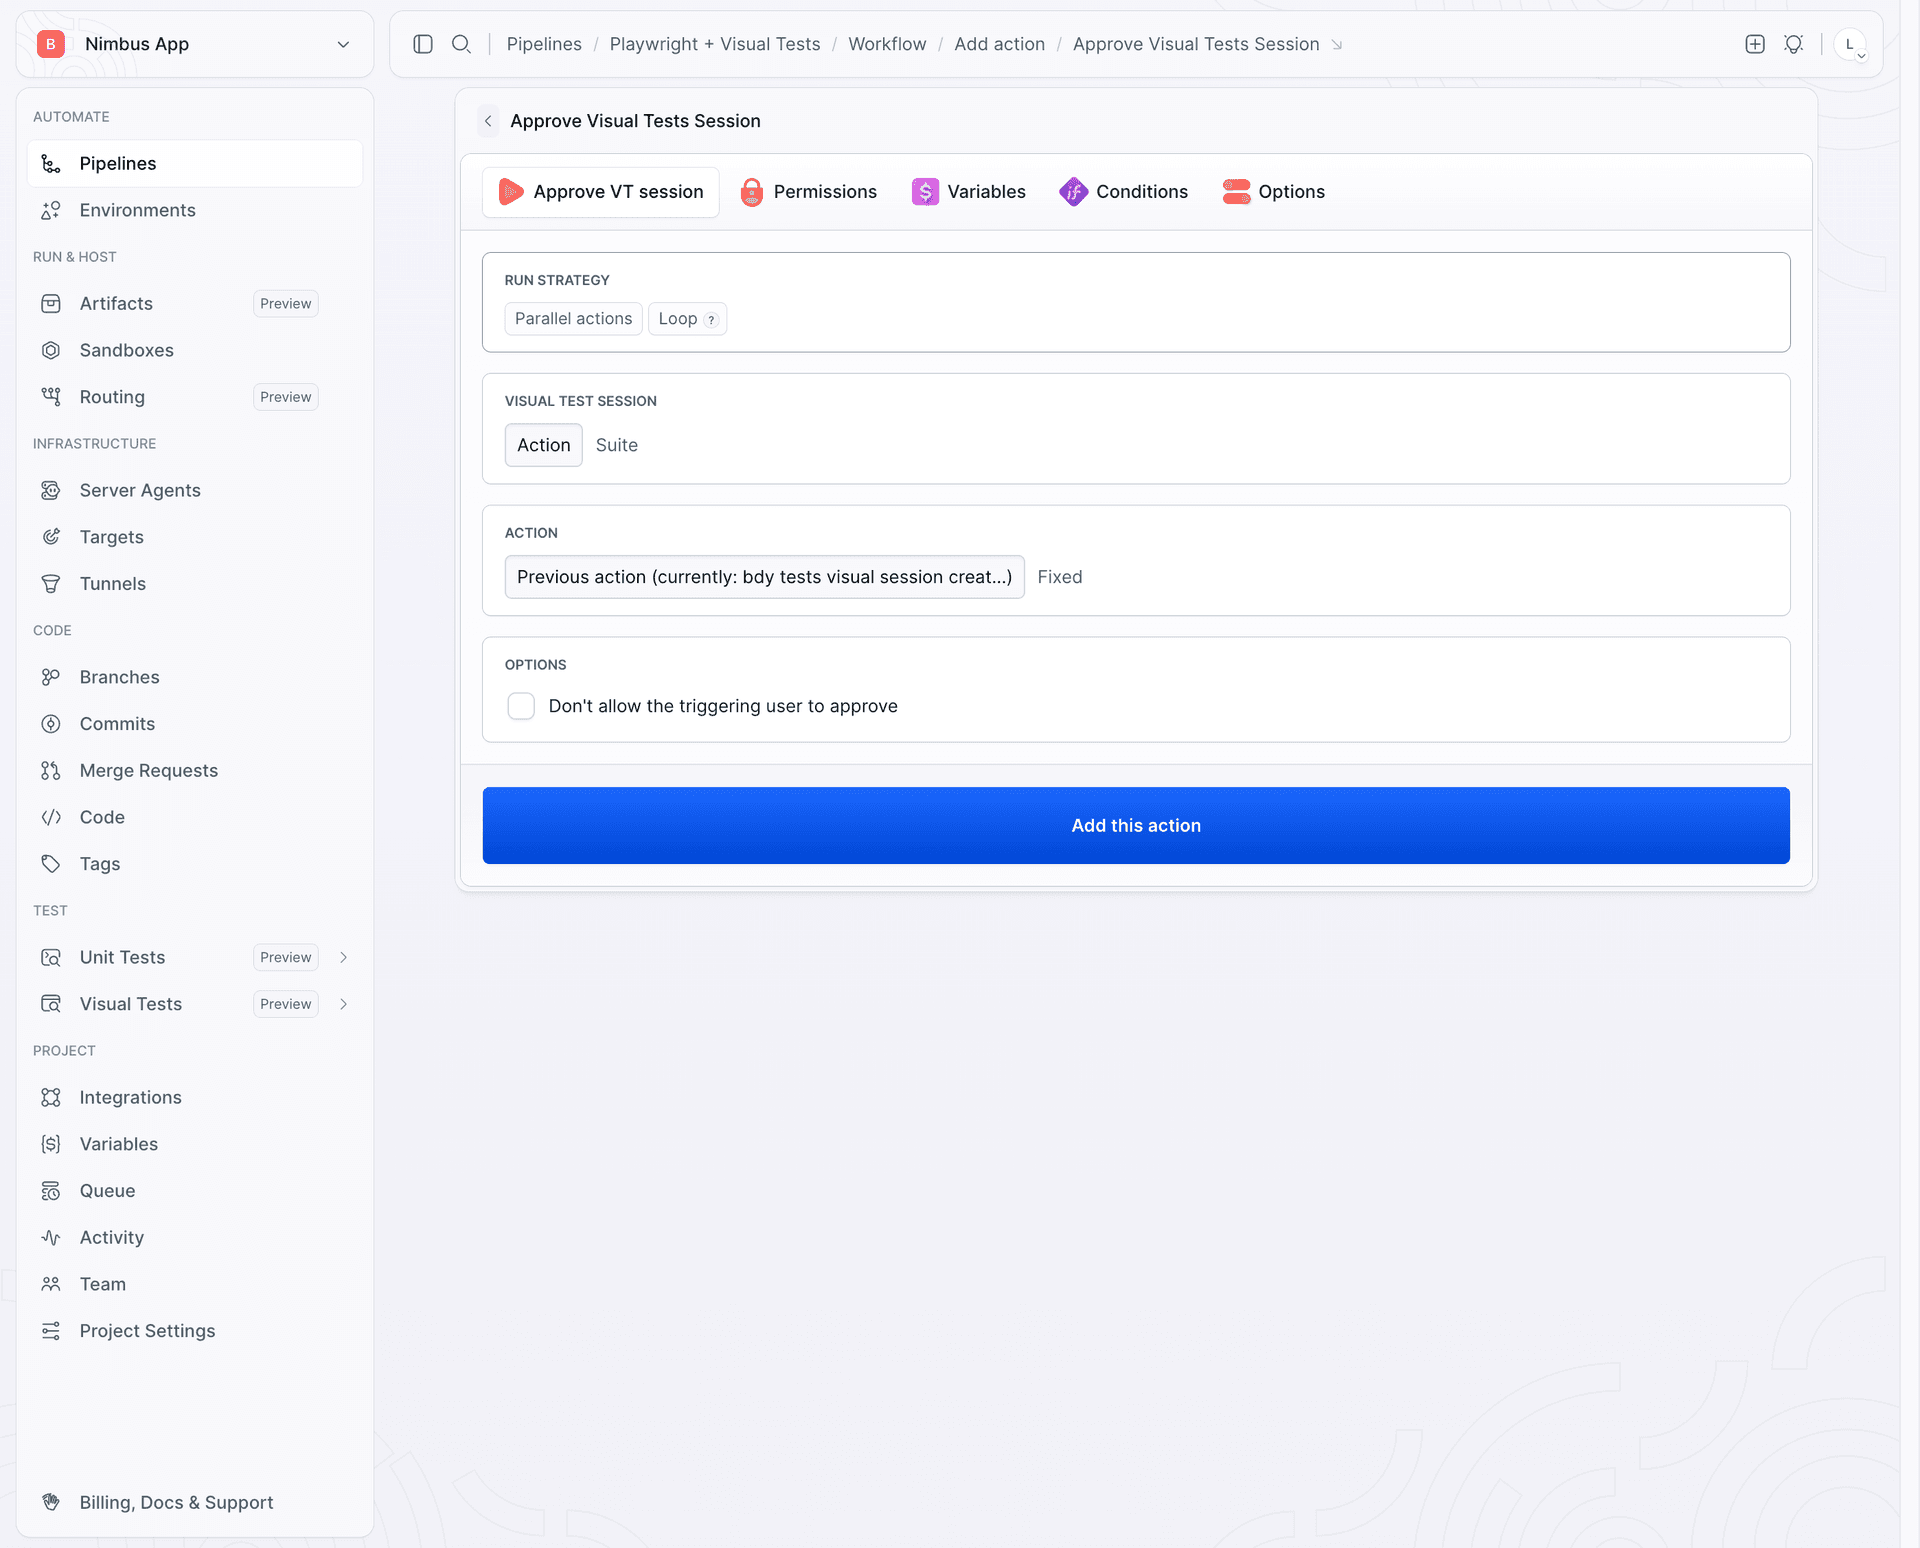
Image loading...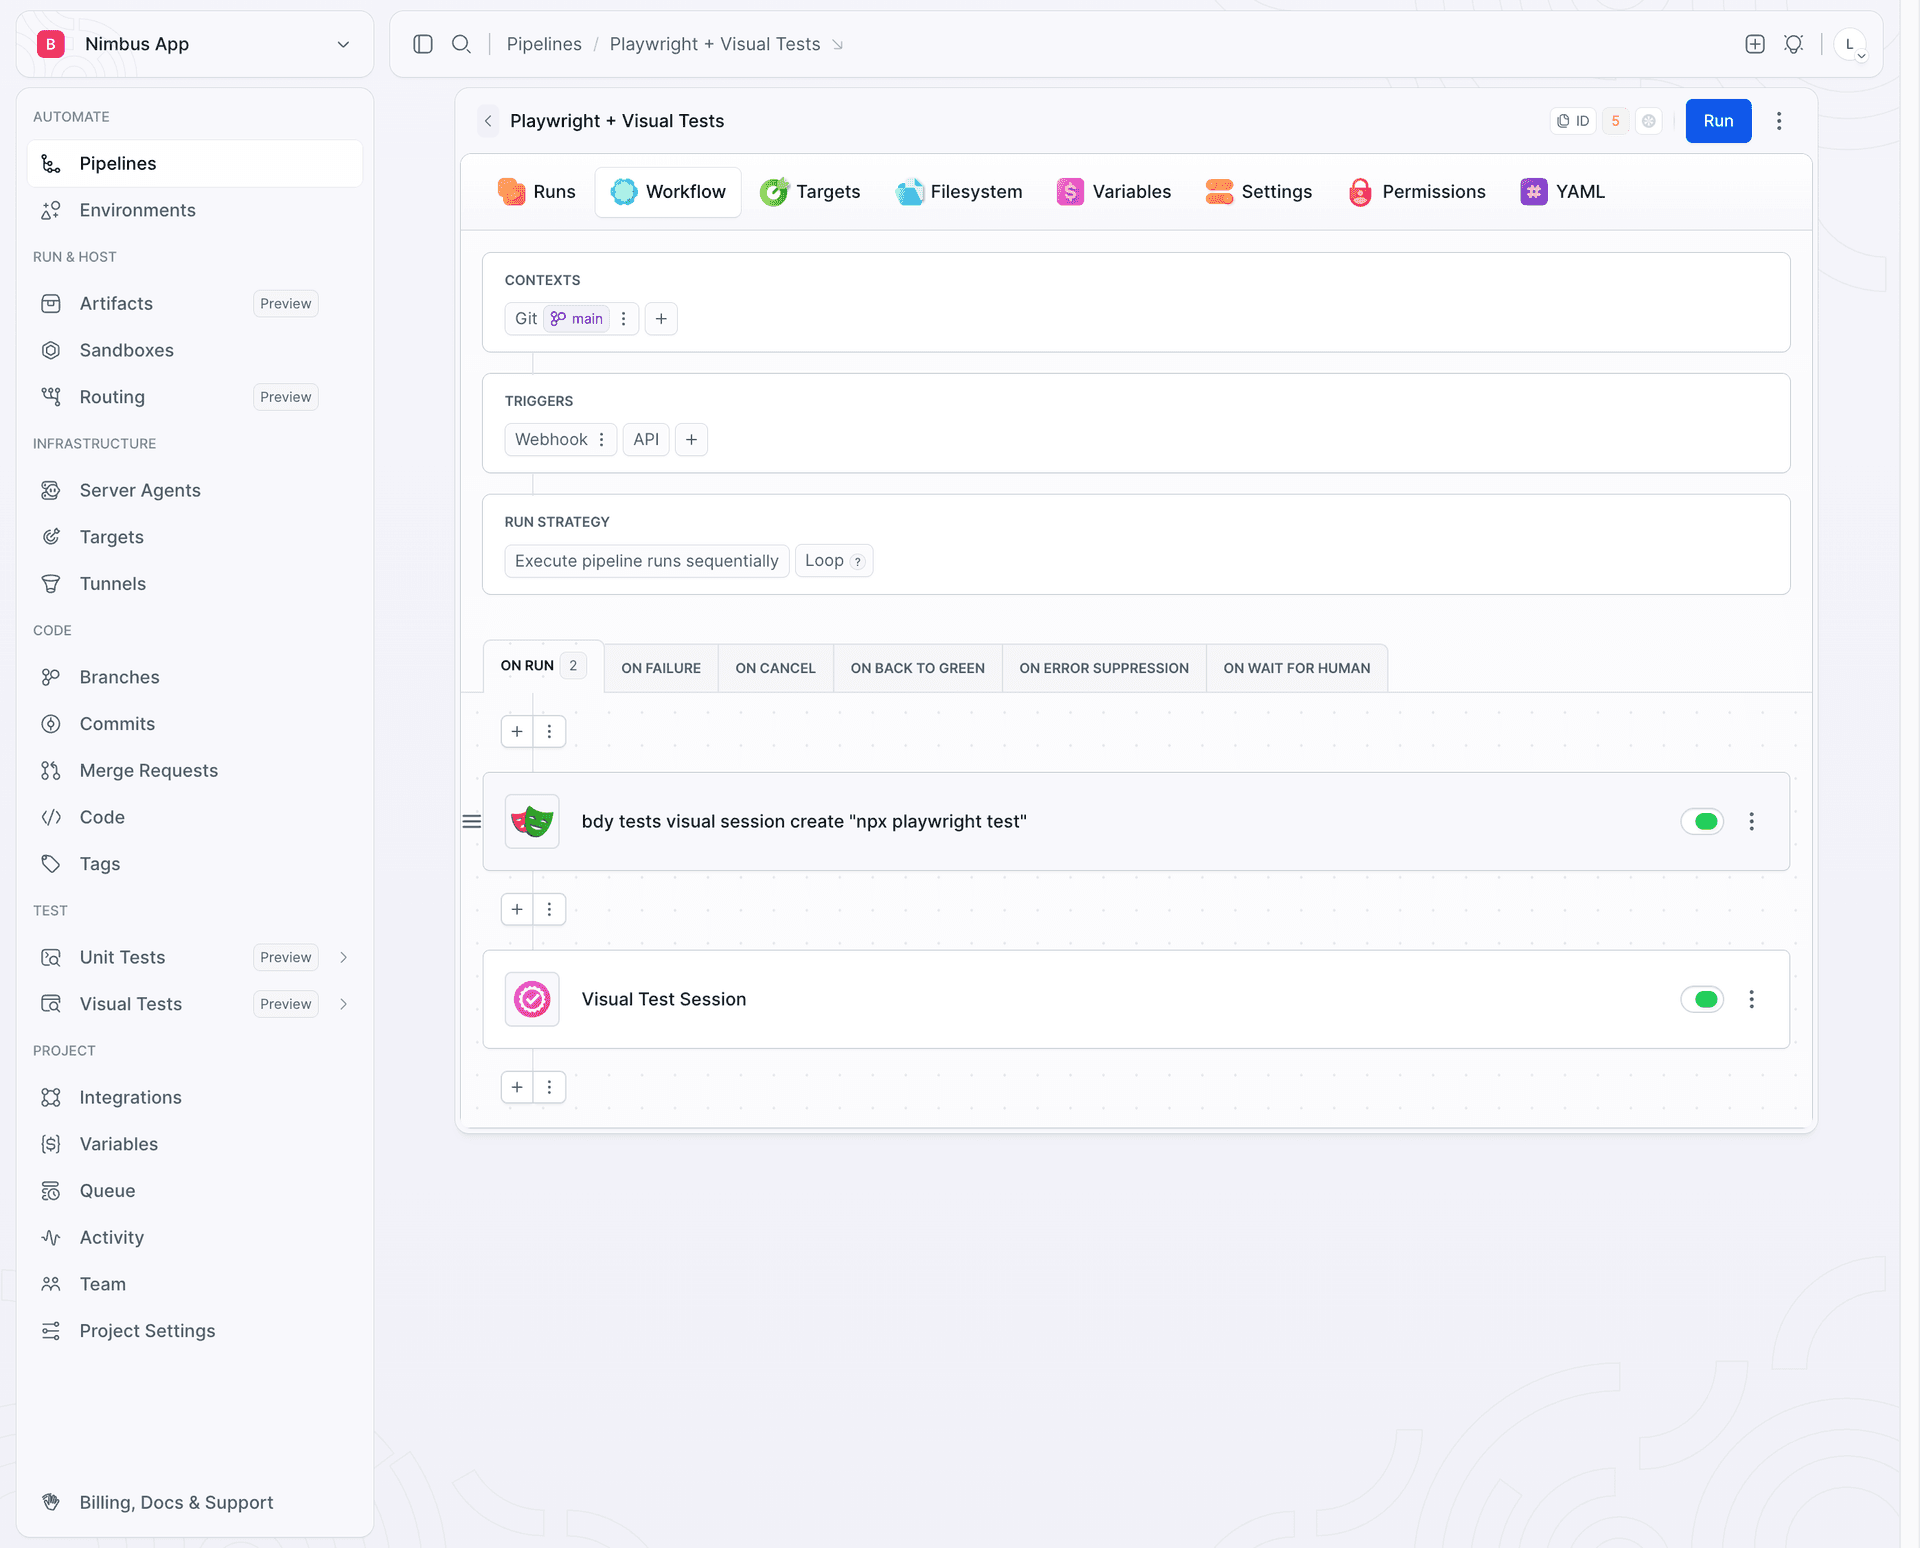
There are two important CI details to configure:
- Set
reuseExistingServer: truein Playwright. The development server must remain available after the tests while Buddy completes each snapshot, so the pipeline starts the server itself and waits for it with a health check. - Use
PUSH, notWEBHOOK, together withrefs: ["refs/heads/*"]to evaluate the diff on the branch before merge.
No visual changes: automatic approval
When the rendered result matches the baseline, Buddy automatically approves the unchanged snapshots without human input:
Image loading...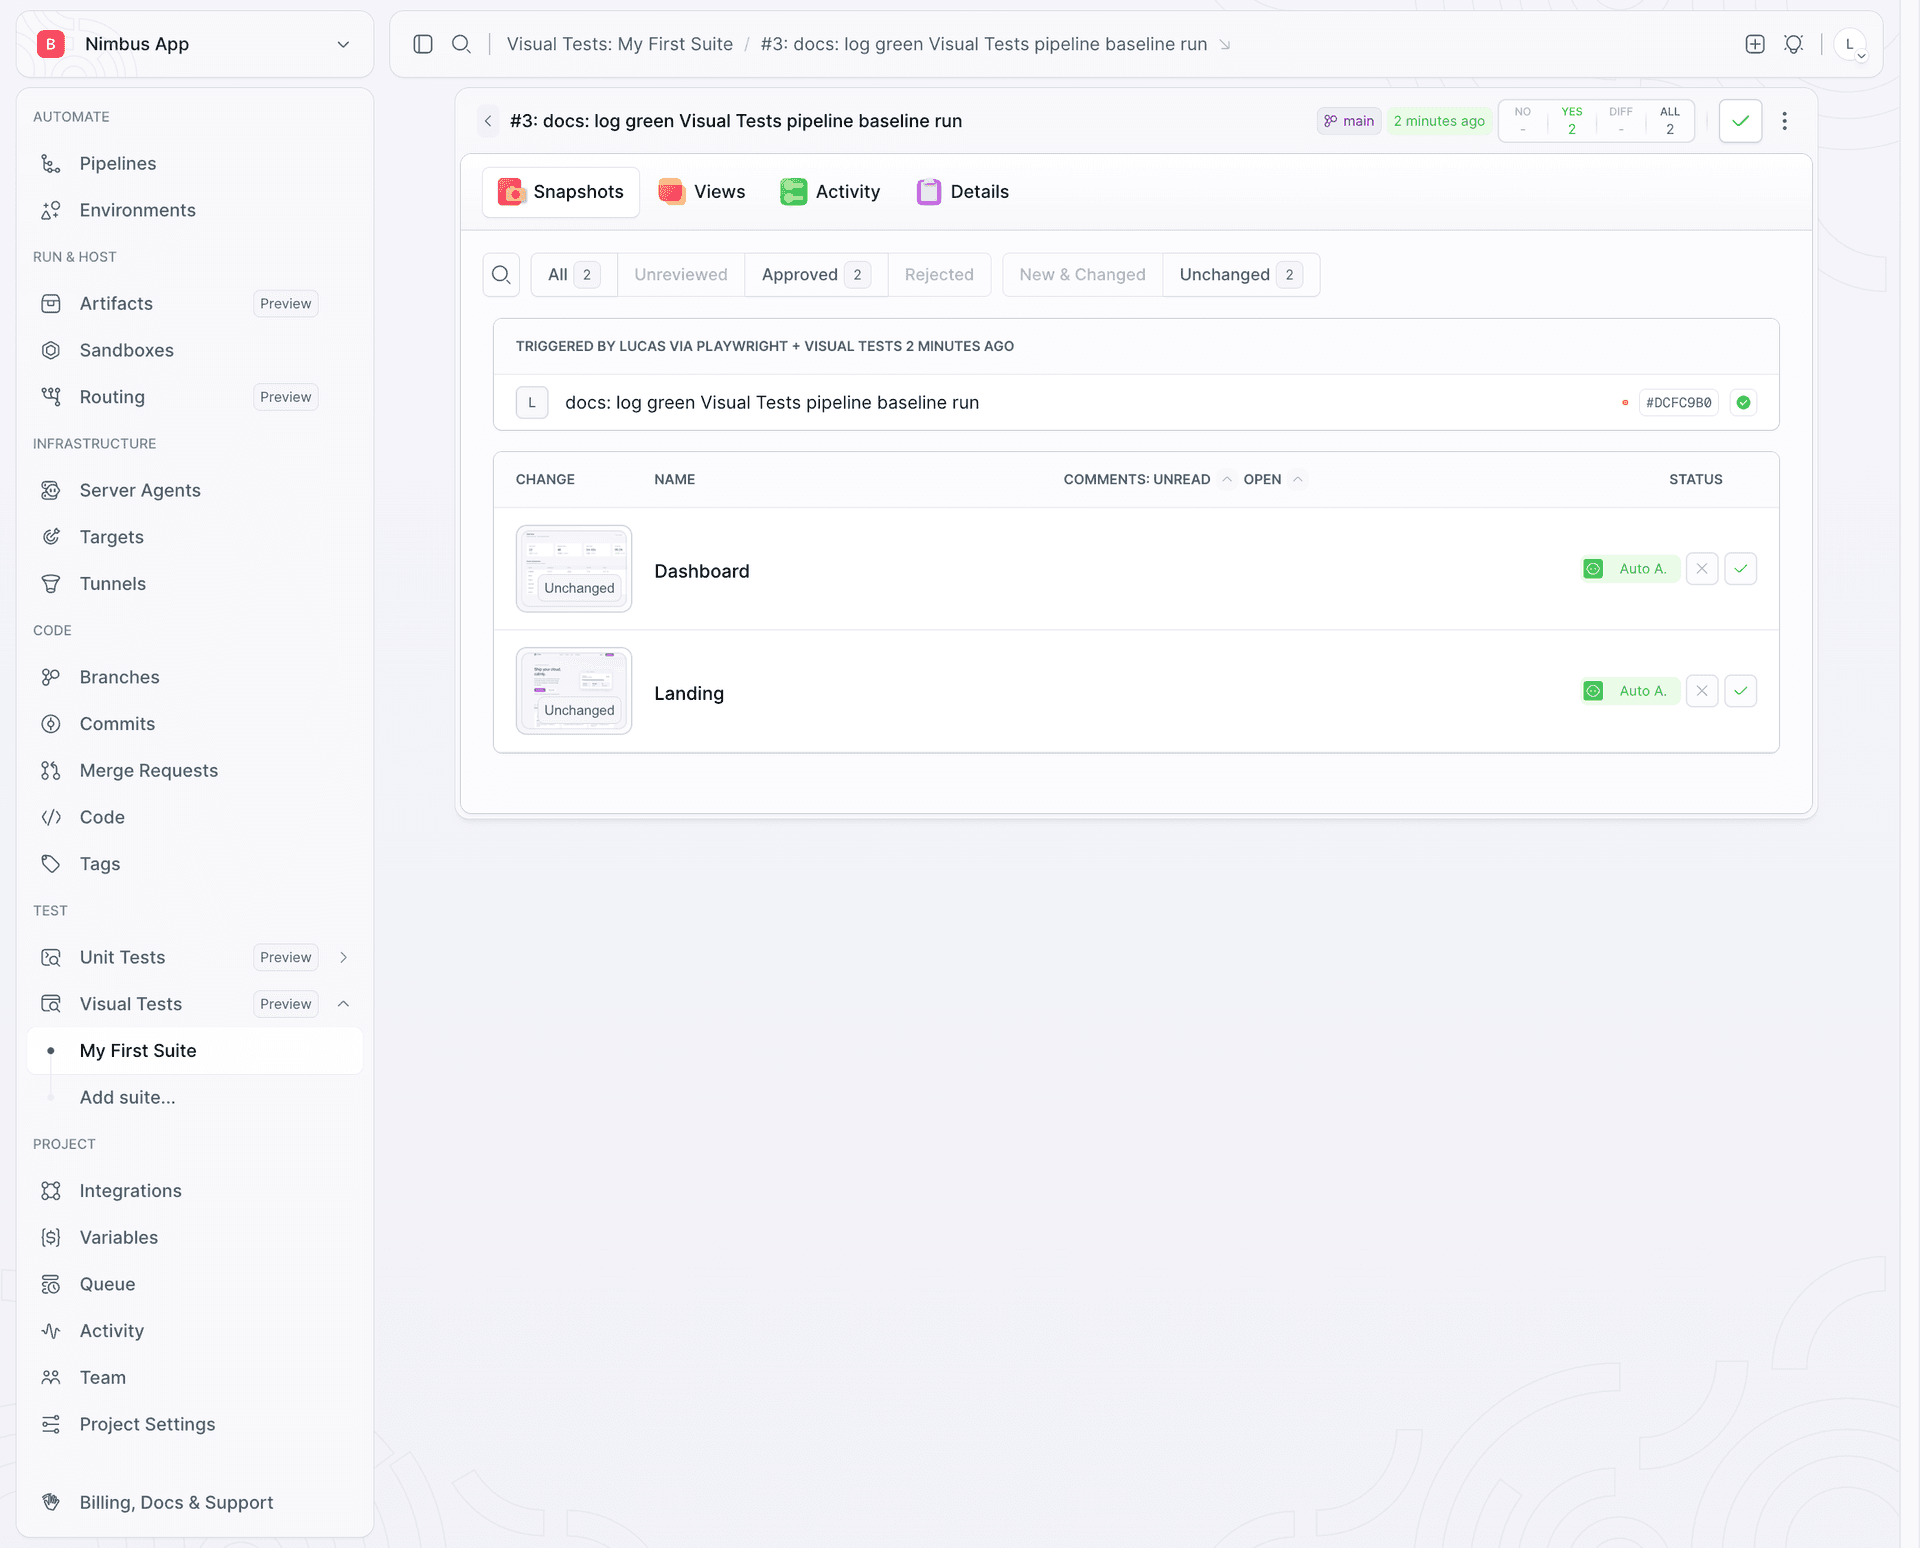
Image loading...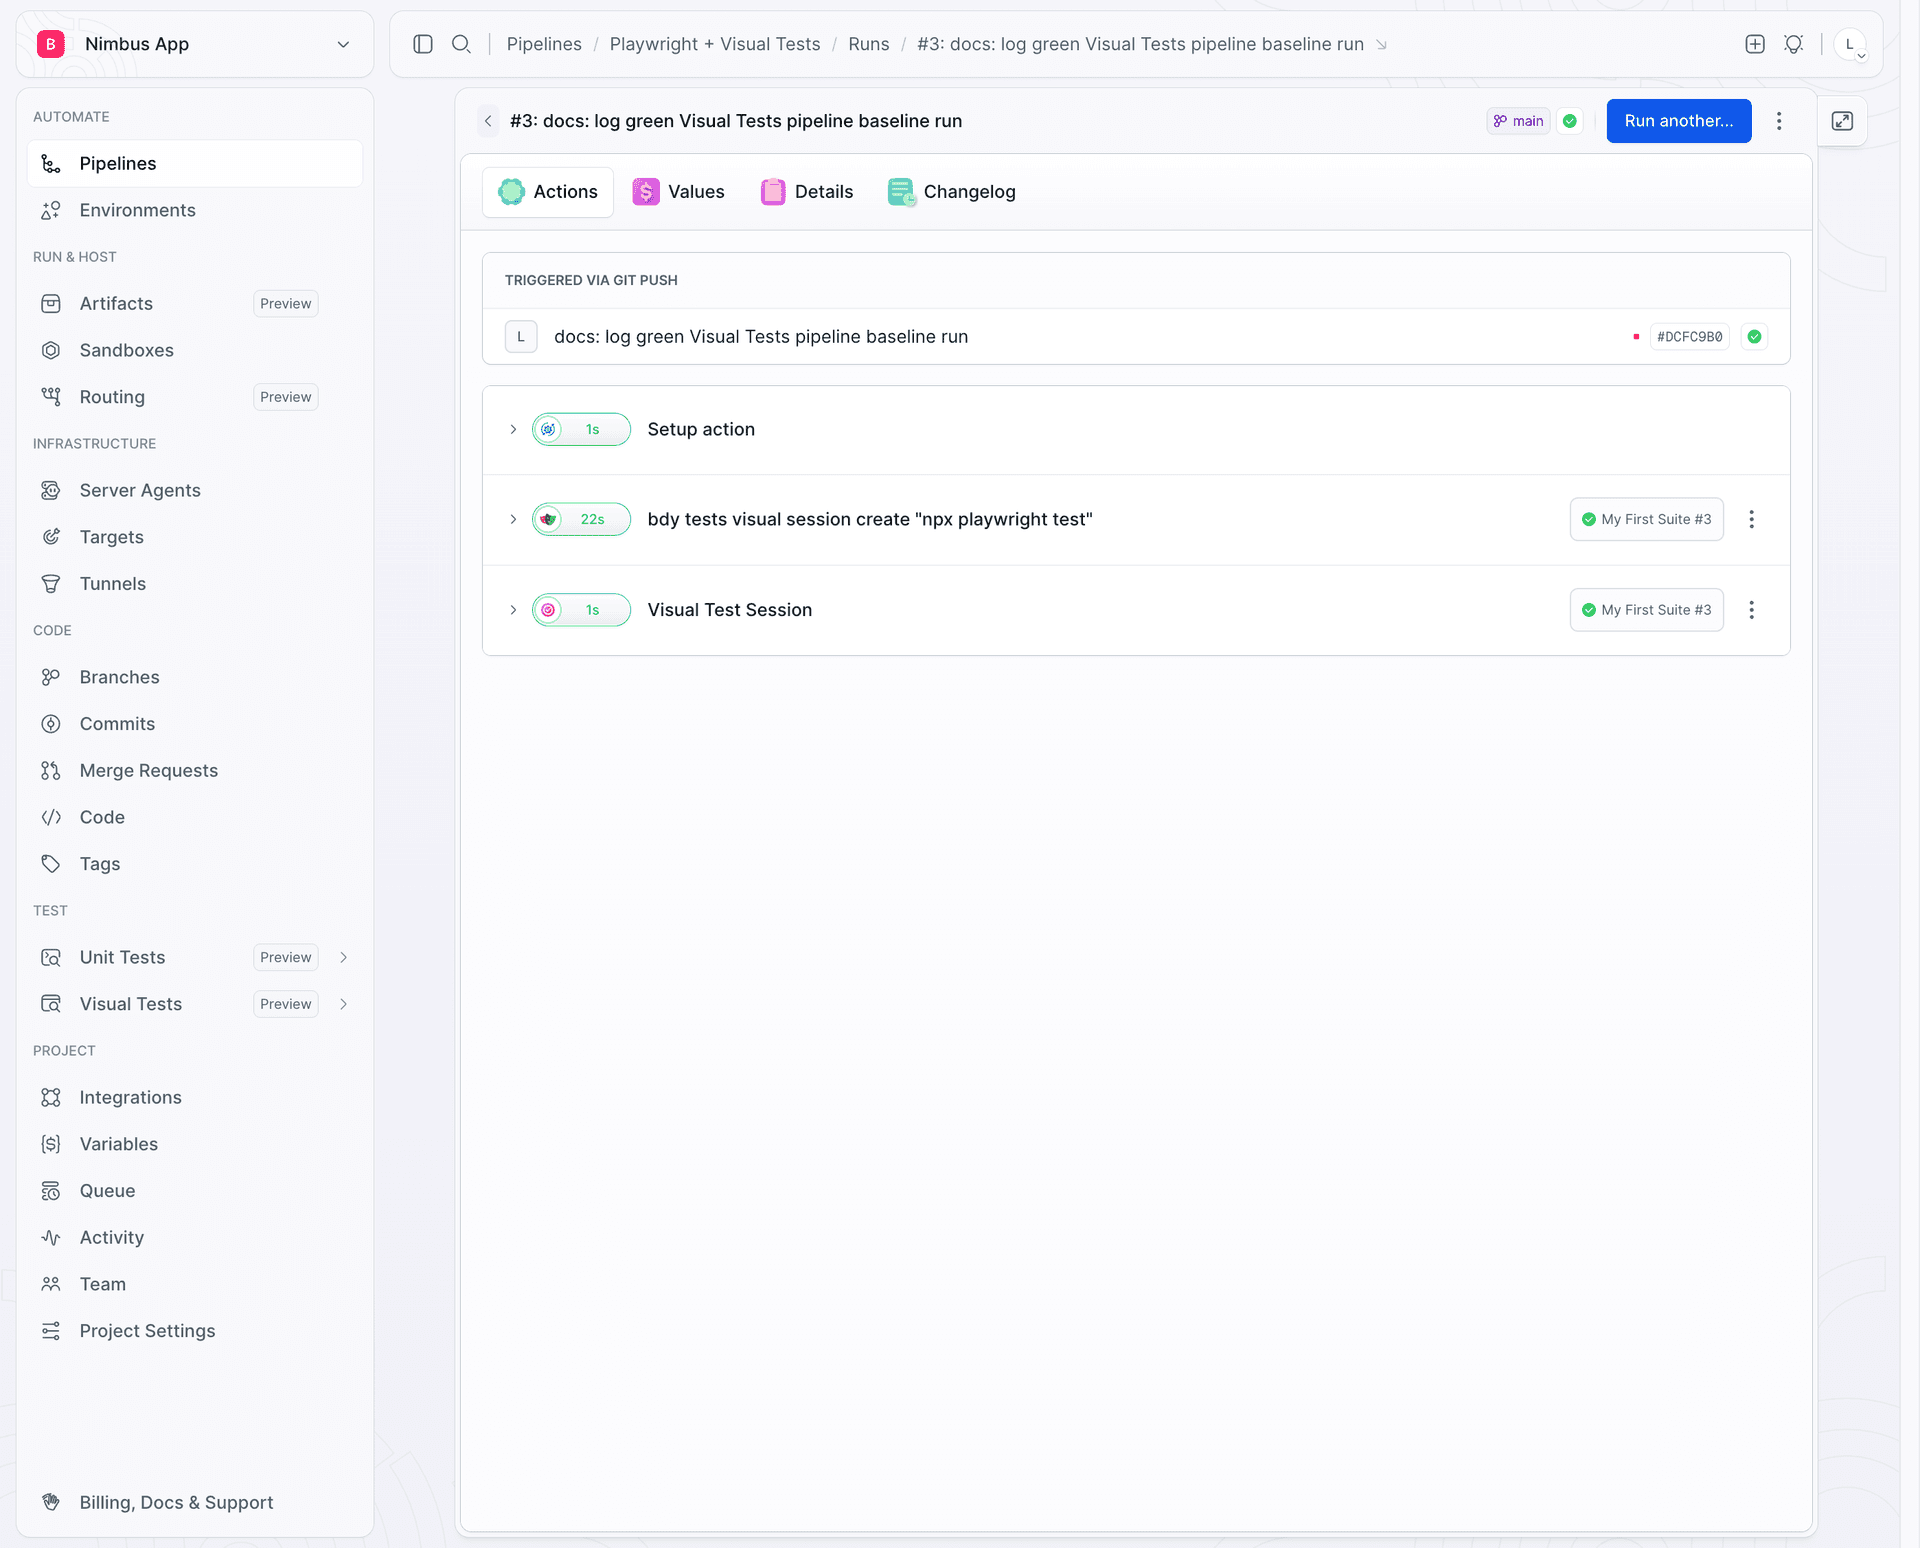
Visual regression: pause the pipeline
After the design token refactor is pushed to a feature branch, the functional tests still pass, but the pipeline stops at the quality gate:
Image loading...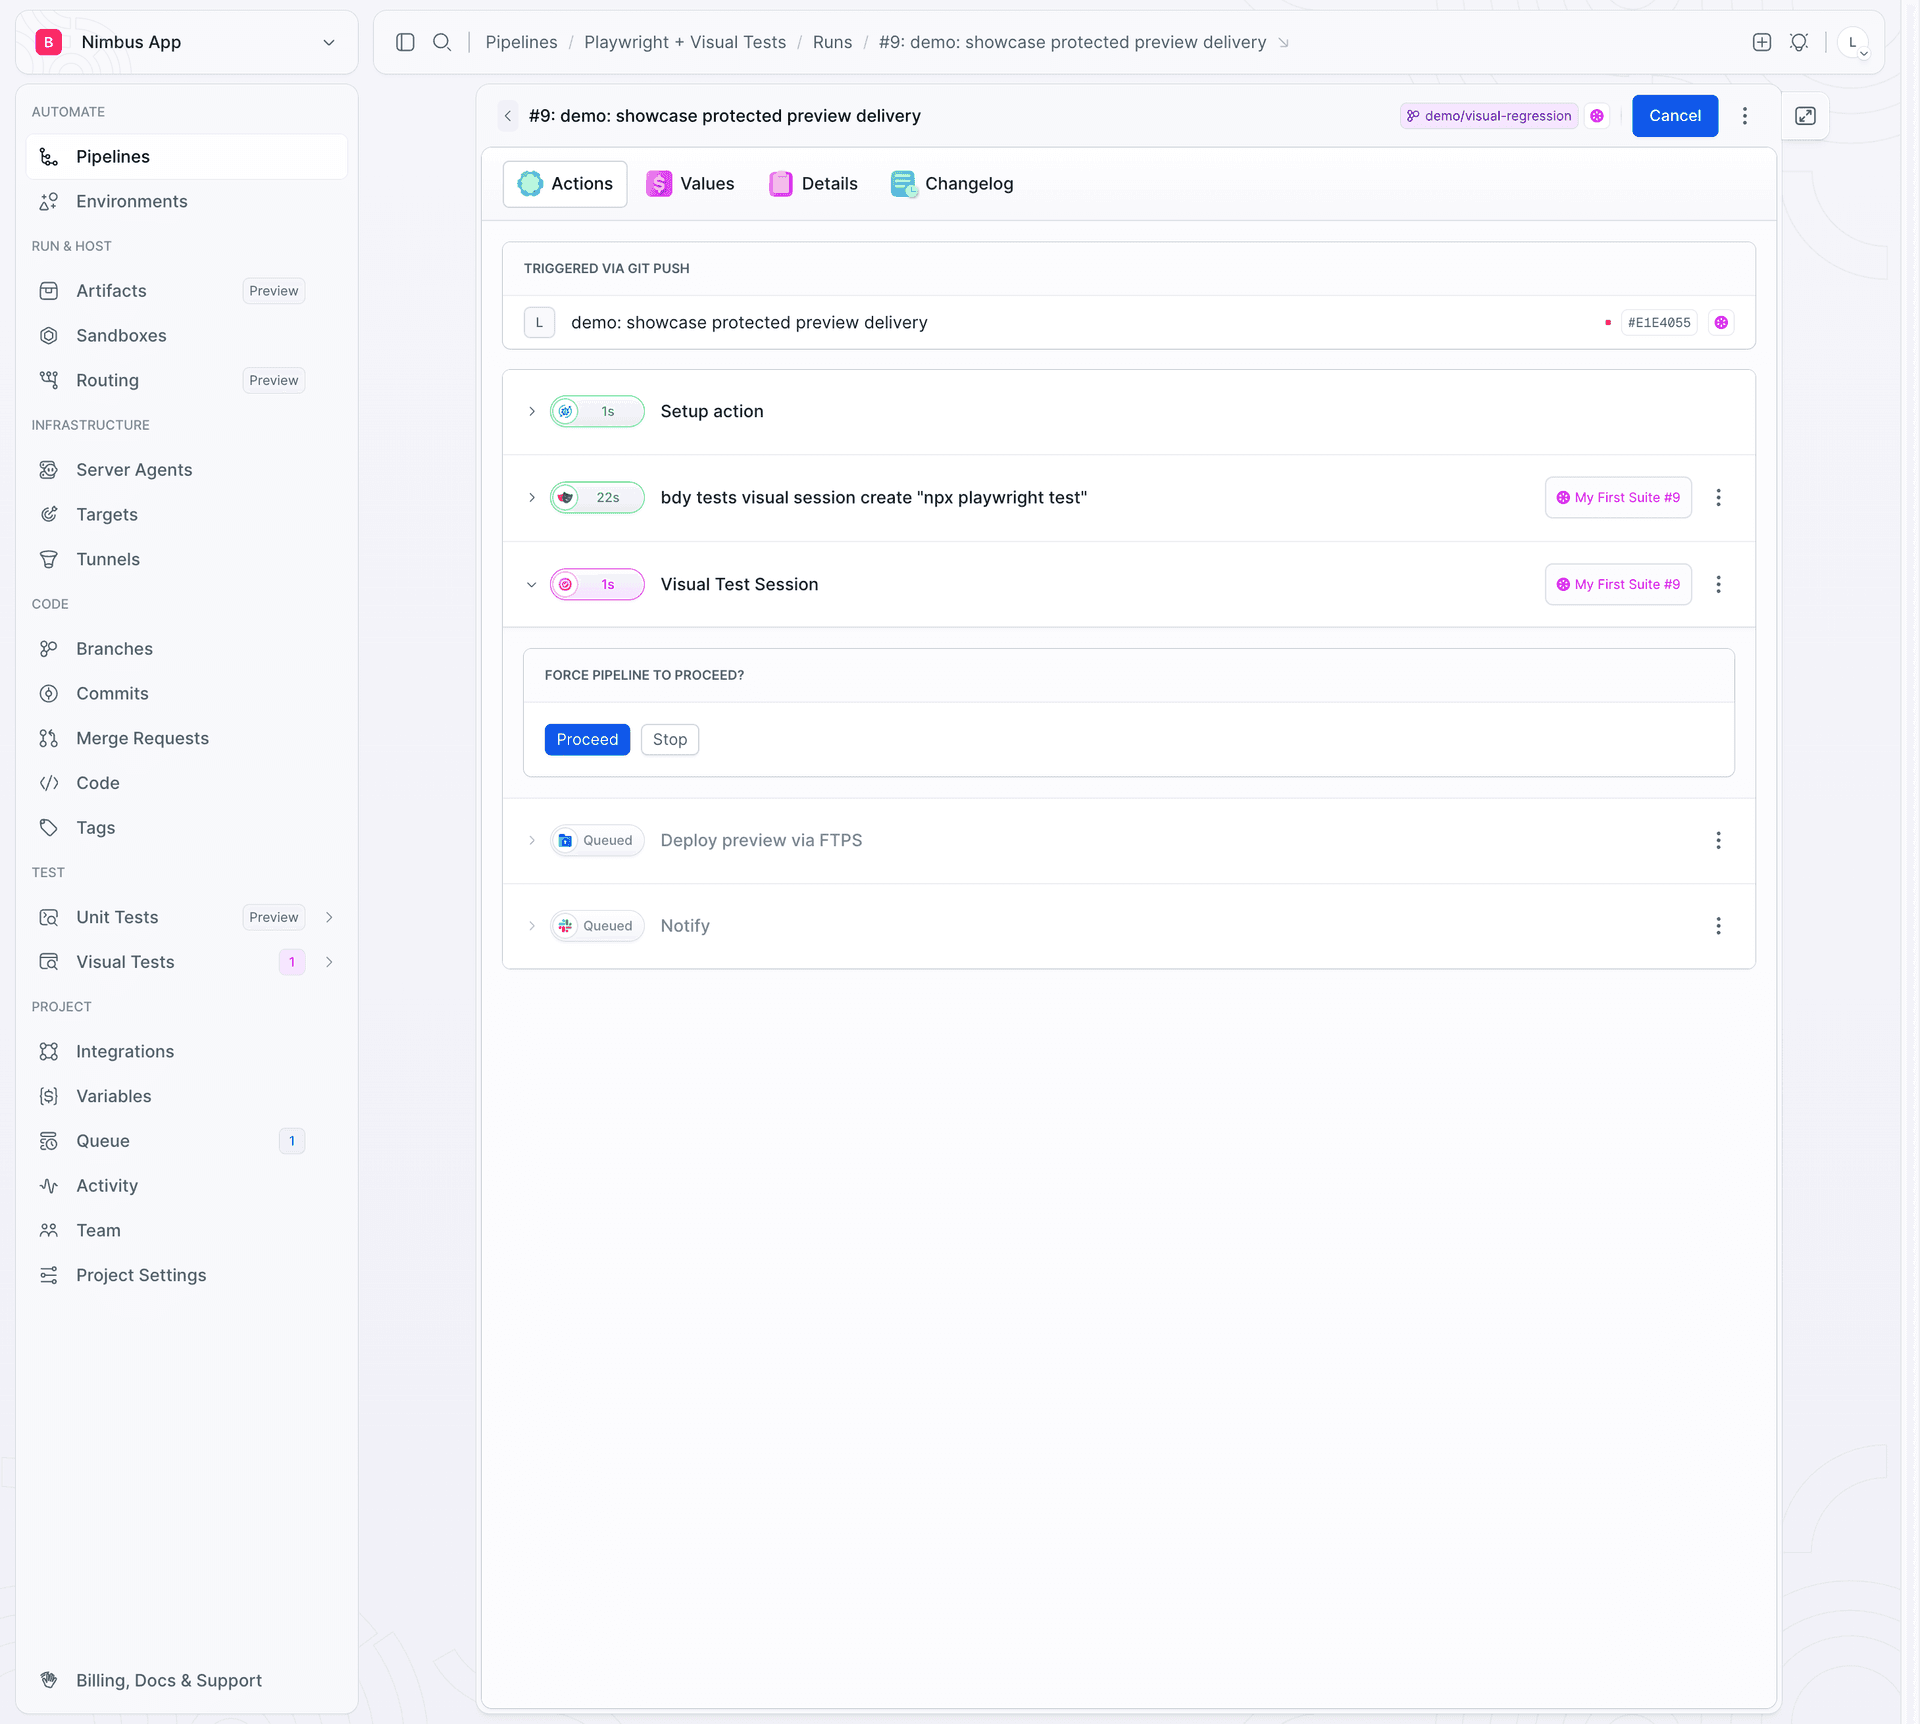
Open the diffs and decide whether the change is accidental or intentional. For an accidental regression, reject it and fix the branch. For an intentional change, approve it to update the baseline.
In this case, reject the change. Delivery never starts, and the regression never
reaches main.
Other ways to send snapshots to Visual Tests
Reusing Playwright tests is one of three ways to populate a Visual Tests suite. It is a good fit when your existing tests already contain the required navigation.
| Method | Best when | Setup cost |
|---|---|---|
| Test runner | You already use Playwright or Cypress | One-time fixture and one checkpoint per view, all on localhost |
URL crawl (bdy tests capture) | You want to avoid test code changes | No test code, but the application needs a public URL, such as a Buddy Sandbox |
Storybook (bdy tests visual upload) | You use Storybook | Tests isolated components story by story |
Summary
- Functional tests are intentionally blind to appearance. They verify content and behavior, not the rendered pixels, so a passing suite can hide a broken UI.
- Visual Tests extends the same test suite with a one-time fixture and one
visualTestPlugin.takeSnap(...)checkpoint per view. - You reuse navigation that already exists. Any state reached by an existing test can become a visual checkpoint.
- Visual Tests can find regressions you did not know about, such as a shared token change affecting multiple views.
- The
APPROVE_VTquality gate pauses a branch pipeline until a person approves or rejects a visual change. Place delivery actions after this gate. - No hosting is required for the test runner workflow. The application can stay
on
localhost. Buddy handles rendering and comparison.

Jarek Dylewski
Customer Support
A journalist and an SEO specialist trying to find himself in the unforgiving world of coders. Gamer, a non-fiction literature fan and obsessive carnivore. Jarek uses his talents to convert the programming lingo into a cohesive and approachable narration.