bdy Agent CLI
bdy Agent CLI is an advanced command-line tool for managing network tunnels, allowing secure forwarding of TCP, TLS, and HTTP traffic from a local network to the internet. The agent can run as a system service and supports various tunnel types with rich configuration options.
Basic bdy agent commands
The main bdy agent command is used to manage the Buddy Agent service on Windows, macOS, and Linux systems.
bashbdy agent$
| Commands | Description |
|---|---|
| install [options] | Install bdy as operating system service on Windows, OS X and Linux systems |
| enable | Enable agent and all tunnels |
| disable | Disable agent and all tunnels |
| start | Starts agent and all tunnels from configuration file |
| stop | Stops agent and all tunnels |
| restart | Restarts agent and all tunnels |
| uninstall | Uninstall bdy service |
| status | Show the status of Buddy agent |
| tunnel | Manage agent's tunnels |
| target | Manage agent's target availability |
| update | Install a new version of Buddy agent (run with administrator rights) |
| version | Show the currently installed version |
| help [command] | Display help for command |
Managing tunnels
The bdy agent tunnel command allows you to create and manage various types of network tunnels.
bashbdy agent tunnel$
| Command | Description |
|---|---|
| tcp [options] [host:port] | Starts a tunnel which forwards all TCP traffic on a public port to a local address. |
| tls [options] [host:port] | Starts a tunnel listening for TLS traffic on port 443 with a specific hostname. |
| http [options] [protocol://host:port] | Starts a tunnel listening for HTTP/HTTPS traffic with a specific hostname. |
| start [name] | Starts tunnel from the configuration file. |
| rm [id] | Remove a tunnel by ID |
| list | List all available tunnels |
| status [id] | Show status information for a specific tunnel |
| help [command] | Show help for a specific command |
TCP tunnel
A TCP tunnel is an ideal solution for forwarding any TCP traffic (such as SSH, databases, Redis) to a service running in a private network.
bashbdy agent tunnel tcp [options]$
Parameters:
| options | Description |
|---|---|
--region <region> | Override default region ("eu", "us") |
--whitelist <cidrs...> | Whitelist provided IP CIDRs. Use "*" to allow all |
--name <name> | Name of the tunnel |
--timeout <seconds> | Enforce connection timeout in seconds |
--follow | Follow tunnel details |
--help | Display help for command |
Example: exposing a MySQL database (port 3306) through a TCP tunnel:
bashbdy agent tunnel tcp --region eu --whitelist 10.0.0.0/8 --name mysql-db localhost:3306$
A TCP tunnel can also be started directly using:
bashbdy tcp [options]$
TLS tunnel
A TLS tunnel is used to securely forward TLS traffic (such as databases or custom TLS services) to an internal service with full control over certificates.
bashbdy agent tunnel tls [options]$
Parameters:
| options | Description |
|---|---|
--region <region> | Override default region ("eu", "us") |
--whitelist <cidrs...> | Whitelist provided IP CIDRs. Use "*" to allow all |
--name <name> | Name of the tunnel |
--timeout <seconds> | Enforce connection timeout in seconds |
--key <key> | Path to a TLS key |
--cert <cert> | Path to a TLS PEM certificate |
--ca <ca> | Path to a TLS PEM CA certificate for TLS auth |
--terminate <at> | Terminate TLS at "target", "agent", "region". By default TLS is terminated at "region" |
--follow | Follow tunnel details |
--help | Display help for command |
Example: creating a TLS tunnel with a custom certificate for a secure application
bashbdy agent tunnel tls --cert /path/to/cert.pem --key /path/to/key.pem --name secure-app --terminate agent localhost:8443$
You can also run a TLS tunnel directly using:
bashbdy tls [options]$
HTTP/HTTPS tunnel
An HTTP tunnel is the most commonly used tunnel type for forwarding HTTP/HTTPS traffic to web applications or APIs running in a private network.
bashbdy agent tunnel http [options]$
Paramters:
| options | Description |
|---|---|
--region <region> | Override default region ("eu", "us") |
--whitelist <cidrs...> | Whitelist provided IP CIDRs. Use "*" to allow all |
--name <name> | Name of the tunnel |
--timeout <seconds> | Enforce connection timeout in seconds |
--host <host> | Provide custom HTTP host header |
--header <headers...> | Header key:value to add to the request |
--response-header <headers...> | Header key:value to add to the response |
--useragent <useragent...> | Whitelist browser user-agent by contained text or regular expressions (e.g. /my-user-agent/). By Default all are allowed |
--auth <user:pass> | Enforce HTTP basic authorization |
--log | Log HTTP requests |
--verify | Enforce TLS verify |
--http2 | Enforce HTTP/2 |
--compression | Turn on HTTP response compression |
--ca <ca> | Path to a TLS PEM CA certificate for TLS auth |
--circuit-breaker <threshold> | Turn on circuit breaker. Provide decimal value between 0 to 1 |
--follow | Follow tunnel details |
--help | Display help for command |
Example of an advanced HTTP tunnel with authentication, logging, and compression:
bashbdy agent tunnel http \ --region eu \ --name my-api \ --auth apiuser:securepass \ --log \ --compression \ --http2 \ --header "X-Forwarded-Proto:https" \ --circuit-breaker 0.8 \ http://localhost:3000$$$$$$$$$$
You can also run a HTTP agent using:
bashbdy http [options]$
Running a preconfigured tunnel:
You can start a tunnel using a preconfigured settings using:
bashbdy agent tunnel start <name>$
bdy agent tunnel list
You can list all the currently active tunnels using:
bashbdy agent tunnel list$
Example tunnel list:
| Id | Type | Target / Latency | Entry / Latency | Status |
|---|---|---|---|---|
| Olr277Ye | HTTP | http://localhost:4000 / 2ms | https://example.eu-1.24h.sh / 63ms | Open |
| knrnLl0N | TCP | localhost:3306 / 1ms | e5axcbq8qysjrx.eu-1.ctrl.sh:10052 / 27ms | Open |
| avryLg1P | TLS | 127.0.0.1:443 / 1ms | n6yficr2c3s.eu-1.key.sh:443 / 28ms | Open |
Checking tunnel status
By using a specific tunnel ID you can check its current status using:
bashbdy agent tunnel status <id>$
Status example:
Buddy Tunnel 1.11.0

Status:          OPEN
DNS:OK
Type:            HTTP
Region:          US
Target:          http://localhost:4000
HTTP:            Ver. 1.1
Entry:           https://next-test-app.us-1.shr.io

Latencies
  Region:        131ms
  Target:        1ms

Connections
  Current:       0
  Total:         3
Deleting a tunnel
Using tunnel's ID you can delete it using:
bashbdy agent tunnel rm knrnLl0N Tunnel stopped$$
Managing tunnel configuration
Tunnel configuration allows you to save tunnel settings under a specific name, enabling quick startup of predefined connections without having to enter all parameters each time.
Adding tunnel configuration
bashbdy tunnel config add [tcp/tls/http] [options] <name> [protocol://host:port]$
Example of adding a HTTP configuration:
bashbdy tunnel config add http my-web-app --region eu --name webapp --log http://localhost:8080$
Deleting tunnel configuration
bashbdy config rm tunnel <name>$
Displaying configured tunnels
You can display a list of currently configured tunnels using:
bashbdy tunnel config get tunnels$
| Name | Type | Target |
|---|---|---|
| config-my-tunnel-1 | HTTP | https://my-site.local:80 |
| config-my-tunnel-2 | HTTP | https://localhost:4000 |
Tunnel configuration details display
You can display all the details for a specific tunnel configuration using:
bashbdy tunnel config get tunnel <name>$
| Option | Value |
|---|---|
| Name | config-my-tunnel-2 |
| Type | HTTP |
| Target | https://localhost:4000 |
| Region | Default |
| Timeout | Default |
| Whitelist | Default |
| Host Header | Not set |
| Basic Auth | user:password |
| User Agents | Everyone |
| Request Headers | Not set |
| Response Headers | Not set |
| Circuit Breaker | Not set |
| Log Requests | Yes |
| TLS Auth | No |
| TLS Verify | Yes |
| Force HTTP/2 | No |
| Compression | No |
Currently, it is not possible to edit existing tunnel configurations.
Practical examples
Examples of adding a new tunnel with specific settings via the CLI.
Example: Sharing a Next.js application
bashbdy agent tunnel http --region us --whitelist 192.168.2.1 --name next-test-app --log http://localhost:4000 HTTP tunnel started$$
On the UI side, our tunnel with the declared settings is available.
Image loading...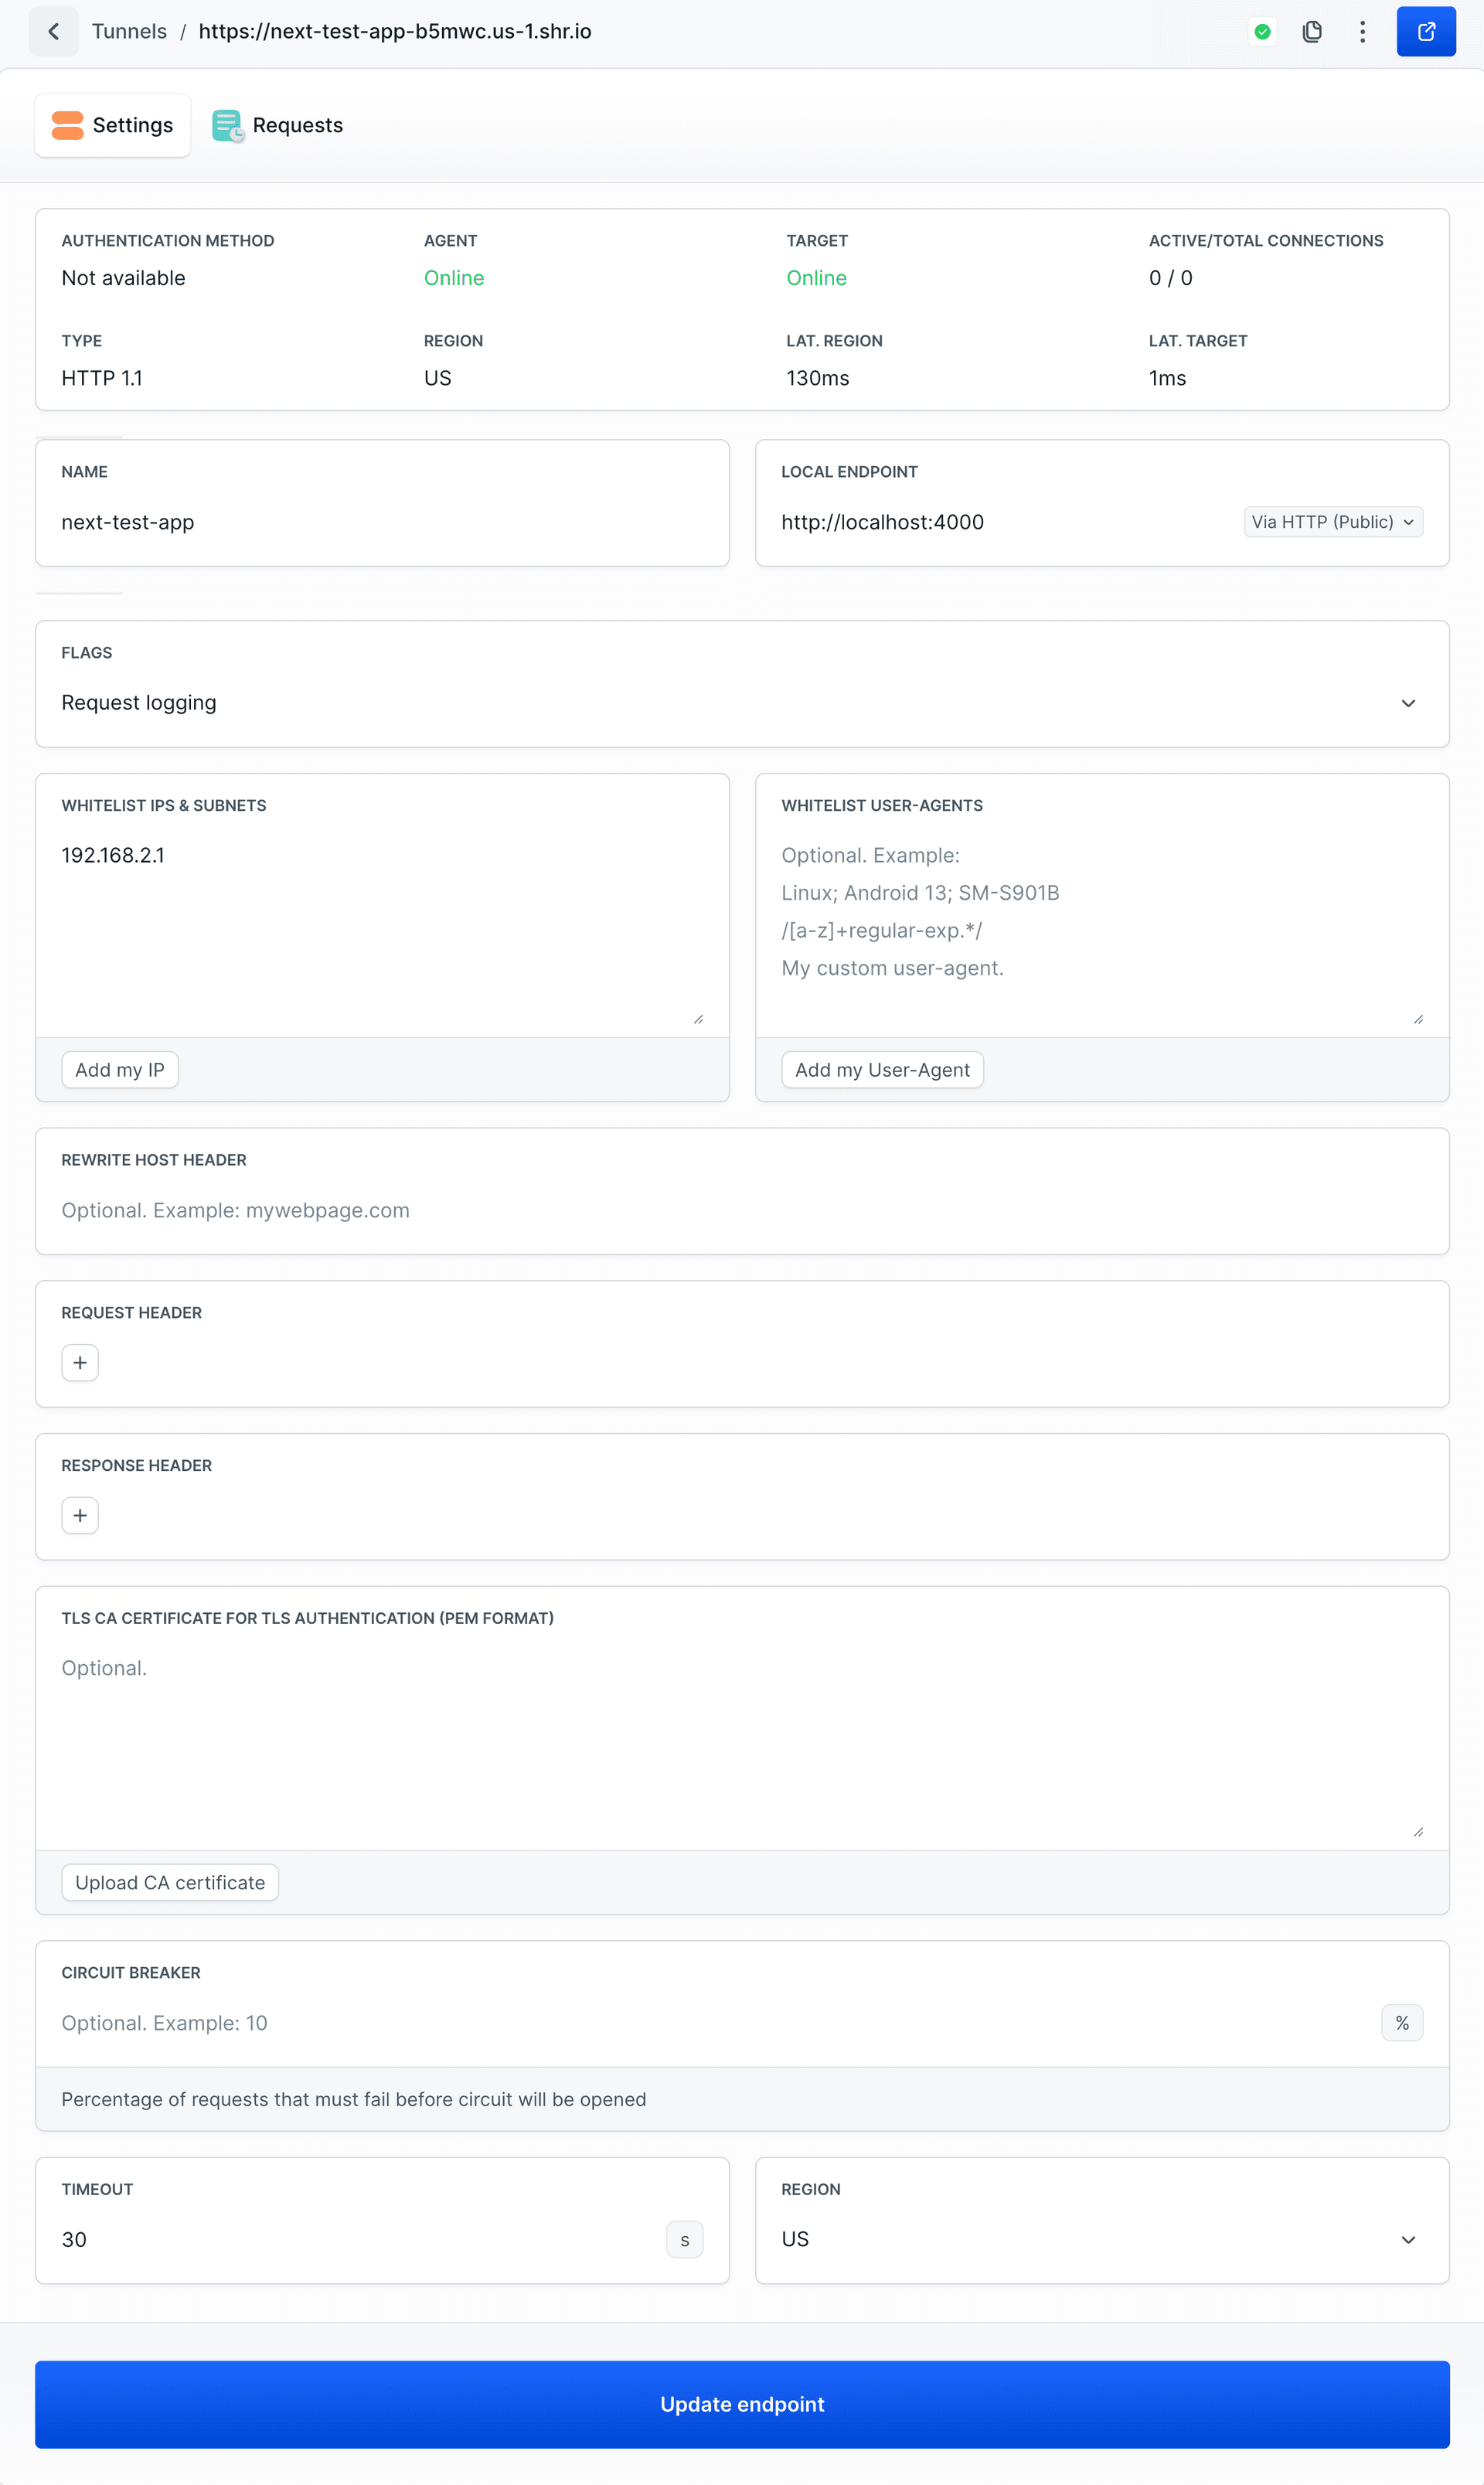
Example: Safe access to PostgreSQL
bashbdy agent tunnel tcp --region eu --whitelist 203.0.113.0/24 --name postgres-db localhost:5432$
Last modified on Apr 22, 2026