ZIP to APK: Build a Signed Android App from a ZIP File in a CI Pipeline
You have a ZIP file and you want an APK. Maybe an AI app builder gave you the ZIP after you hit Export, maybe you downloaded a project from GitHub - either way, no "zip to apk converter" will do it, because an APK is a compiled Android package and something has to compile it.
This tutorial builds a Buddy pipeline that wraps the web app with Capacitor, builds a release APK, signs it, verifies the signature, zips the result and publishes it as a versioned artifact. The first run takes a few minutes because it downloads the Android SDK. Every run after that finishes in under three minutes.
First, check what's in your ZIP
Unpack it and look at the top level. There are three cases, and they need different amounts of work:
| Inside the ZIP | What it is | What to do |
|---|---|---|
something.apk + something.obb | A split game package, already compiled | Nothing to build. Install the .apk, then copy the .obb to Android/obb/<package.name>/ on the phone. |
build.gradle or build.gradle.kts, an app/ folder | A native Android project | Skip to Step 4 for the key, then Step 5 and run APK Build from the repository root, without the cd android line - gradlew is already at the top level. |
package.json, index.html, src/ | A web app (this is what AI builders export) | Follow all the steps below. |
The rest of this tutorial covers the third case, because that is what most people end up with. If package.json has a build script, you have everything you need.
Step 1: Get the ZIP into a Git repository
Create a project in Buddy, pick Buddy as the Git provider, and push the unpacked files:
bashcd my-exported-app git init git add . git commit -m "Exported from AI builder" git remote add origin https://git.buddy.works/<workspace>/<project>.git git push -u origin main$$$$$$
No lockfile in the export? That's normal for AI exports, and it's why the pipeline below uses npm install rather than npm ci.
Step 2: Add Capacitor
Capacitor turns a web app into a native Android project. It puts your built files inside a WebView and generates a real Gradle project around it. It only works if npm run build emits static files - plain HTML, JS and CSS. A Next.js app without output: 'export' or anything that needs a Node server at runtime will not fit in a WebView.
You need Node.js on your machine for this step, because the packages have to land in package.json before the pipeline can install them:
bashnpm install @capacitor/core @capacitor/android npm install -D @capacitor/cli$$
Add capacitor.config.json next to your package.json:
json{
  "appId": "com.example.myapp",
  "appName": "My App",
  "webDir": "dist"
}
appId- the Android package name, reverse-domain style. It has to be unique and you cannot change it after publishing.appName- the label under the icon on the home screen.webDir- where your build output lands. Vite usesdist, Create React App usesbuild. Check your own project.
A common cause of a white screen in a Capacitor app is that your bundler emits absolute asset paths, while the WebView loads the app from the filesystem, not from a web server. In Vite, set base to a relative path:
ts// vite.config.ts
export default defineConfig({
  base: './',
  build: { outDir: 'dist' },
});
Then decide what to do with the generated android/ folder. For a first build, let the pipeline generate it and keep it out of Git. Add this to .gitignore:
# .gitignore
node_modules/
dist/
android/
*.keystore
*.jks
Commit and push what you have so far, so the pipeline in Step 3 sees Capacitor in package.json, the config, the Vite base path and the .gitignore:
bashgit add package.json package-lock.json capacitor.config.json .gitignore git add vite.config.ts # only if you changed it git commit -m "Add Capacitor" git push$$$$
Keeping android/ out of Git works until you want a custom icon, a splash screen or your own versionCode. Those live in files inside android/. At that point remove it from .gitignore, run npx cap add android locally once, commit the folder, and drop the if [ ! -d android ] guard from Step 3.
Step 3: Build the web app and generate the Android project
Create a pipeline, set the trigger to On push on main, and add a Node.js action:
yaml- action: "Build the web app and add Android"
  type: "BUILD"
  docker_image_name: "library/node"
  docker_image_tag: "22"
  cached_dirs:
  - "/root/.npm"
  commands: |-
    npm install
    npm run build
    if [ ! -d android ]; then npx cap add android; fi
    npx cap sync android
npx cap add android scaffolds the native project, and npx cap sync android copies your freshly built web files into it. No Java needed yet - Capacitor only writes files at this stage.
if [ ! -d android ] guard is not cosmetic. Buddy's pipeline filesystem persists between runs, so on the second run cap add android would fail with "android platform already exists". The guard makes the action idempotent.
Note the cache: /root/.npm rather than node_modules. Cached directories live outside the pipeline filesystem, and the Gradle build in the next step needs node_modules present in that filesystem - that's where Capacitor's own Gradle subproject lives. Cache the npm download cache instead and let node_modules stay in the filesystem.
Step 4: Create a release key and store it in Buddy
The build action in the next step copies the release key into the pipeline filesystem, so the key has to exist before the first run. Generate the keystore on your own machine:
bashkeytool -genkeypair -v \ -keystore release.keystore \ -alias my-key-alias \ -keyalg RSA -keysize 2048 -validity 10000 \ -dname "CN=My Name, O=My Company, C=US"$$$$$
Now put it in Buddy instead of in the repository. Go to the pipeline's Variables tab, click New → Asset..., upload release.keystore, name it RELEASE_KEYSTORE and make sure it is allowed to be copied to action containers. Inside a build action, $RELEASE_KEYSTORE expands to the path of the uploaded file in the container - that is what the cp line in Step 5 reads.
$RELEASE_KEYSTORE fails with FileNotFoundException. Copy the file into the pipeline filesystem first, as Step 5 does, and give the signing action that path.
Image loading...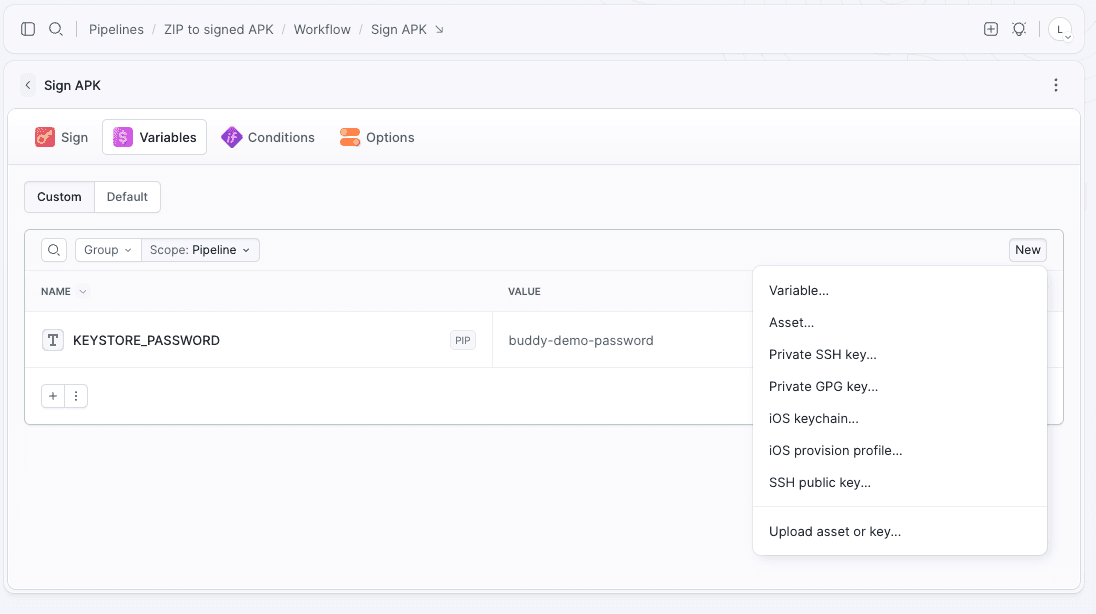
Add the passwords the same way, as encrypted variables:
KEYSTORE_PASSWORDKEY_PASSWORD
Step 5: Build the APK from the ZIP contents
Look up APK Build on the action list and add it. The preset comes with the whole Android SDK bootstrap already written - you only adjust two things and add two lines:
yaml- action: "APK Build"
  type: "BUILD"
  docker_image_name: "library/eclipse-temurin"
  docker_image_tag: "21"
  shell: "BASH"
  setup_commands: "apt-get update && apt-get install -y unzip curl"
  cached_dirs:
  - "/root/.gradle"
  - "/opt/android/sdk"
  commands: |-
    export ANDROID_HOME="/opt/android/sdk"
    export PATH=$PATH:$ANDROID_HOME/cmdline-tools/tools/bin
    if [ ! -d "$ANDROID_HOME/cmdline-tools" ]; then
      curl -o sdk.zip https://dl.google.com/android/repository/commandlinetools-linux-11076708_latest.zip
      unzip -q sdk.zip
      rm sdk.zip
      mkdir -p "$ANDROID_HOME/cmdline-tools"
      mv cmdline-tools "$ANDROID_HOME/cmdline-tools/tools"
      yes | sdkmanager --licenses > /dev/null
    fi
    sdkmanager "platforms;android-35" "build-tools;35.0.0"
    mkdir -p output keystore
    cp "$RELEASE_KEYSTORE" keystore/release.keystore
    cd android
    chmod +x gradlew
    ./gradlew assembleRelease
Image loading...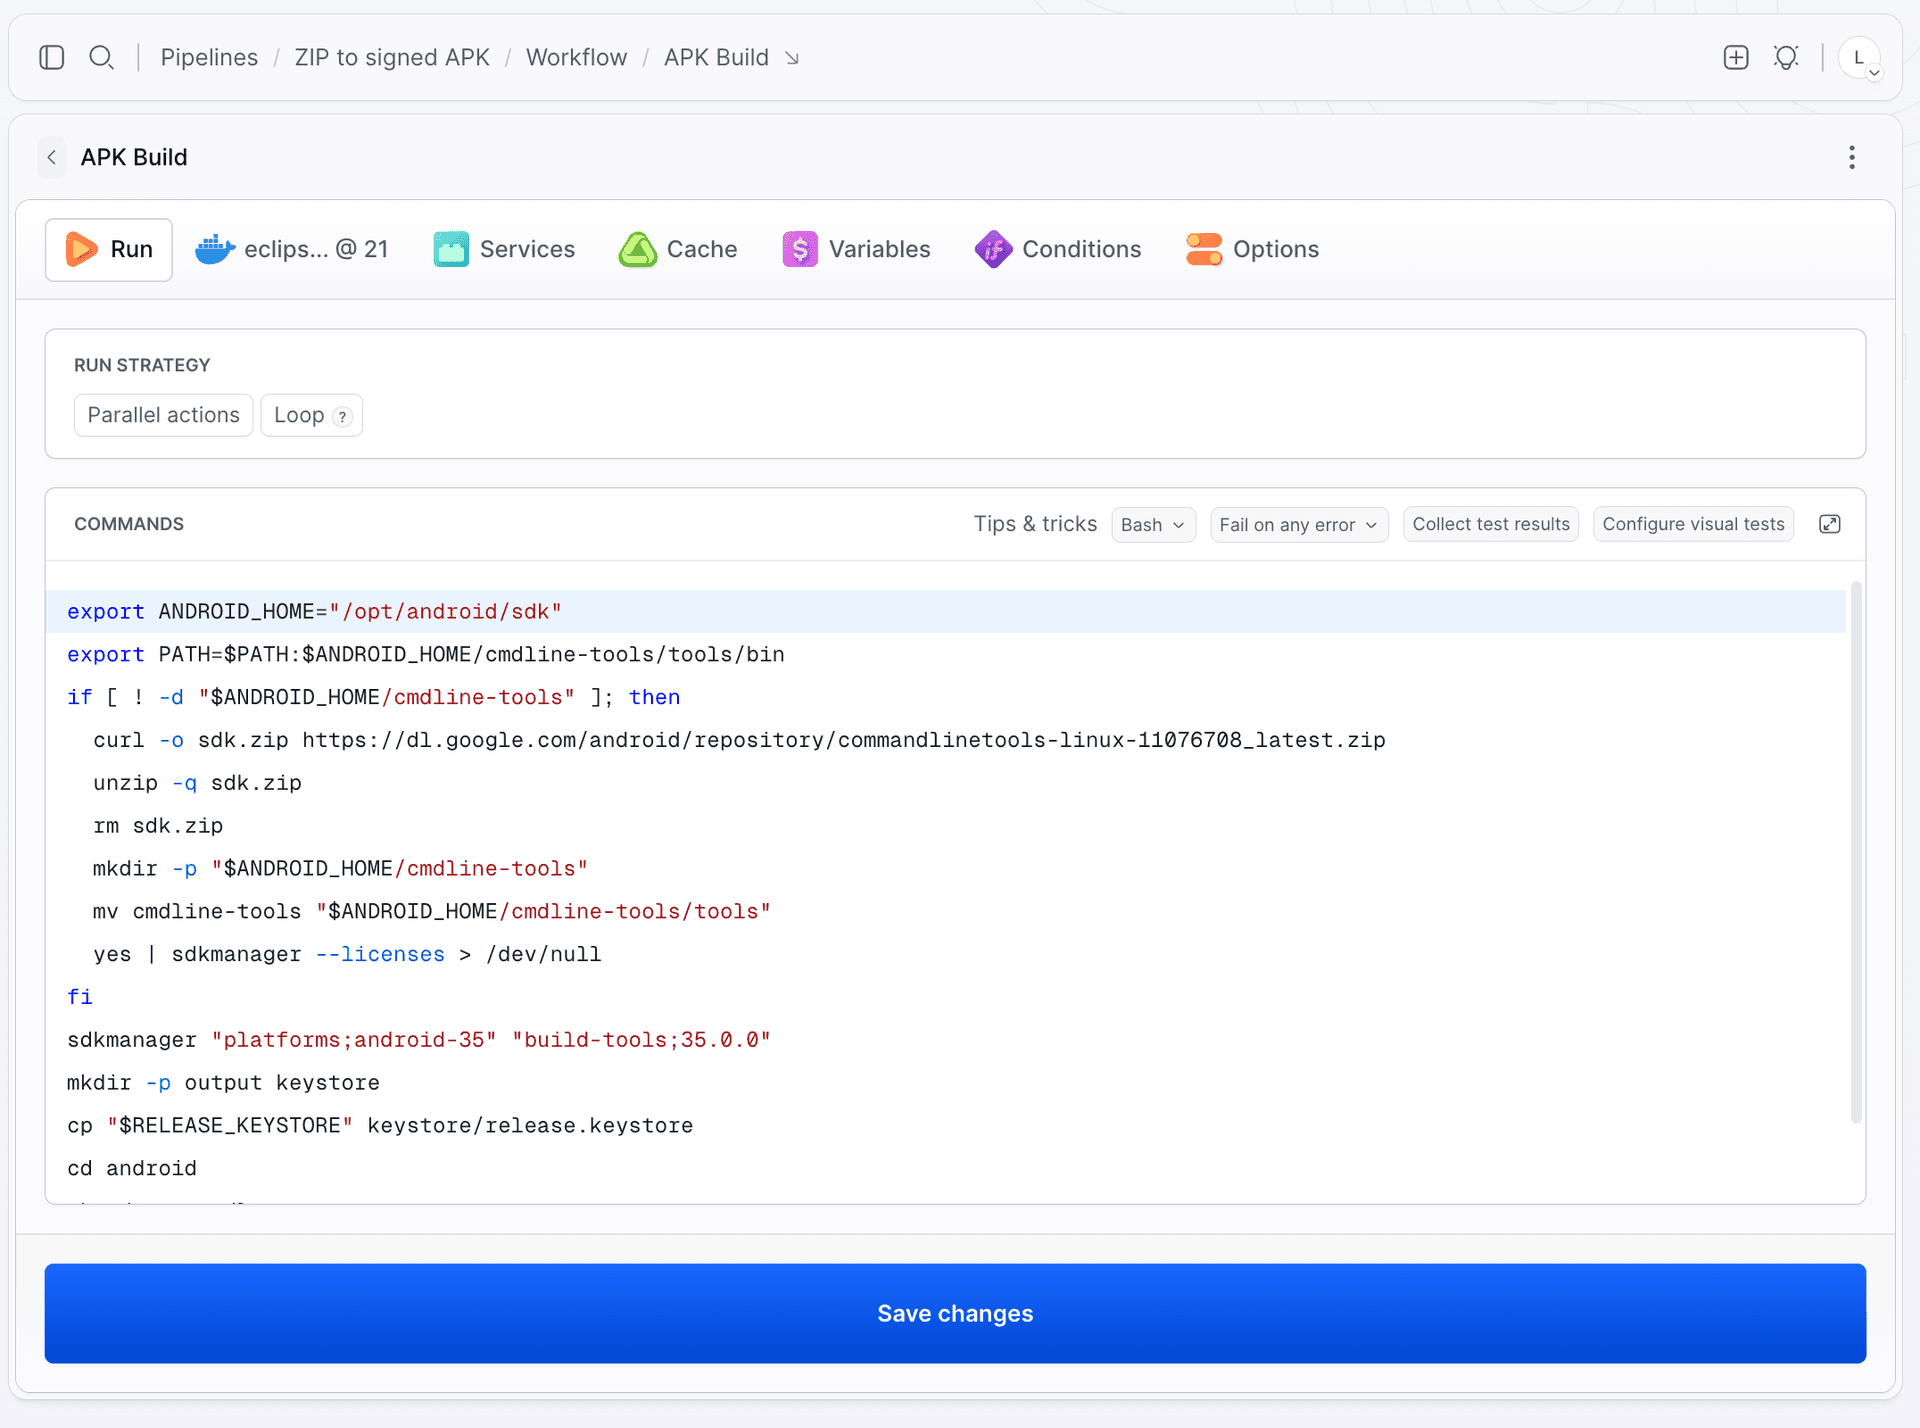
The first change is the image tag. The preset runs on library/eclipse-temurin and defaults to the newest JDK, but Capacitor 7 ships Gradle 8.11, which refuses anything above Java 21 with Unsupported class file major version. Switch the tag to 21.
Image loading...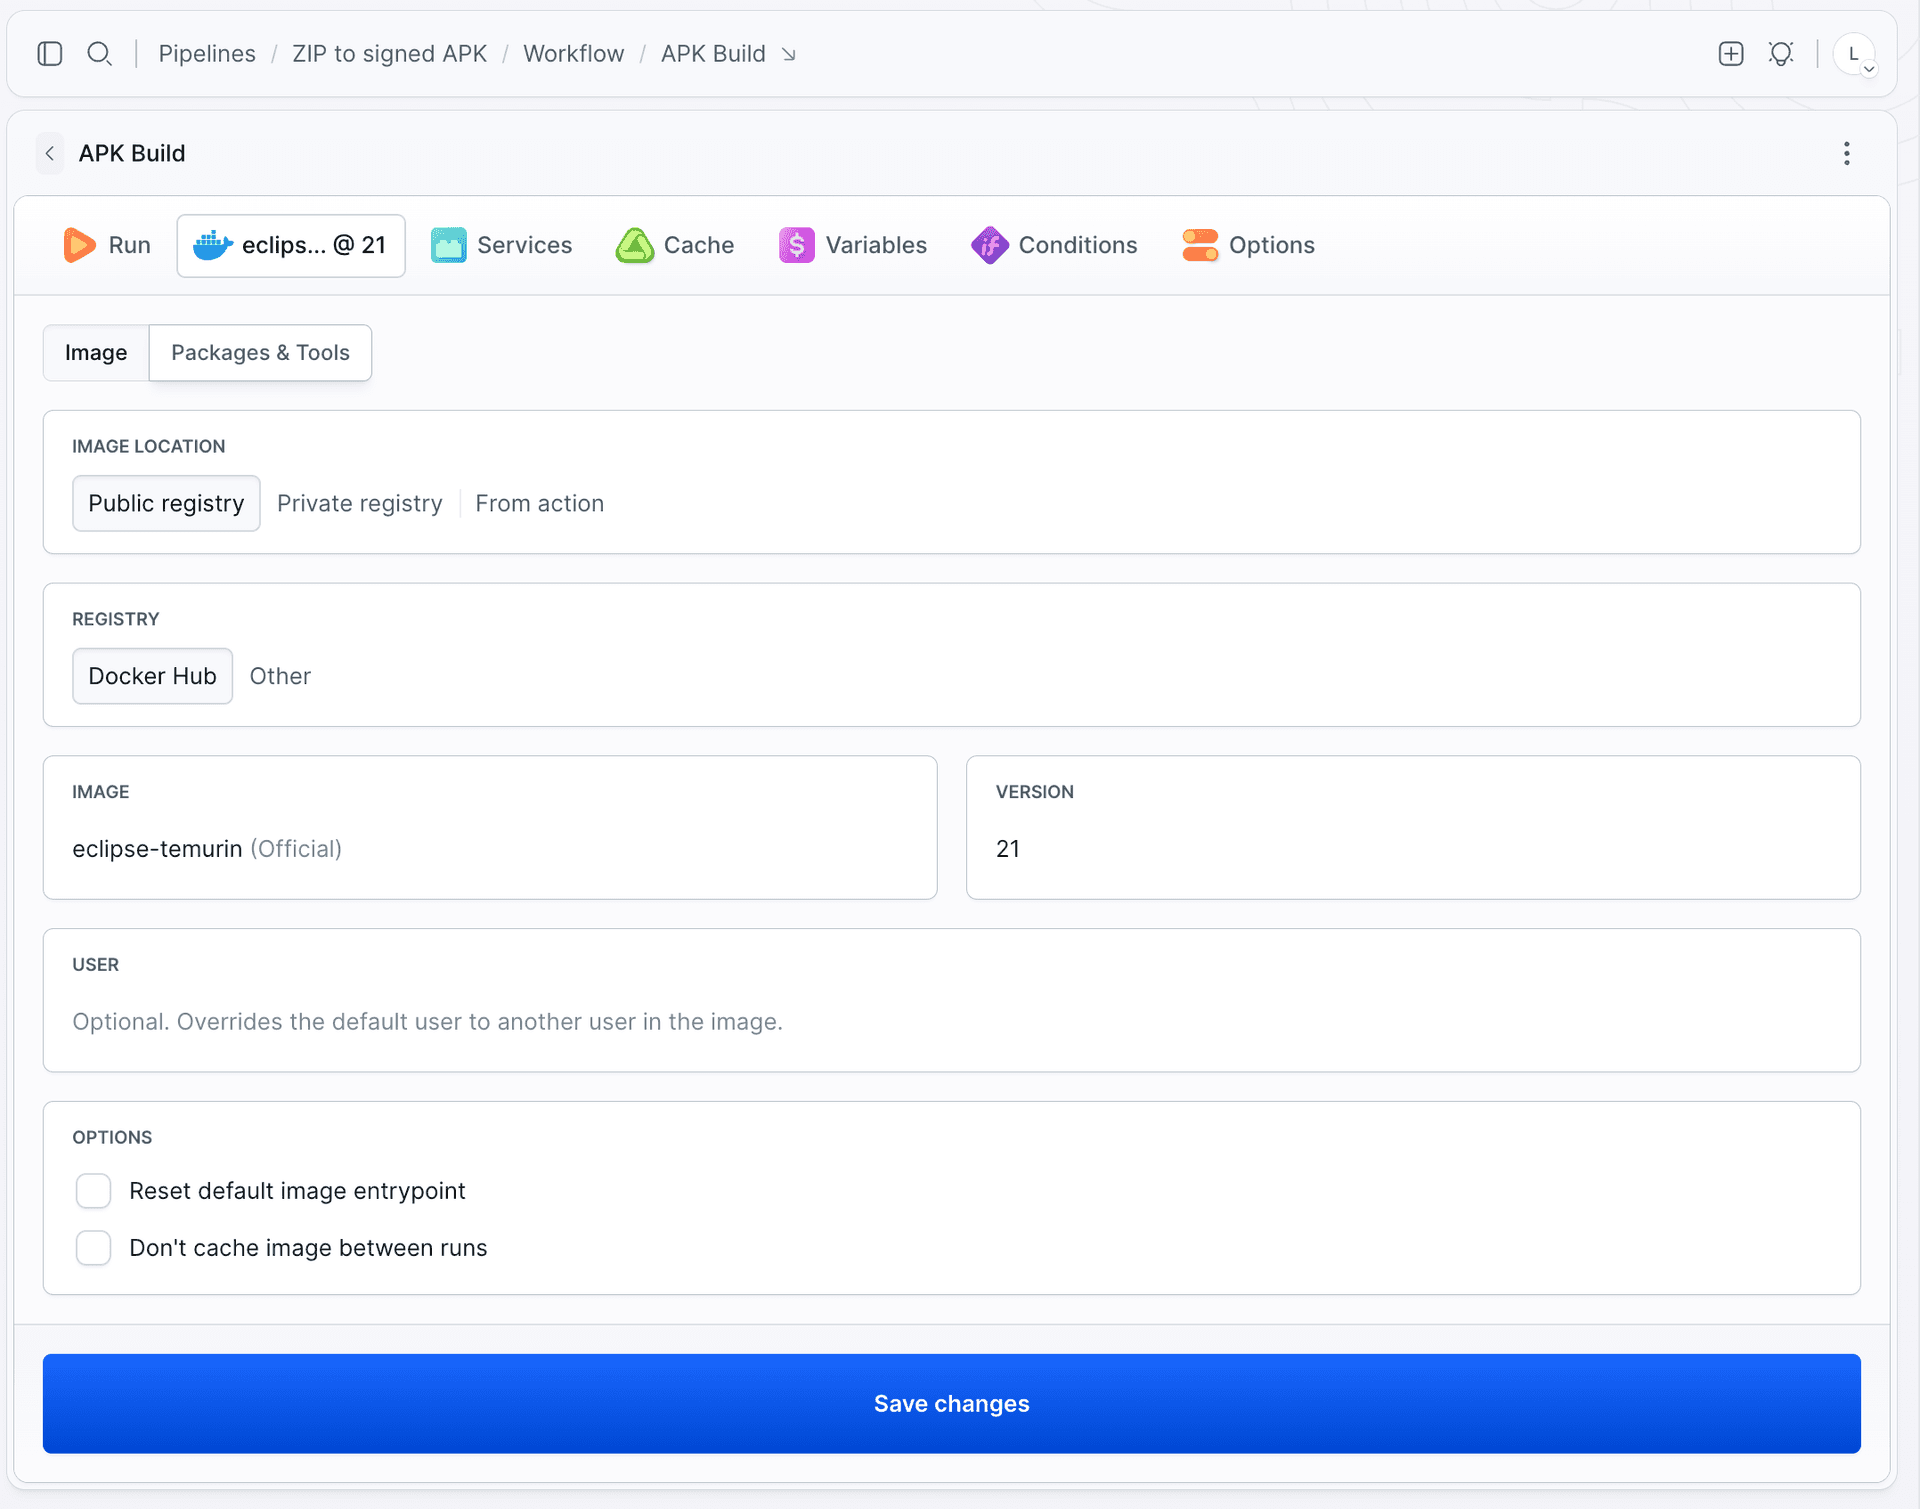
The second is the cmdline-tools version. The preset downloads commandlinetools-linux-7583922, which is old enough that it does not know about build-tools;35.0.0 - and Capacitor 7 needs compileSdk 35. Bump the filename to 11076708 and sdkmanager resolves both packages.
The added lines are mkdir -p output keystore and the cp. The signing action in Step 6 writes to output and apksigner will not create the directory for you. The keystore folder is where the release key ends up: Buddy copies an asset into the containers of build actions only, so this is the place to move it into the pipeline filesystem, where the Sign APK action can read it. $RELEASE_KEYSTORE is the asset from Step 4.
Everything else in the preset stays as it is. ANDROID_HOME points at /opt/android/sdk, which is also a cached directory, so the SDK download happens on the first run only. cd android walks into the project Capacitor generated in Step 3 - if your ZIP was a native Android project, delete that line, because gradlew is already in the root. The cmdline-tools download is the Linux x64 build, so this pipeline needs an x64 runner - that is the CPU option you pick when creating the pipeline.
The unzip and curl packages come from setup_commands. This is not a pipeline setting - it lives inside the action. Open the APK Build action, switch to the image tab at the top (the one labelled eclipse-temurin @ 21), then pick the Packages & Tools sub-tab. The field is called Commands executed on first pipeline run, with the note "These commands are run before the pipeline filesystem with pulled repository is available". Buddy bakes them into a generated Dockerfile layer, so they are installed once and cached.
Image loading...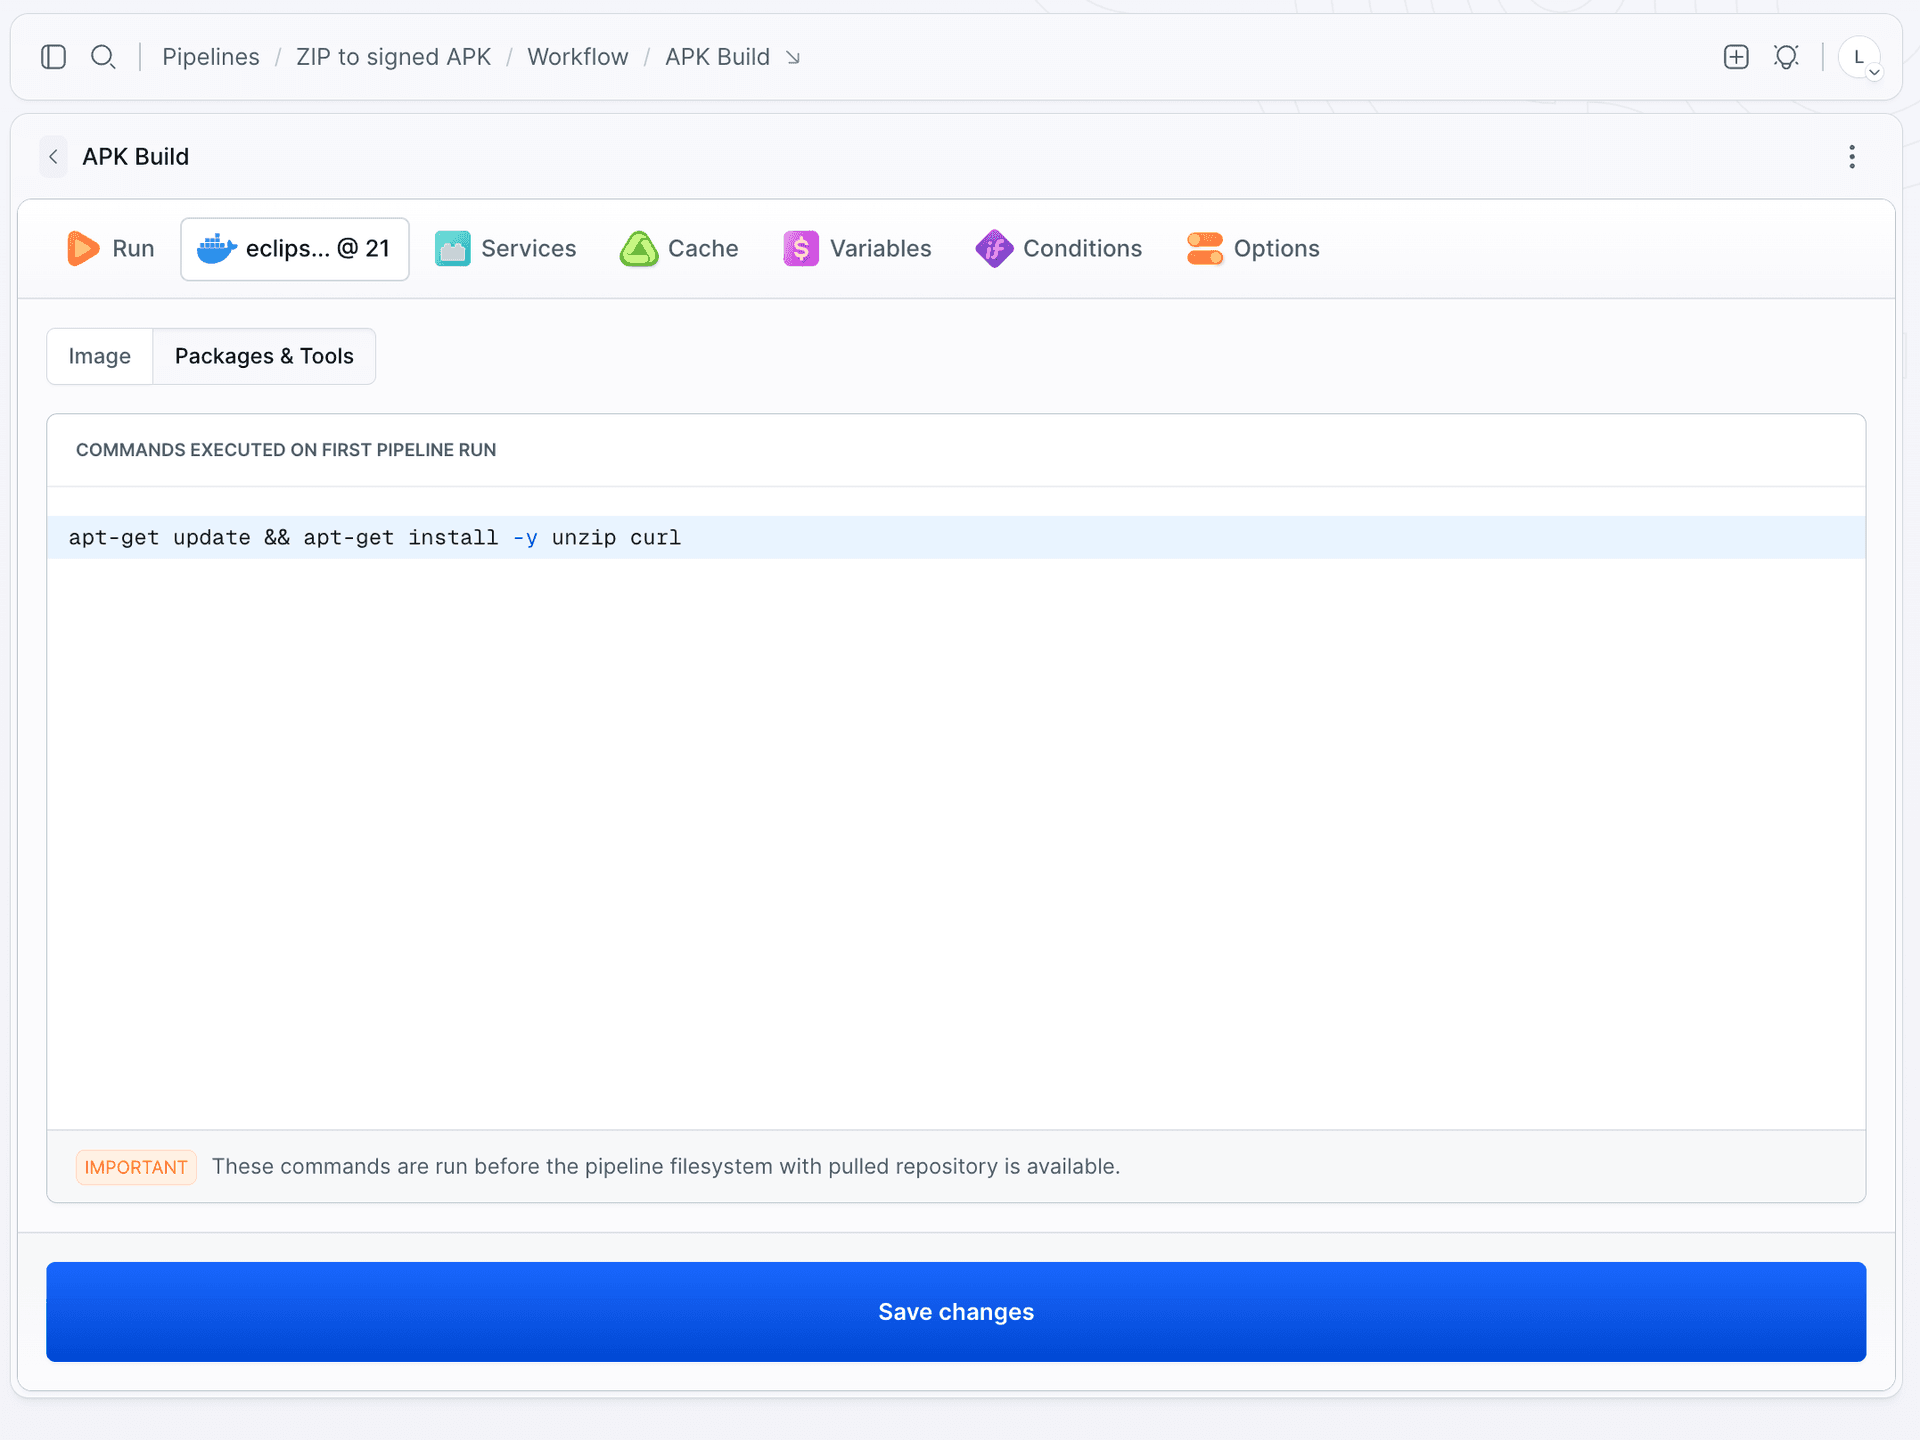
Run the pipeline once now, to see an unsigned APK come out before you add signing. The first run takes a while - besides downloading the SDK, Gradle pulls in Build-Tools 34 and Platform-Tools on its own because Capacitor's Gradle plugin asks for them. Expect the log to end with:
> Task :app:assembleRelease
BUILD SUCCESSFUL in 1m 50s
115 actionable tasks: 115 executed
The APK is at android/app/build/outputs/apk/release/app-release-unsigned.apk in the pipeline filesystem. It is unsigned, which means Android will refuse to install it.
If you just want something installable for your own testing, swap assembleRelease for assembleDebug. Gradle signs debug builds with an auto-generated debug key and the result installs immediately - but a debug key is not suitable for distribution or Google Play.
Step 6: Sign the APK
Add the Sign APK action:
yaml- action: "Sign APK"
  type: "ANDROID_SIGN"
  local_path: "android/app/build/outputs/apk/release/app-release-unsigned.apk"
  application_name: "my-app-signed.apk"
  output_dir: "output"
  key_path: "keystore/release.keystore"
  key_alias: "my-key-alias"
  keystore_password: "$KEYSTORE_PASSWORD"
  key_password: "$KEY_PASSWORD"
  build_tool_version: "35.0.0"
Image loading...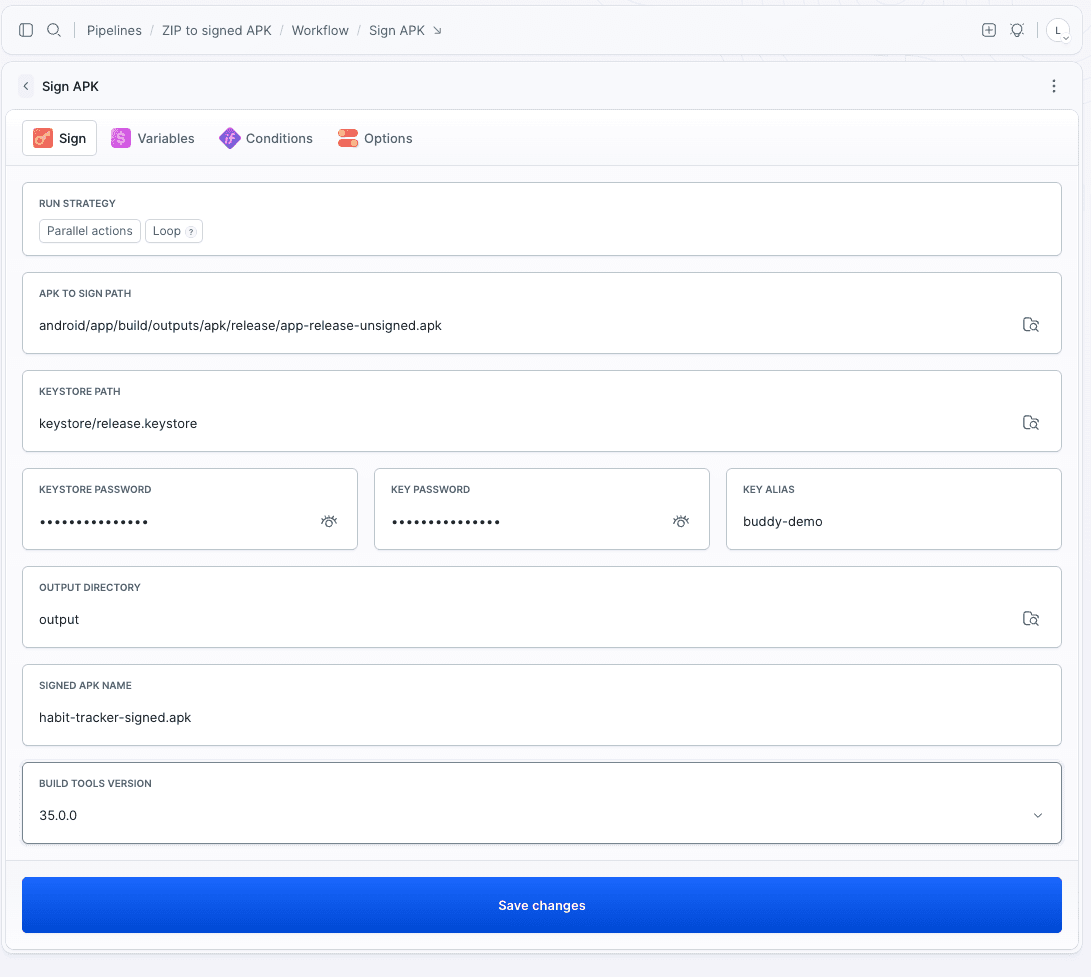
output_dir is the output folder created in Step 5 and key_path is the copy of the asset made there. build_tool_version has to match a version installed in the cached SDK - 35.0.0 here.
Step 7: Verify the signed APK before you ship
Sign APK confirms that the signing command completed, but verify the resulting file before publishing it. Add one more APK Build action - same preset, same image - and let it inspect the artifact instead of building one:
yaml- action: "Verify signature"
  type: "BUILD"
  docker_image_name: "library/eclipse-temurin"
  docker_image_tag: "21"
  shell: "BASH"
  setup_commands: "apt-get update && apt-get install -y unzip curl"
  cached_dirs:
  - "/root/.gradle"
  - "/opt/android/sdk"
  commands: |-
    export ANDROID_HOME="/opt/android/sdk"
    export PATH=$PATH:$ANDROID_HOME/build-tools/35.0.0
    ls -lh output/
    apksigner verify --print-certs --verbose output/my-app-signed.apk
Image loading...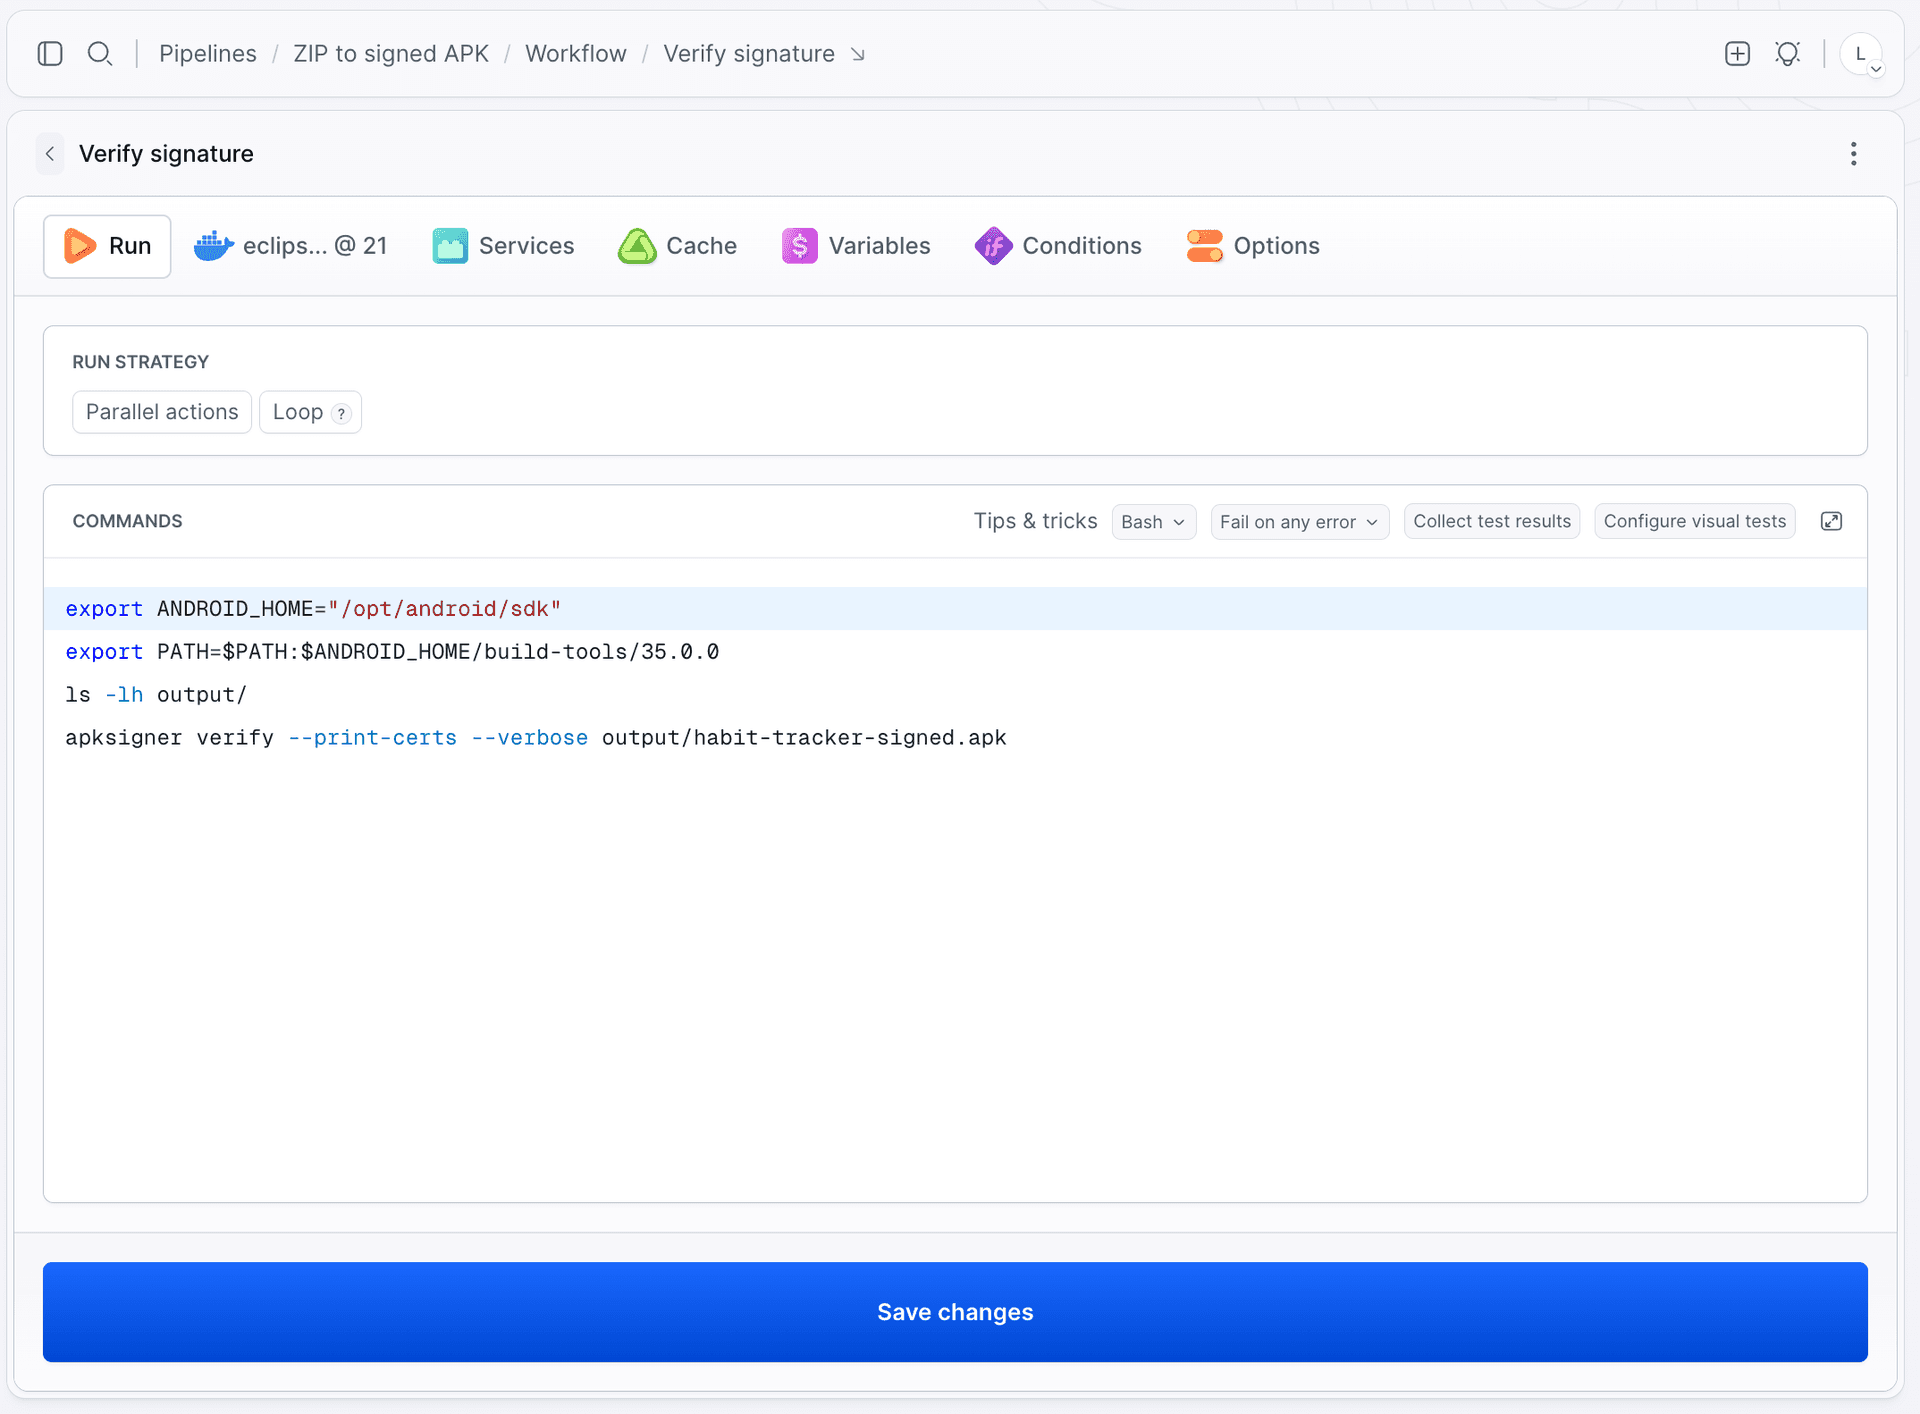
This action does not bootstrap the SDK, and it does not have to. /opt/android/sdk is a cached directory of the pipeline, not of a single action: APK Build fills it earlier in the same run, and this action mounts the same directory, so build-tools/35.0.0 is there even on the very first run of a brand-new pipeline. Because the image and the setup_commands are identical, Buddy reuses the same cached image too. In the demo pipeline the action took 7 seconds. If you drop /opt/android/sdk from its cached_dirs, it sees an empty SDK and you need the if [ ! -d "$ANDROID_HOME/cmdline-tools" ] block from Step 5 in front of the apksigner call.
Here is the real output from the demo pipeline, where the app is called habit-tracker:
total 3.1M
-rw-r--r-- 1 root root 3.1M Sep  7 14:08 habit-tracker-signed.apk
-rw-r--r-- 1 root root  34K Sep  7 14:08 habit-tracker-signed.apk.idsig

Verifies
Verified using v1 scheme (JAR signing): true
Verified using v2 scheme (APK Signature Scheme v2): true
Verified using v3 scheme (APK Signature Scheme v3): true
Number of signers: 1
Signer #1 certificate DN: CN=Buddy Demo, OU=Dev, O=Buddy, L=Warsaw, C=PL
Signer #1 certificate SHA-256 digest: 2e370771e06663fb55af95780dab0e9129768a2e15b4aa85dc23a24993fbd19f
Signer #1 key algorithm: RSA
Signer #1 key size (bits): 2048
Image loading...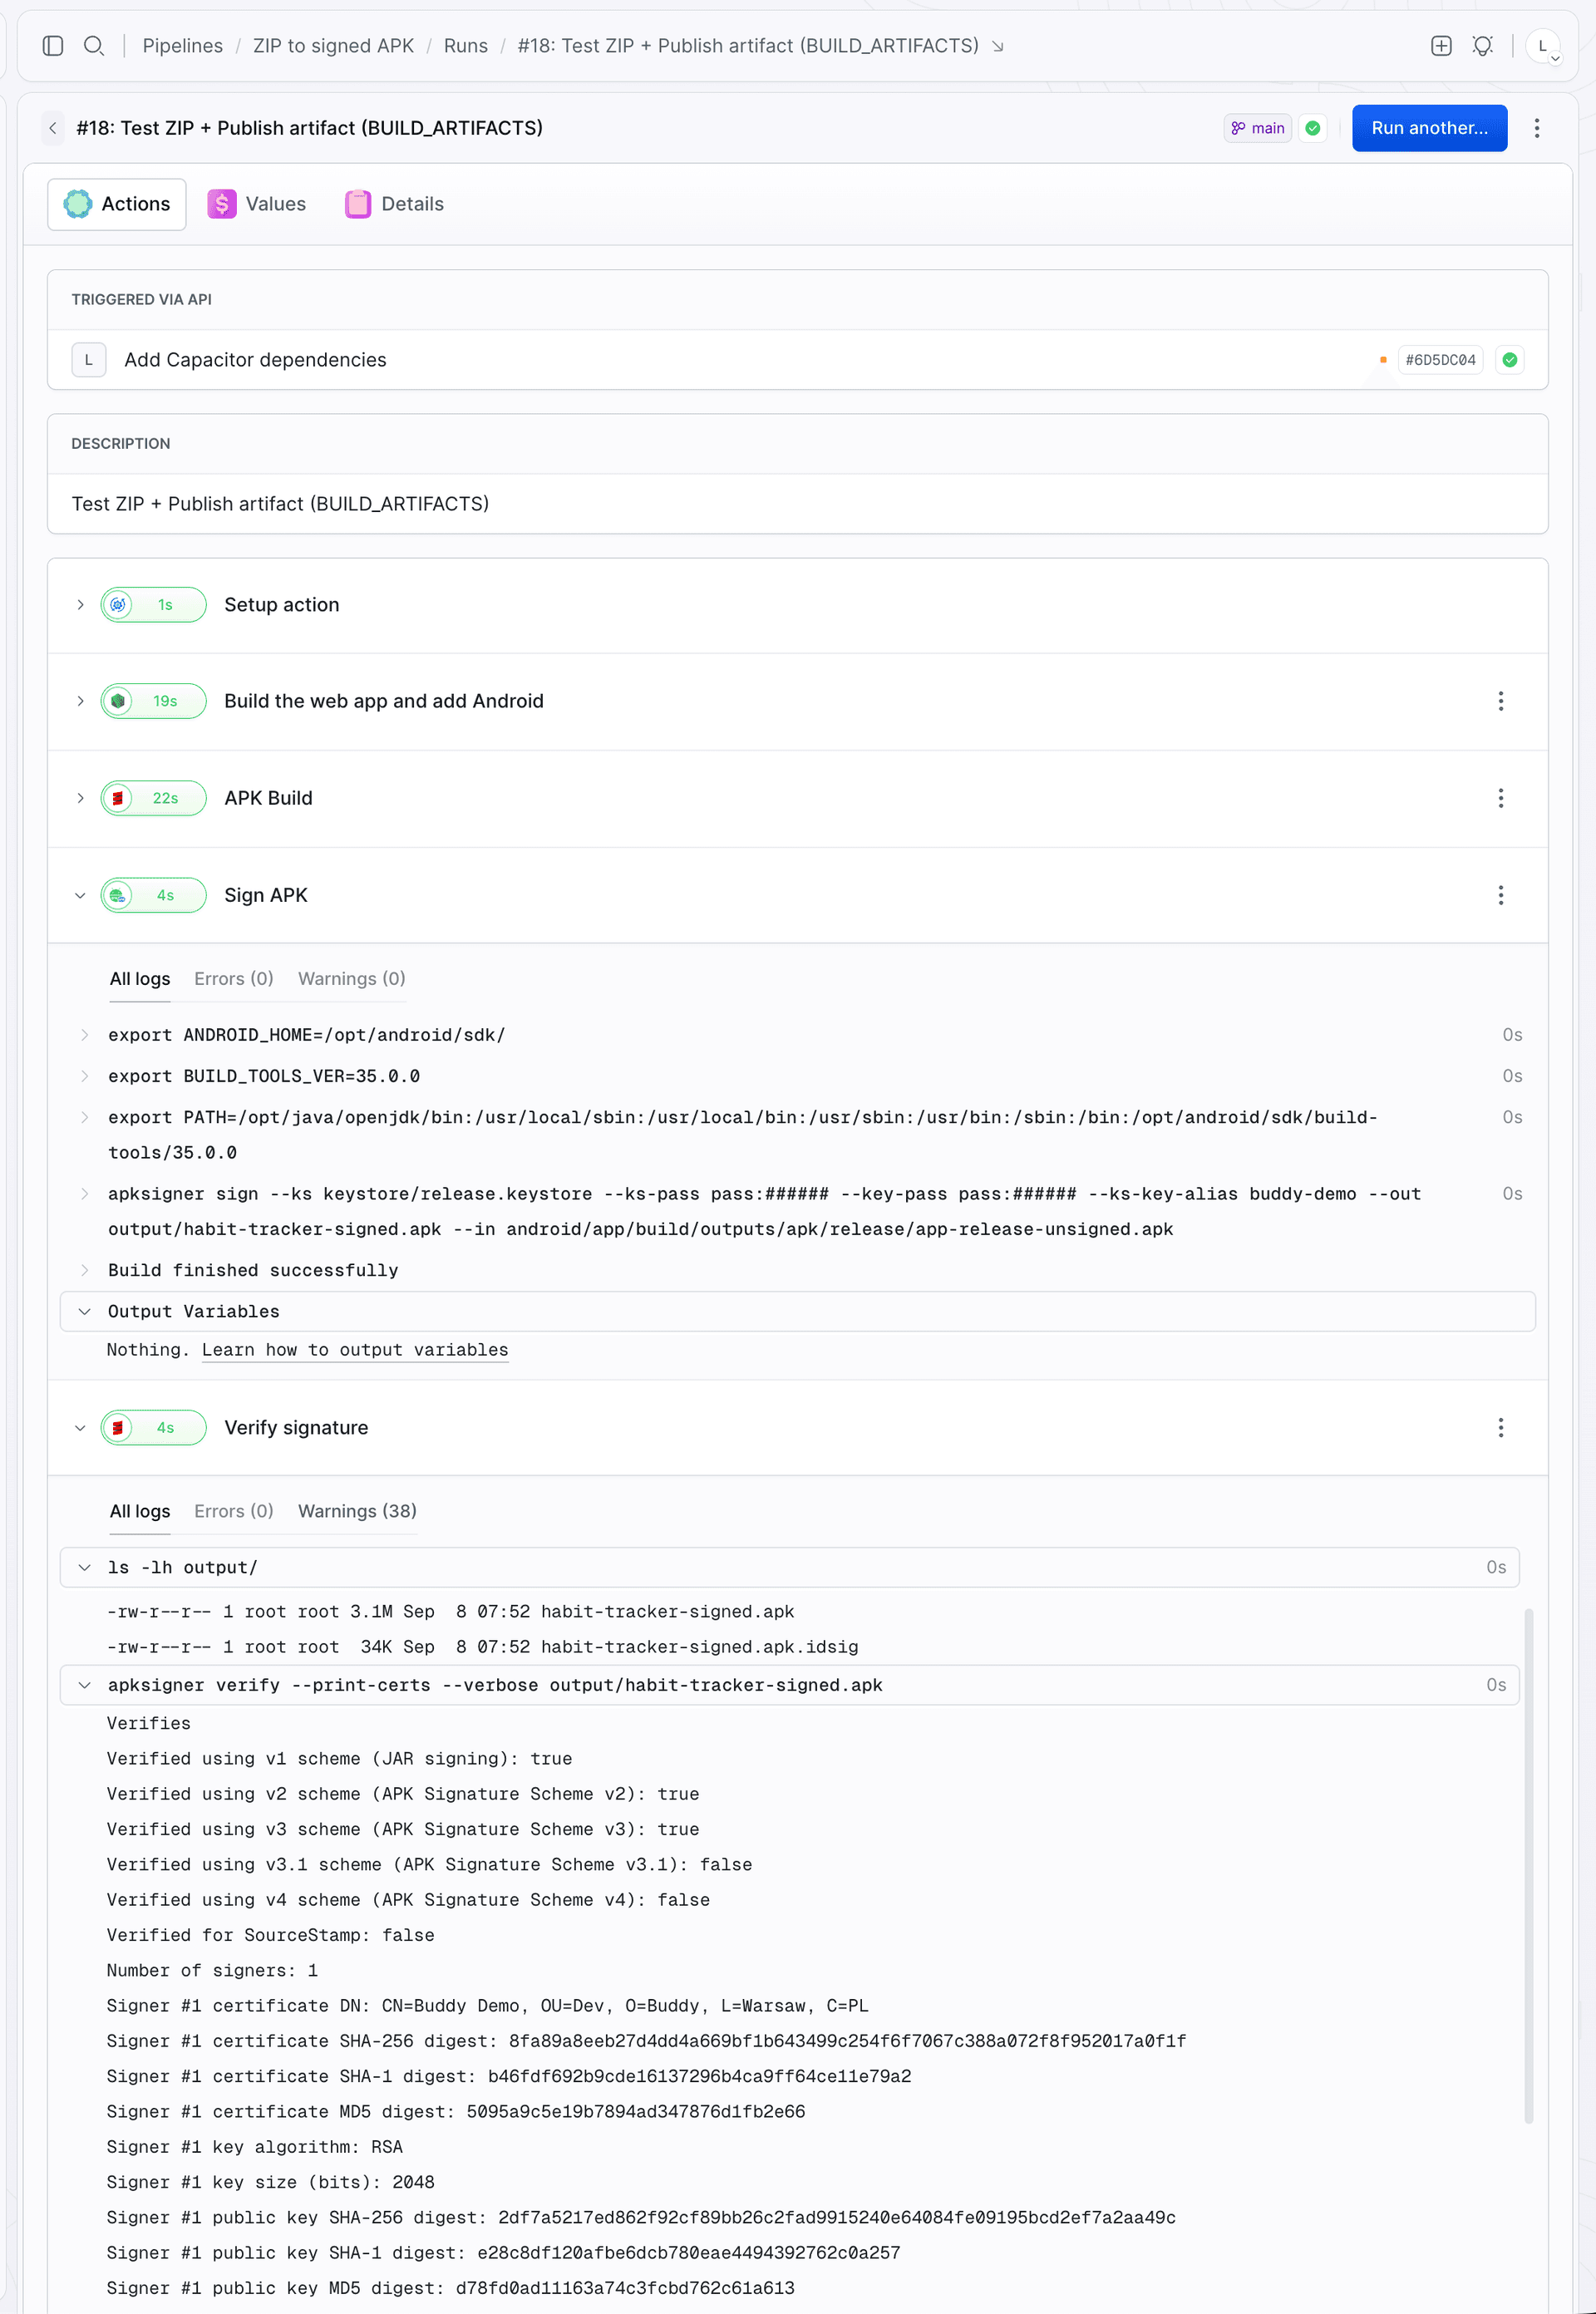
3.1 MB, signed with v1, v2 and v3 schemes, and the certificate DN matches the key you created. Download it from the pipeline filesystem and install it with adb install, or send it to a phone directly.
--verbose also prints a long list of WARNING: META-INF/... not protected by signature lines. Those are Gradle's own metadata files and they are expected in every Capacitor build - not a signing problem.
Step 8: Zip the signed APK
The output/ folder now holds two files: the APK and the .idsig file that apksigner wrote next to it. The .idsig is the signature used by incremental installs on Android 11 and newer - a plain adb install ignores it, and at 34 KB there is no reason to strip it. Pack both into one archive with the ZIP action:
yaml- action: "Zip the signed APK"
  type: "ZIP"
  local_path: "output"
  destination: "release/my-app-signed.zip"
local_path is the folder to pack and destination is where the archive lands, both relative to the pipeline filesystem. The action creates the release/ folder if it does not exist.
Step 9: Publish the build as an artifact
The pipeline filesystem keeps only the latest build. To keep every release, publish the archive to a Buddy artifact. Create one in your project's Artifacts section first and give it a name - my-app-apk below. Then add the Publish Artifact Version action:
yaml- action: "Publish to artifact"
  type: "PUBLISH_ARTIFACT_VERSION"
  artifact: "my-app-apk"
  input_type: "BUILD_ARTIFACTS"
  local_path: "release"
  always_from_scratch: true
  versions:
  - "$BUDDY_RUN_ID"
  - "latest"
Two settings matter here. input_type: BUILD_ARTIFACTS means the source is the pipeline filesystem, where the ZIP action put the archive. The default source is the repository, and the pipeline fails with Source path does not exist or was removed because release/ is not in Git. versions publishes the same archive twice: once under the run number, so every build stays downloadable, and once as latest, so the URL you hand out never changes.
Step 10: Get notified when a build is ready
Add a Slack action as the last one in the pipeline. It runs only after every action before it has passed, so one message means one signed, verified and published build:
yaml- action: "Send notification"
  type: "SLACK"
  integration: "slack"
  channel: "general"
  content: "[#$BUDDY_RUN_ID] $BUDDY_PIPELINE_NAME execution by <$BUDDY_TRIGGERING_ACTOR_URL|$BUDDY_TRIGGERING_ACTOR>."
Useful variables for the message body: $BUDDY_RUN_URL links to the run, $BUDDY_RUN_COMMENT carries the commit message. There are Discord, Telegram, Email and Webhook flavours of the same action.
The finished pipeline has seven actions on the Workflow tab:
Image loading...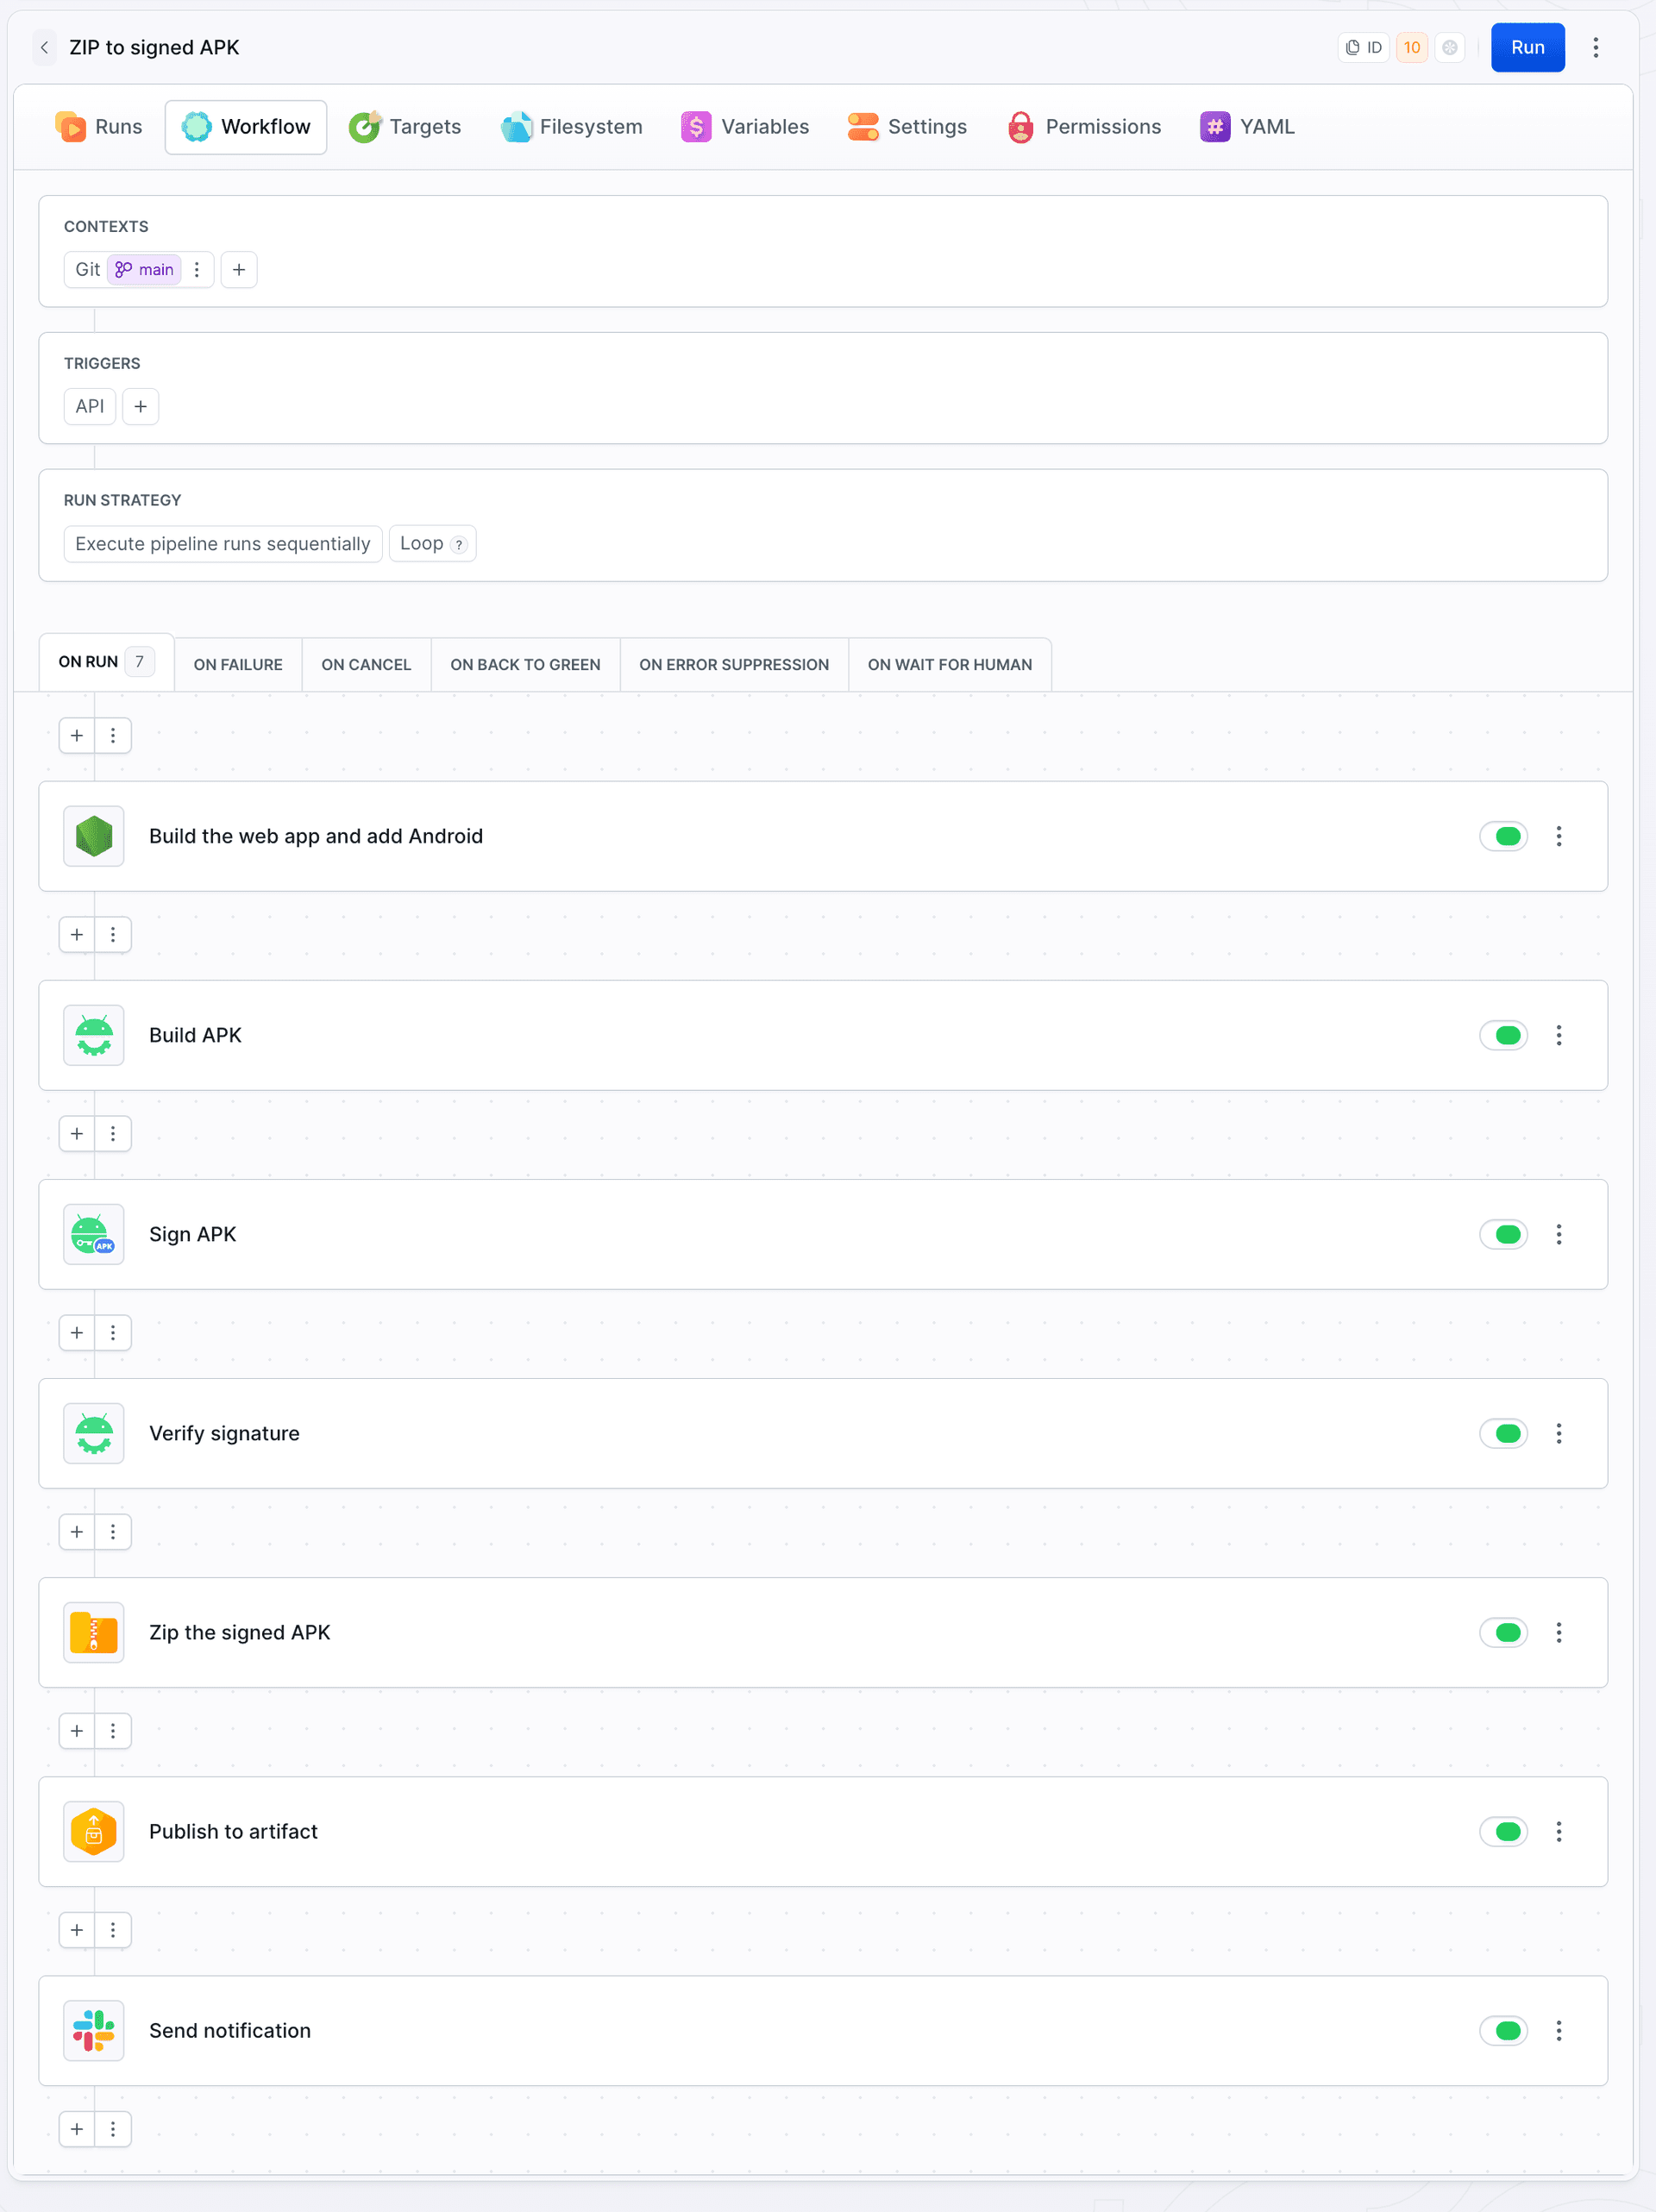
A push to main runs all of them and ends with the artifact versions on the publish action:
Image loading...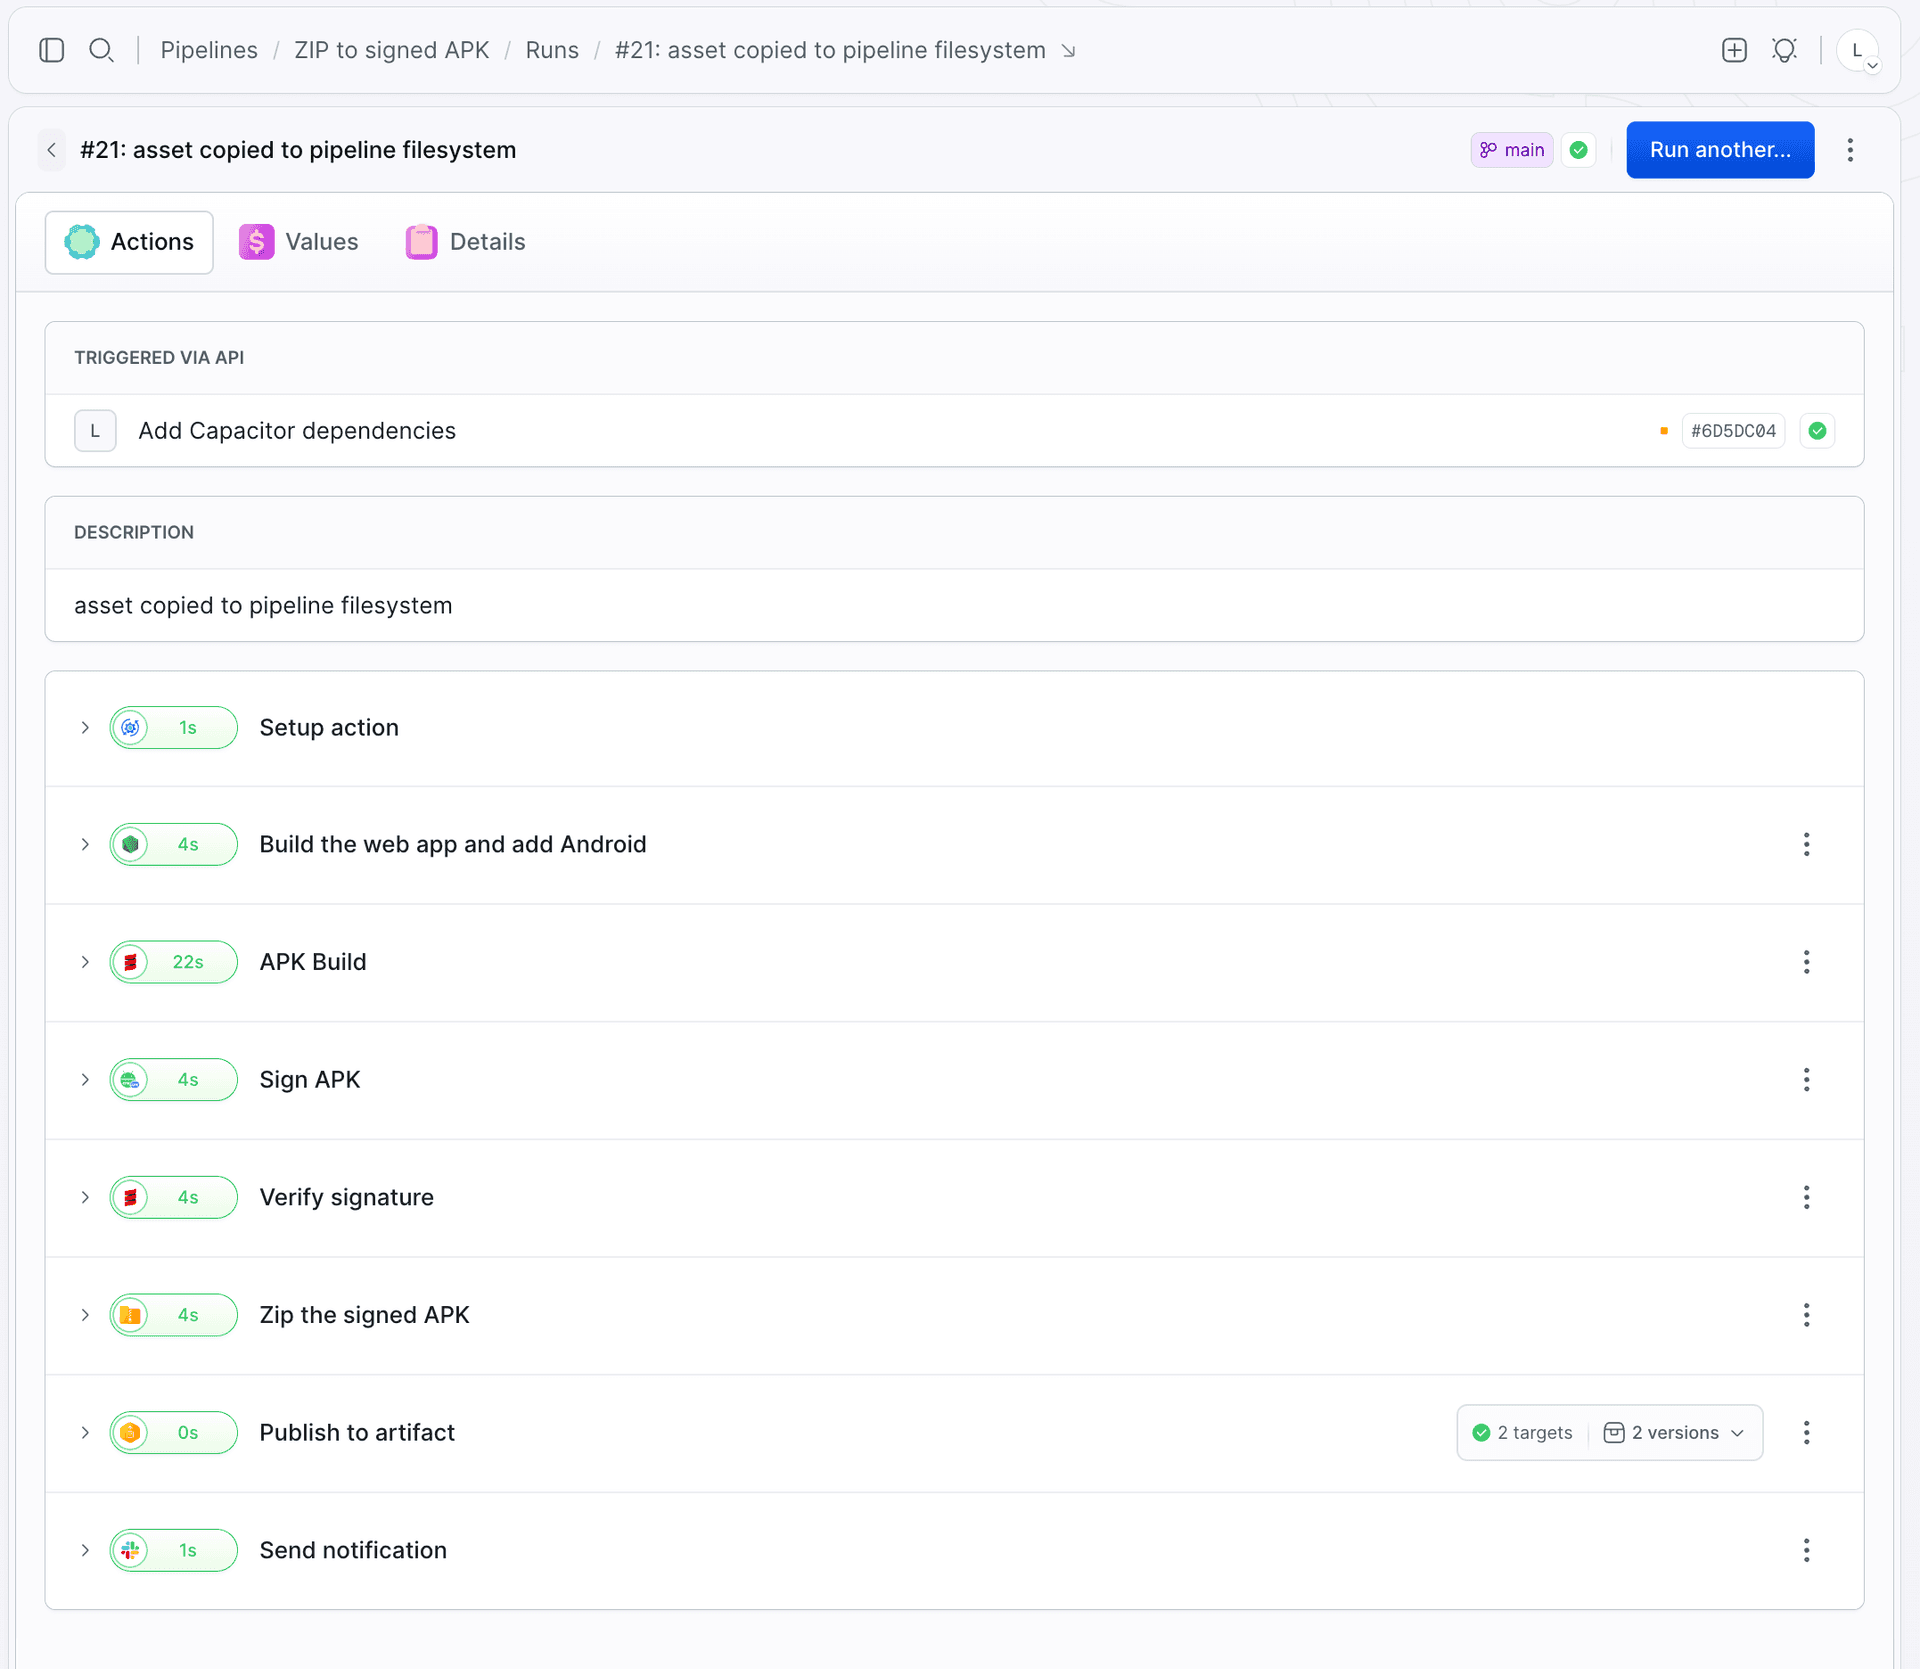
Where to go from here
- Publish to Google Play - add the Publish APK to Google Play store action and let the pipeline push straight to a track. See the Android workflow docs.
- Ship an AAB instead - Google Play requires Android App Bundles for new apps. Swap
assembleReleaseforbundleReleaseand use Sign Bundle in place of Sign APK. - Version on every build -
$BUDDY_RUN_IDmakes a usableversionCodeif you inject it intoandroid/app/build.gradle. - Distributing outside the Play Store? Google is rolling out developer verification for sideloaded apps, so register as a developer before you build a distribution flow around raw APK files.
