Building a pipelineTriggering pipelinesTrigger on Git eventTrigger pipelines recurrentlyTrigger pipelines manuallyPipeline listPipeline historyPipeline filesystemArtifactsConfiguration and static filesEnvironment variablesAdvanced pipeline settingsResourcesPriorityForce deploy from scratchClear cache before executionSkip queued runs for same Git referenceTerminate runs in progress for same Git referenceExecute pipeline runs concurrentlyFetch all refsClone depthTarget URLTrigger conditionVisibility & permissionsSee also
Introduction
The core feature of pipelines is building and deploying applications. They can also be effectively used for various recurrent activities, including website monitoring and data backups, things like automatic notifications, as well as advanced DevOps tasks such as building Docker containers and Kubernetes orchestration.
Common use cases:
- Run test after every push
- Deployment pipelines
- Daily integration tests
- Selenium tests
- Docker building
- Monitoring pipelines
- Manual deployment approval
Building a pipeline
You can find dedicated pipeline examples for the most popular languages and frameworks in our Quickstart section.
Pipelines consist of actions executed in a specific order. Buddy offers a wide range of more than 150 preconfigured actions, allowing you to automate your workflow in a split second.
For example, you can create a pipeline that will test and compile your PHP application, and deploy it to the server:
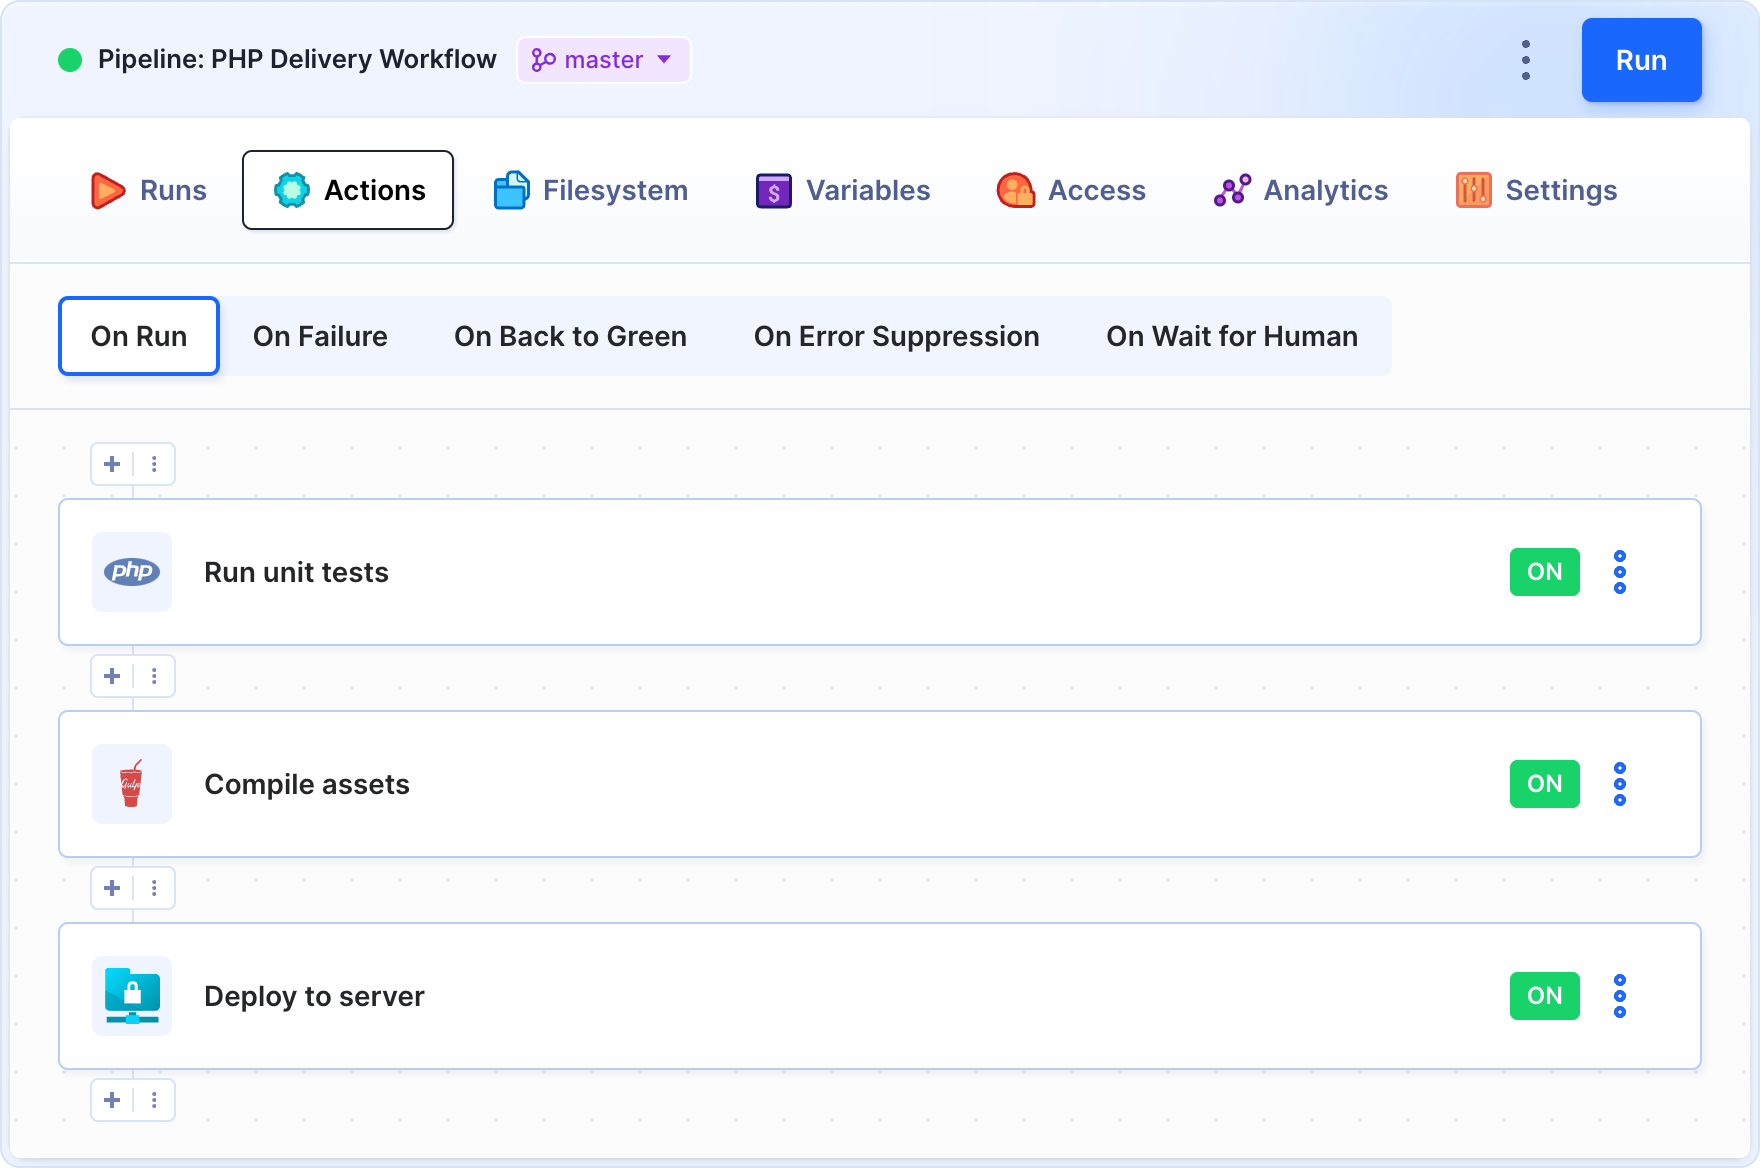 Pipeline example
You can also add a notification action to the On failure scenario. The action will notify your team in case something goes wrong (e.g. tests fail):
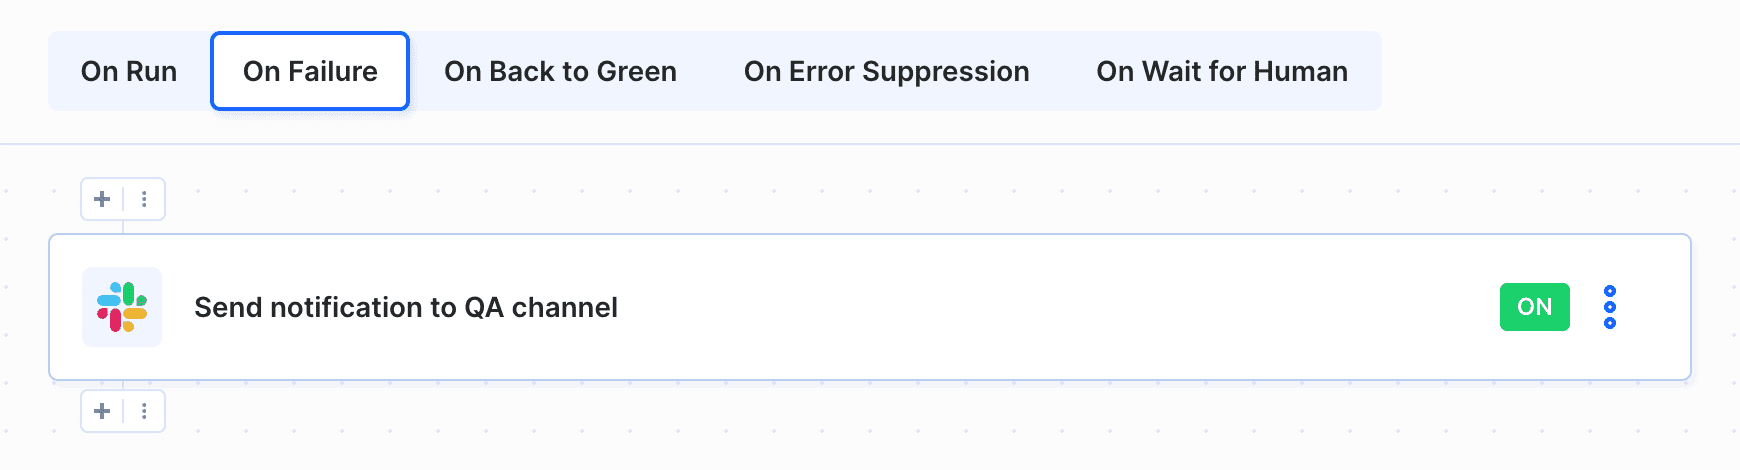 Pipeline example
Another use case involves building a Docker image of a Node.js application and pushing it to the registry:
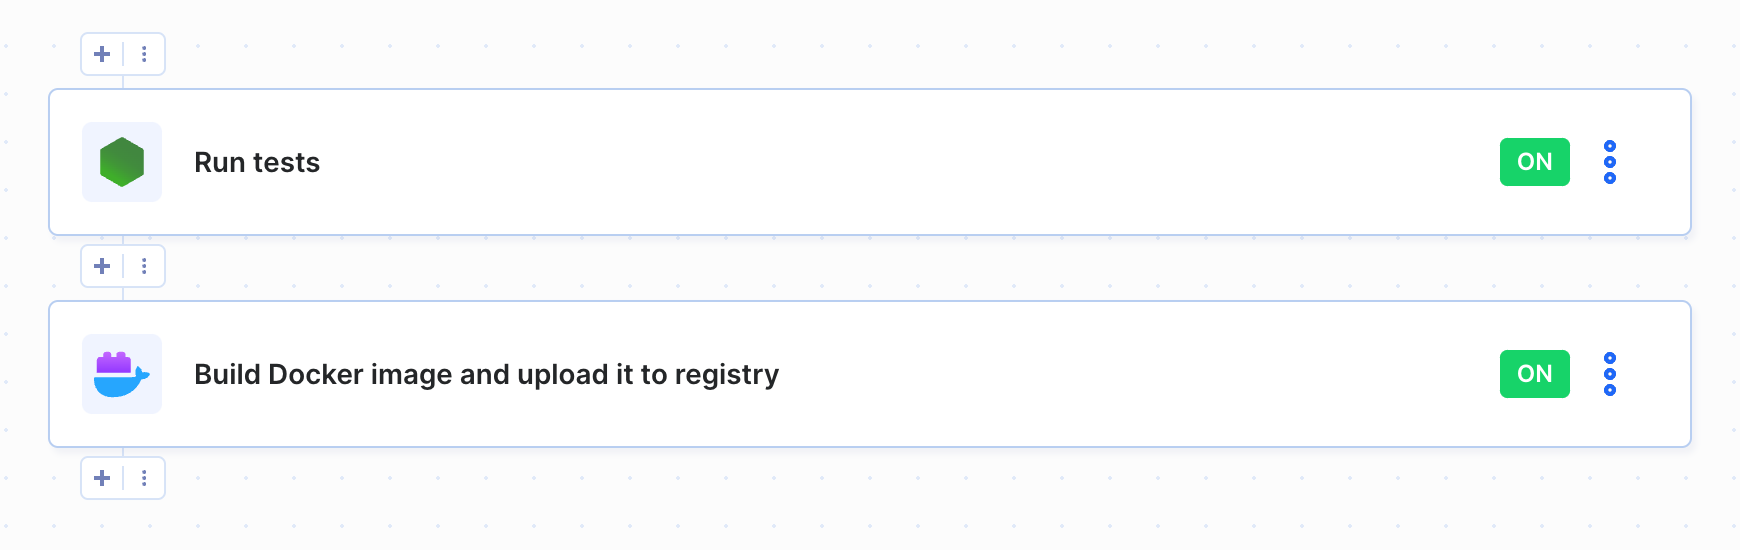 Docker pipeline example
Triggering pipelines
A pipeline can be triggered in three different ways:
 Pipeline trigger conditions
You can also specify for which branches, tags, or pull requests the pipeline will be triggered:
- a single branch – e.g. master branch for a production pipeline
- on push to any branch in the repository repository – wildcard
*, e.g. for a pipeline running unit tests - after pushing a tag that fulfills a specific pattern – wildcard
refs/tags/v*, e.g. for a pipeline releasing a new version of the app.
 Branch selection
Trigger on Git event
Selecting On events as the trigger mode will run the pipeline whenever:
- a commit is pushed to the repository
- a branch or tag is created
- a branch or tag is deleted
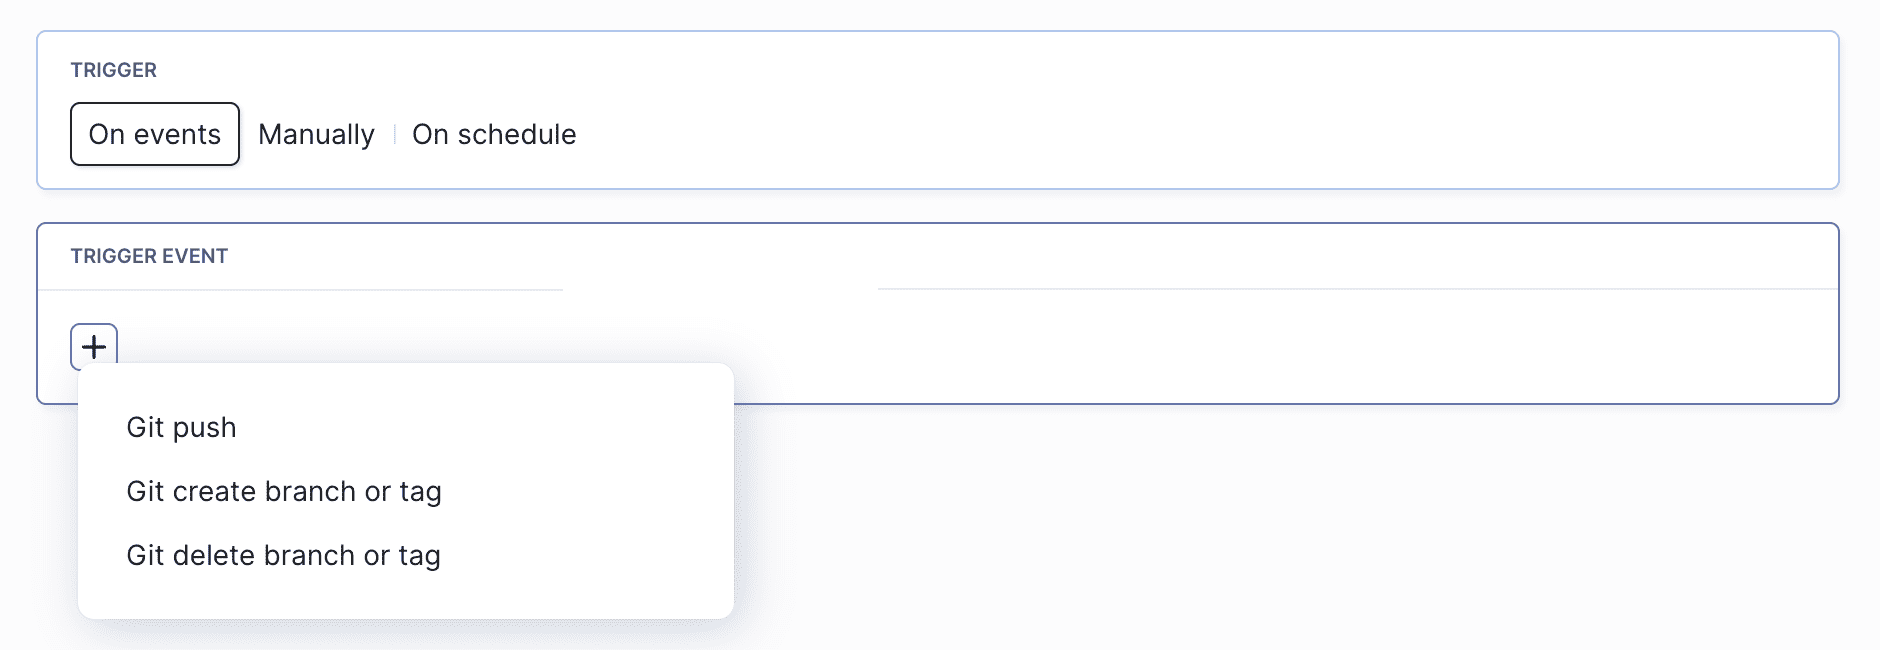 Git event trigger options
For example, if you want to run unit tests for every change to the repository, you can select Git push as the trigger event and use a wildcard with *:
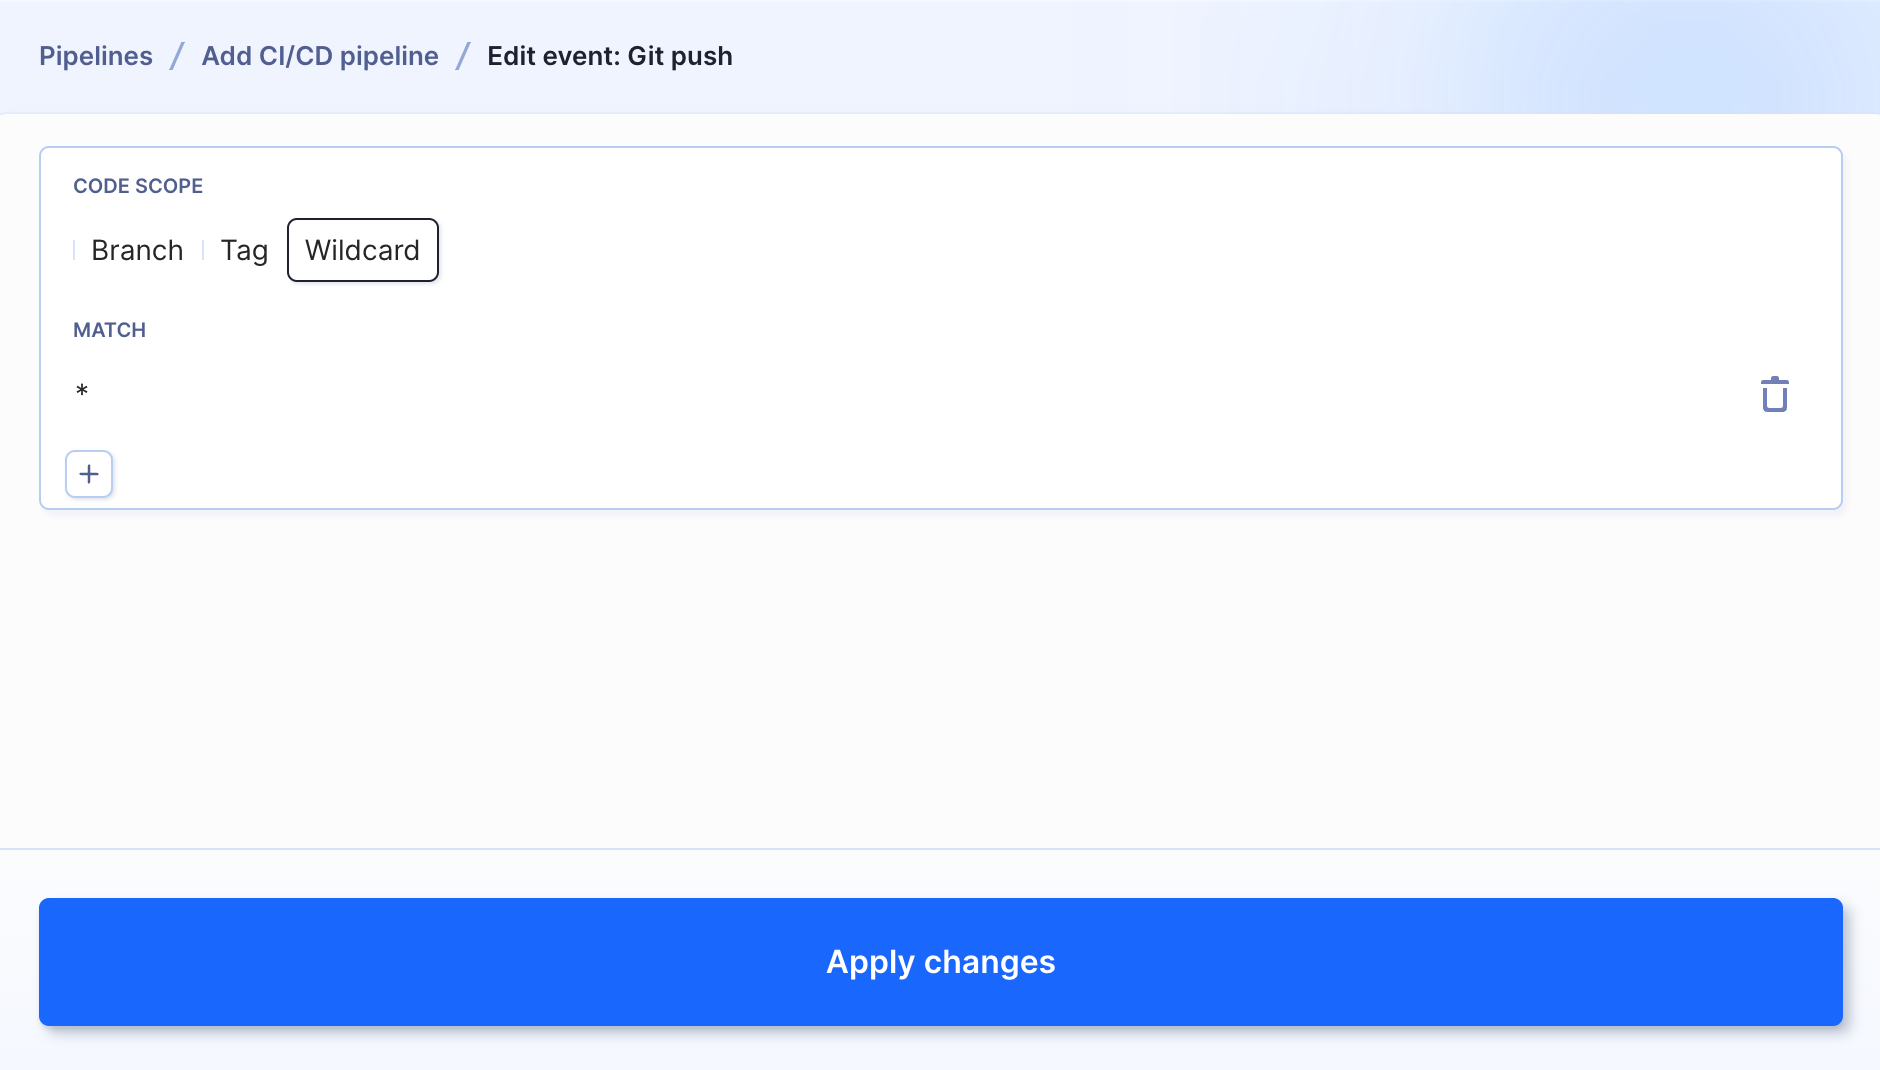 Wildcard trigger conditions
You can also use it to automatically deploy changes from a specific branch whenever a change in the branch is detected:
 Single branch trigger conditions
Trigger pipelines recurrently
You can set your pipeline to be triggered at a certain time of the day. For example, you can schedule a pipeline to run integration tests every day at 5 p.m.:
 Setting recurrent pipeline execution
The time is set according to the timezone of the user and converted to UTC upon saving. Please make sure to update your settings after seasonal time changes (1 hour ahead or back).
Cron expressions allow you to set the time when the pipeline should be run with additional rules, e.g. run at 10:15 AM Monday to Friday:
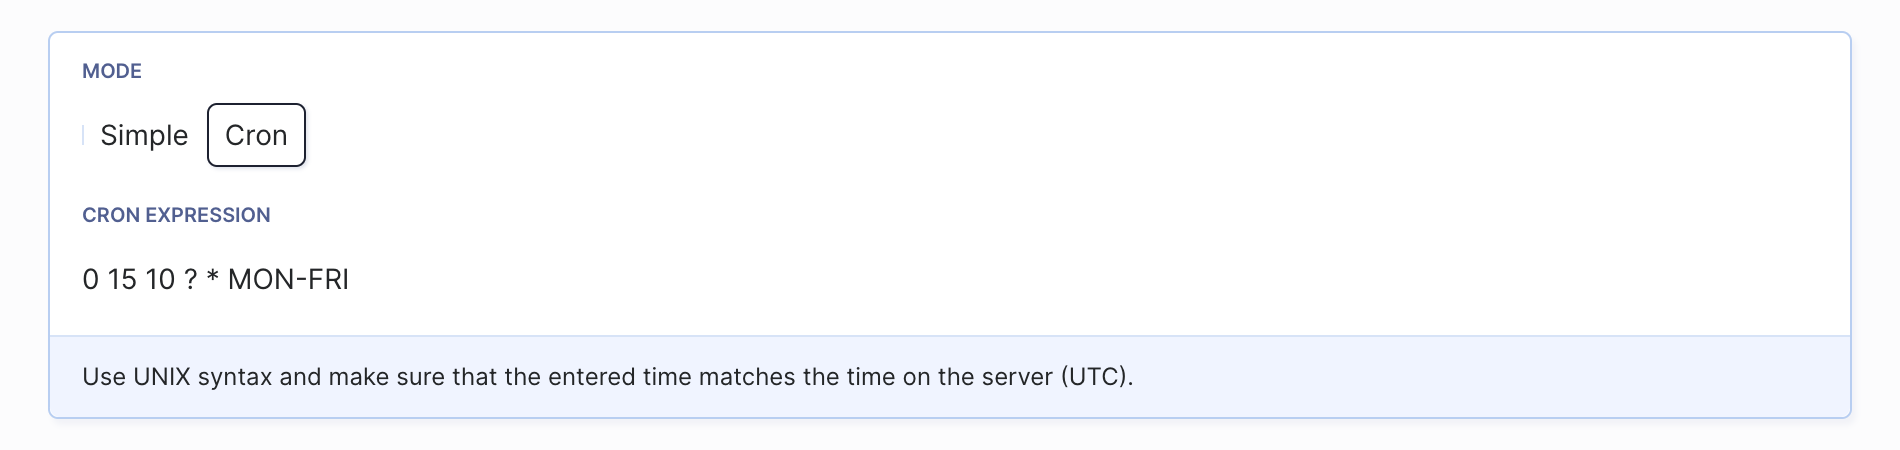 Advanced recurrence settings
Cron expressions always use the UTC format.
Read more about daily integration tests and monitoring pipelines.
Trigger pipelines manually
For production pipelines, it is best to set them to manual mode and restrict access rights to senior devs only.
Triggering a pipeline manually lets you specify:
- the revision for which the pipeline will run
- the actions to run (for example, if you want to re-deploy the same build)
- whether the deployments should be based on the changeset or made from scratch
- whether the cache should be cleared before execution
- the priority of the execution
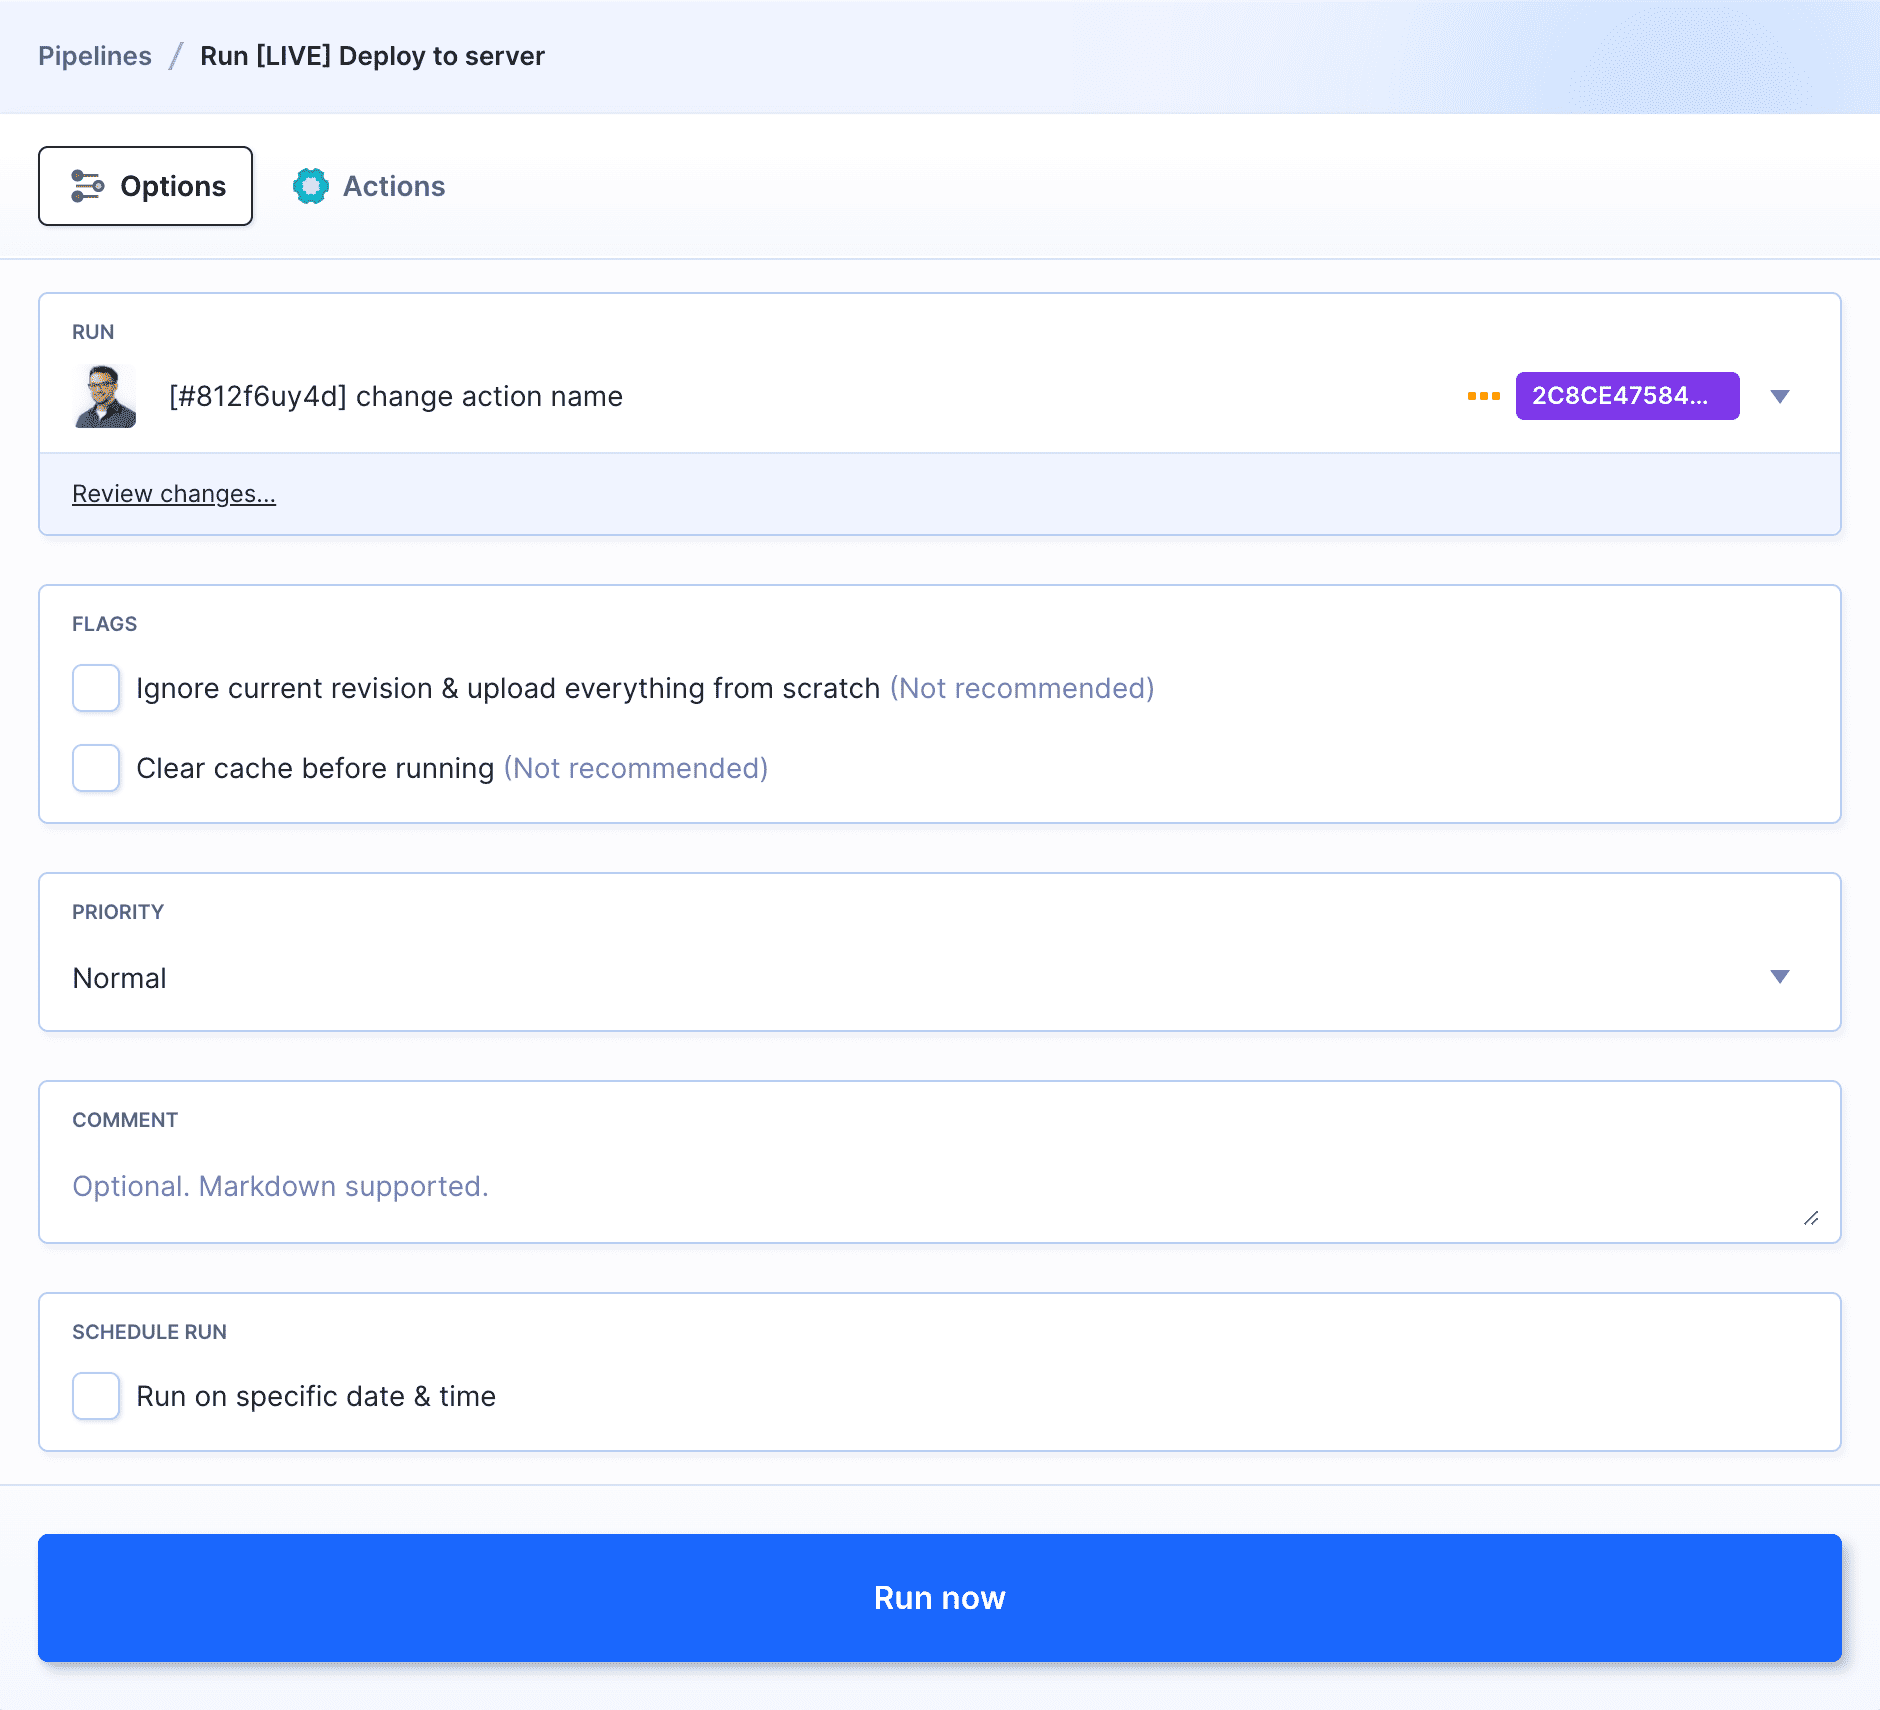 Manual pipeline trigger
When running a pipeline manually with a button, you can also indicate the exact time and date for the execution of this particular run:
 Scheduling run
The time of the pipeline run is using the user's local timezone.
Pipeline list
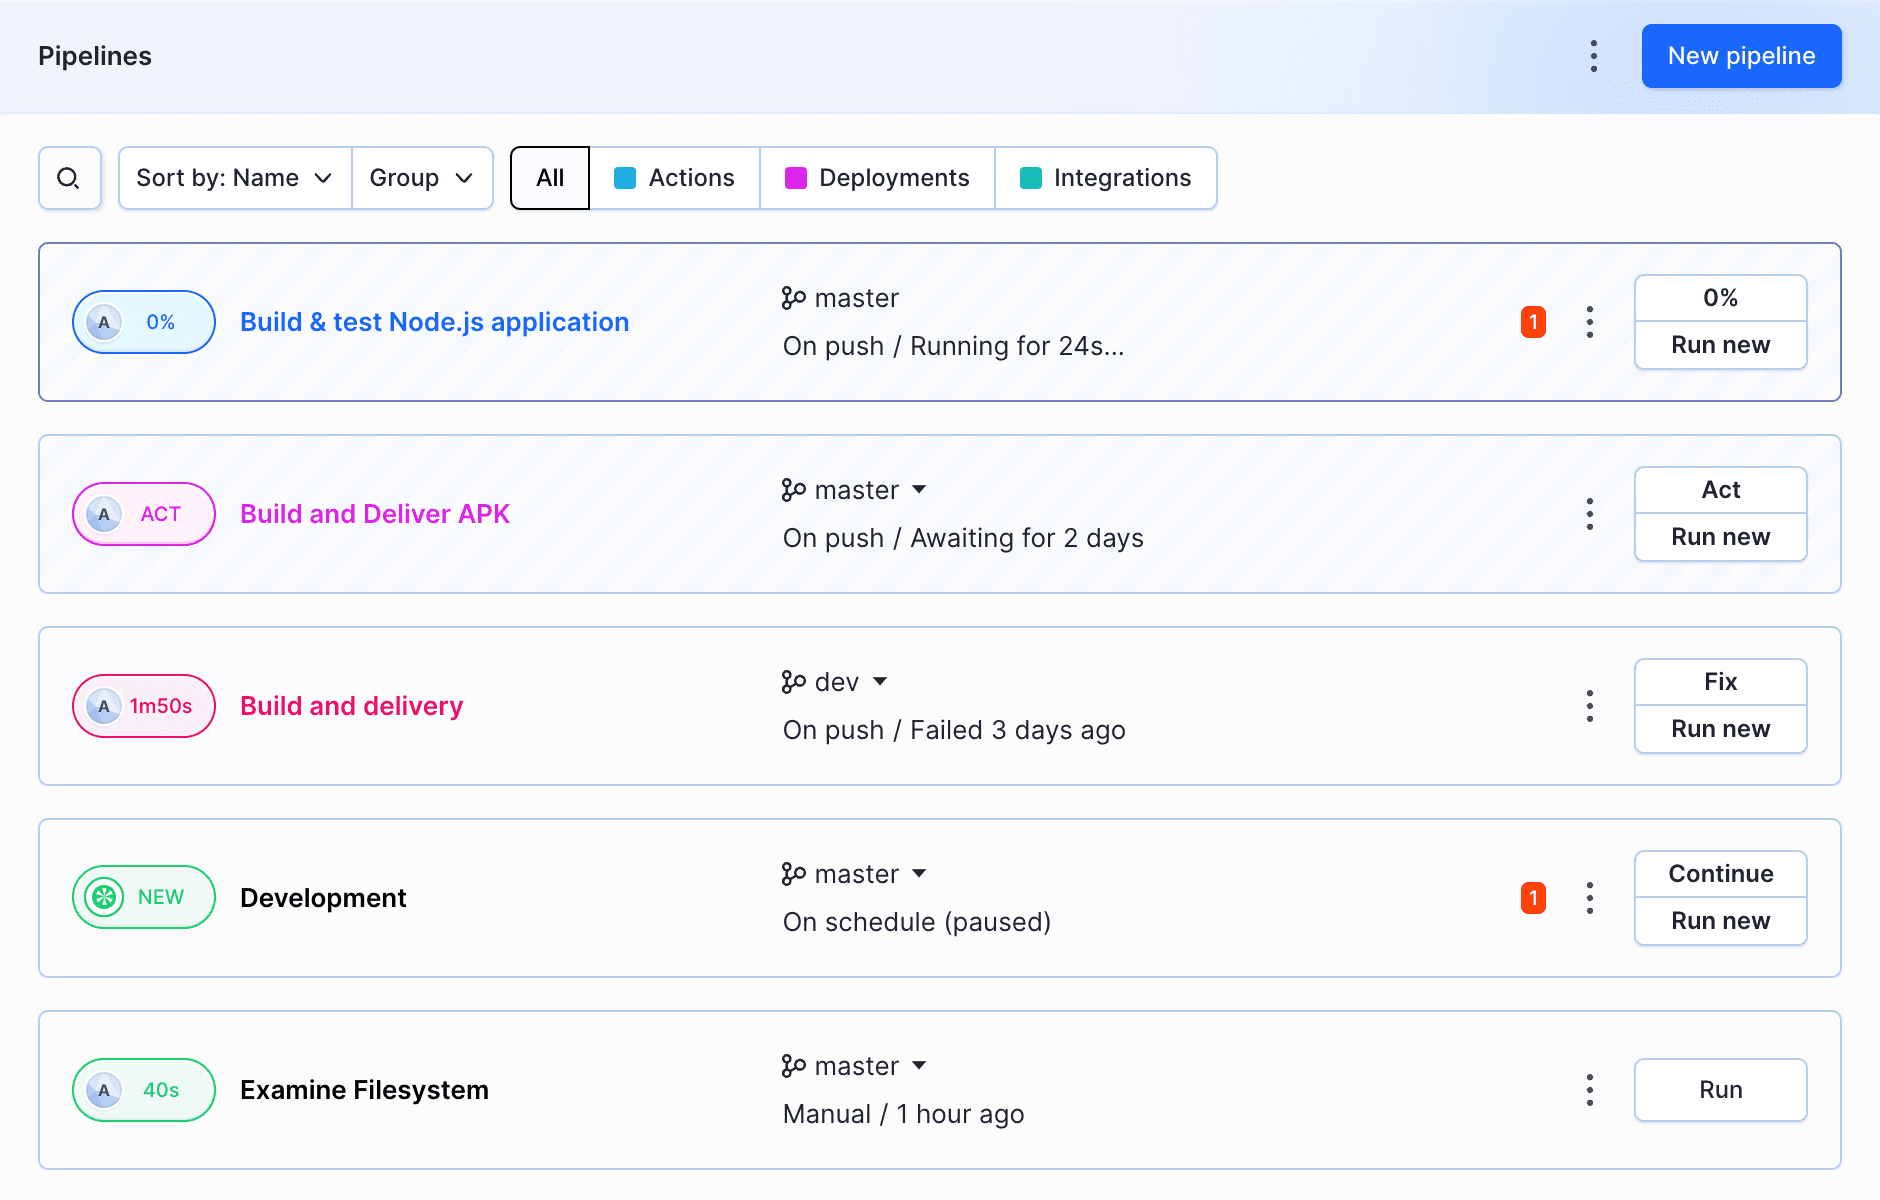
Each pipeline has its own configuration and filesystem attached. You can create multiple pipelines that will run different tasks within one repository. The pipeline view gives you quick access to he most important information:
- assigned branch
- run status (passed, failed, in progress, on hold)
- trigger mode (on push, manual, recurrent)
- the time of the last run and the time the of next scheduled run
- whether it's deployed to the newest revision or how many commits behind the branch it is
 List of example pipelines
You can debug failed action directly in the container with the Fix button.
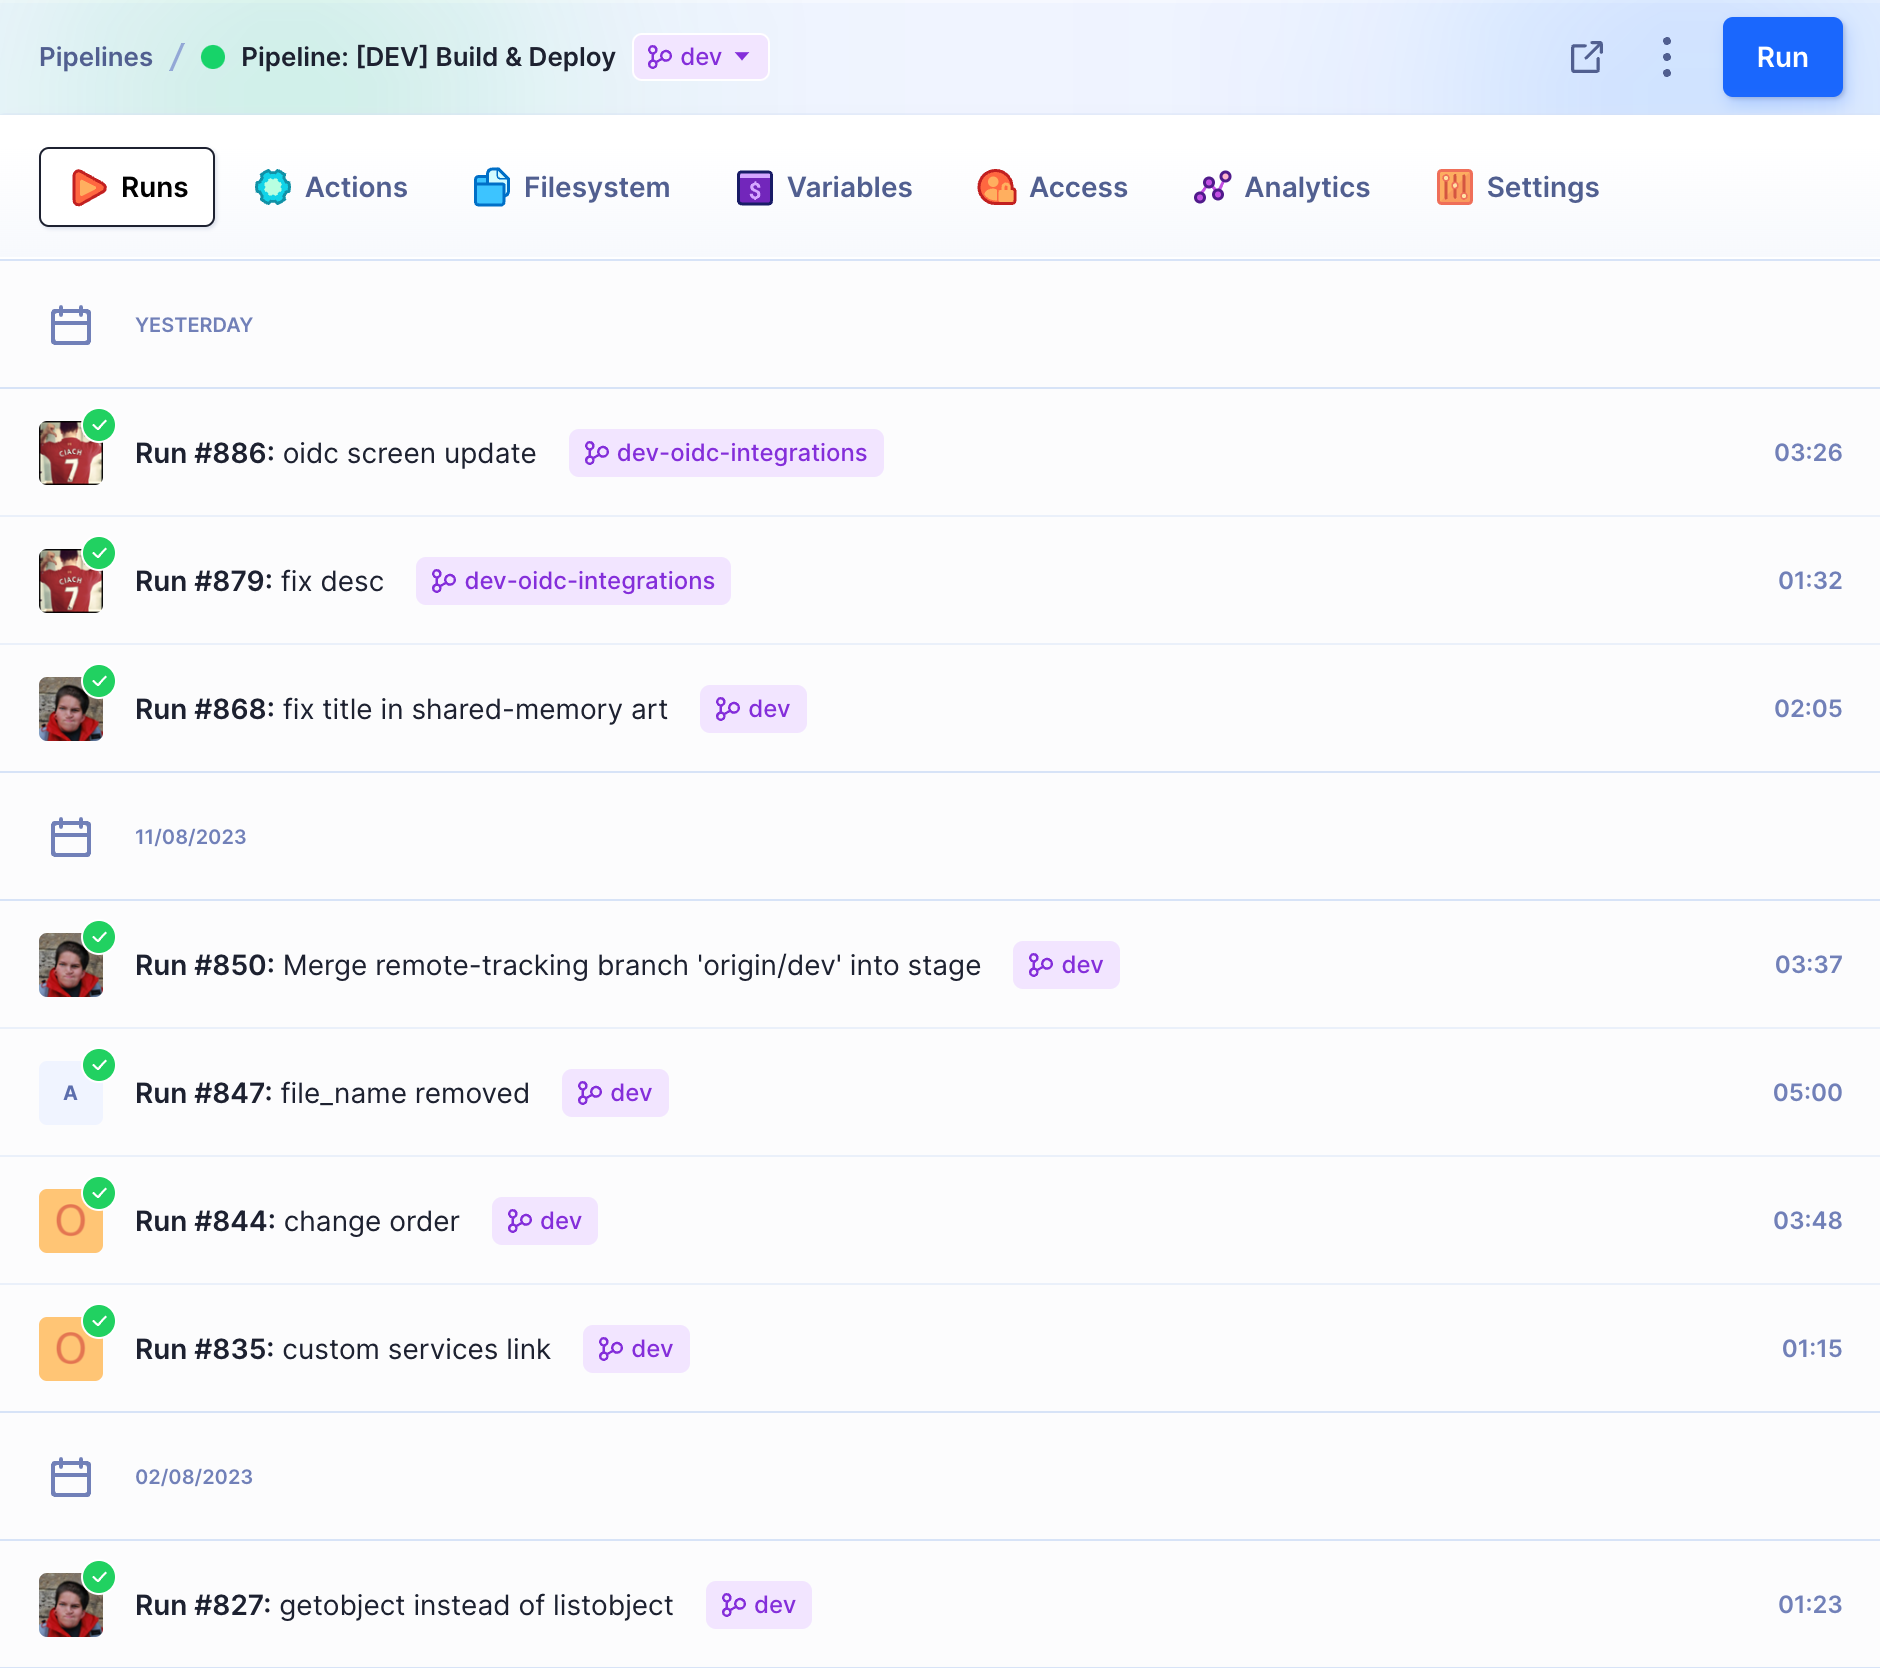
Pipeline history
The Runs tab displays the recent history of executions and configuration changes of the given pipeline. Here you can find information about who and when triggered the pipeline, for which revision, and on which branch it was done. It also displays the duration of each run:
 Pipeline execution history
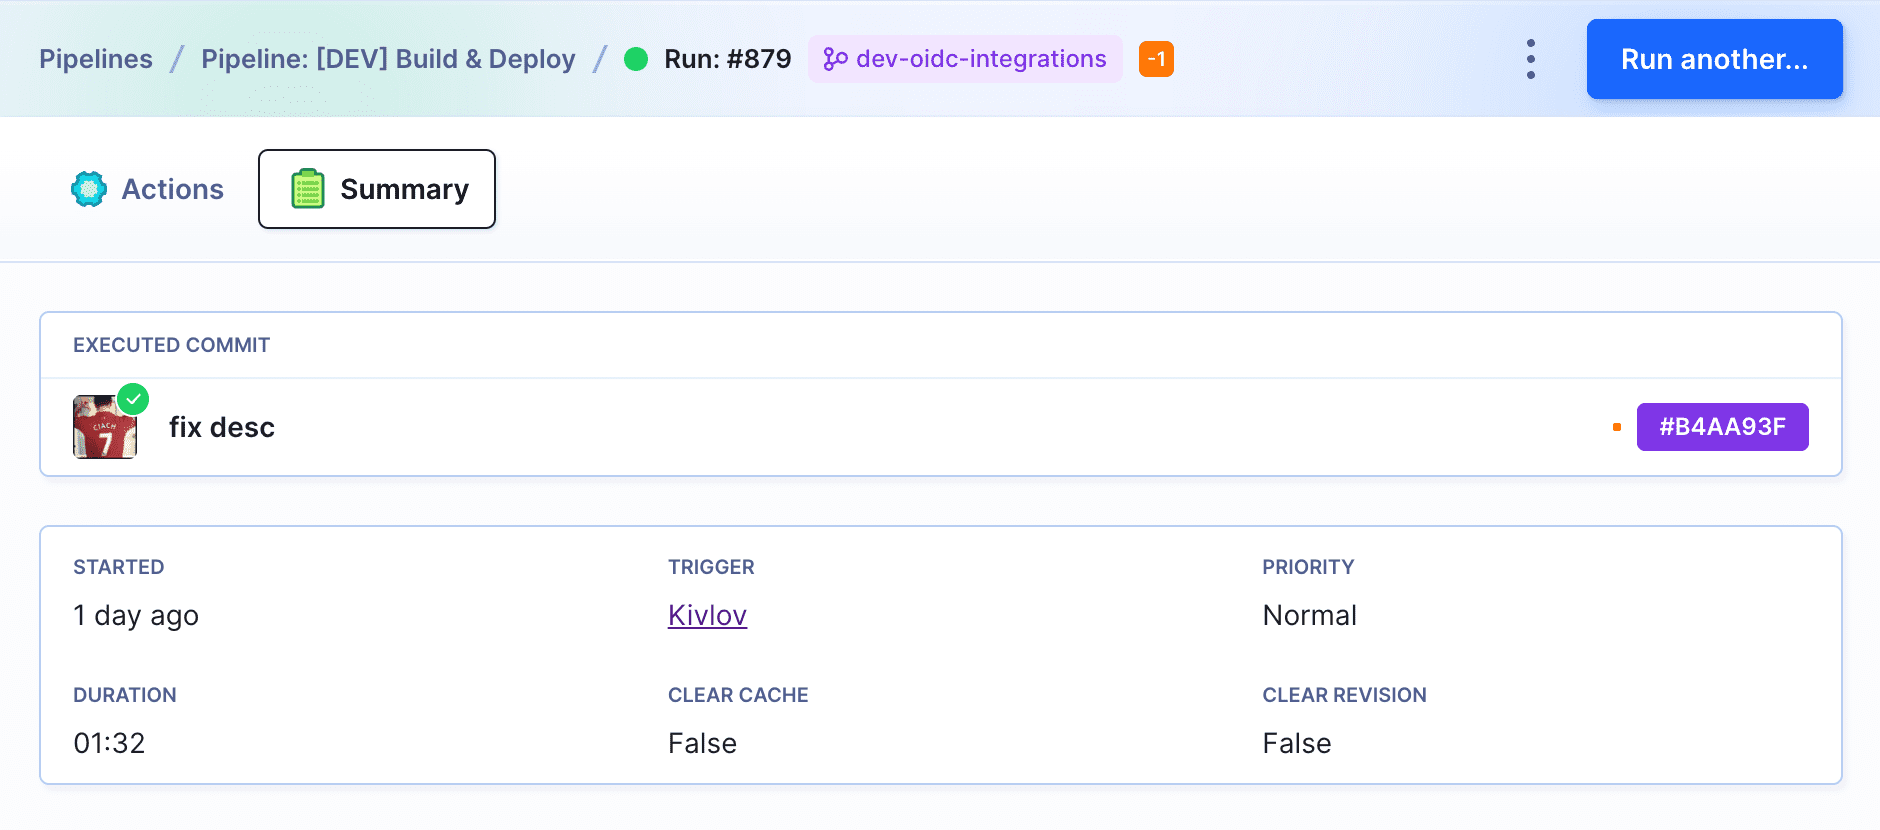
Clicking a run will bring up its further details:
- start time and duration
- logs for each pipeline action
- the commit for which the pipeline was run
- the invoker of the execution
- priority and cache settings
 Revision details
If you want to learn more about the performance of your builds, open the Analytics tab. It allows you to quickly check the time of builds, average execution time, and error frequency:
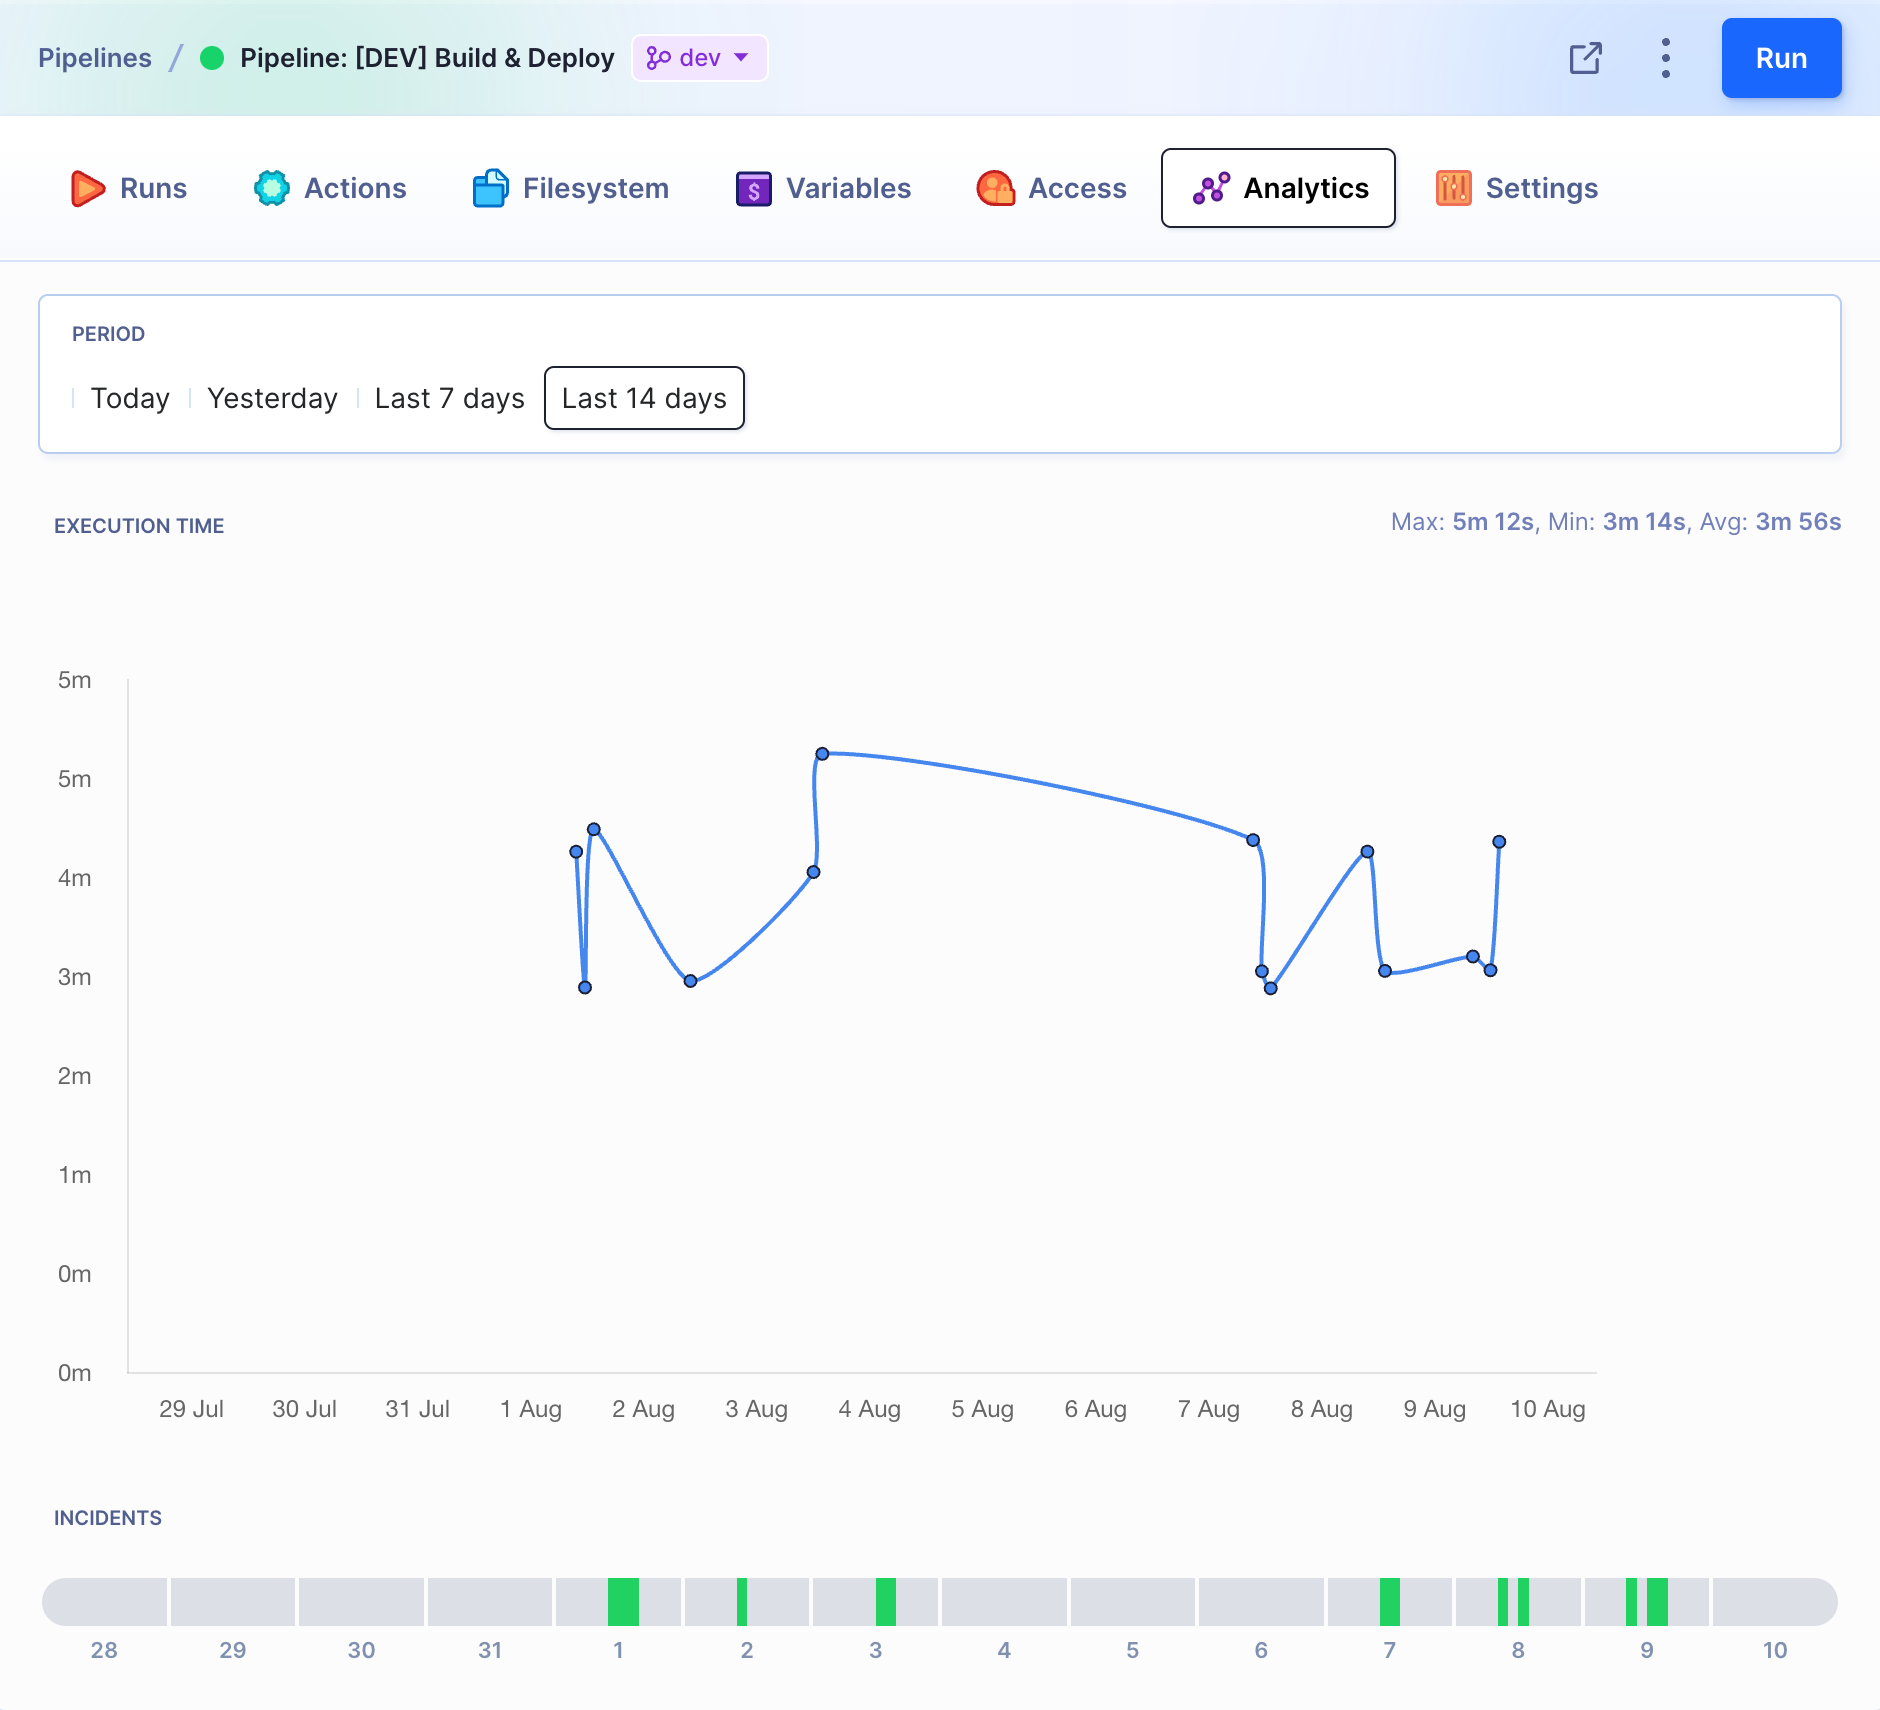 Performance details
Pipeline filesystem
Every pipeline has its own filesystem attached. The filesystem contains a clone of your repository in the revision selected in the latest run, together with the artifacts generated by your pipeline actions. It serves as the primary cache for your pipeline; this way, you don't need to fetch the whole repository and dependencies on every execution.
Artifacts
All files created during the execution will land in the filesystem marked with a diamond icon. You can browse and download them via the UI or with cURL (using a dedicated URL).
Configuration and static files
Not all files should be stored in the repository. For example, configuration files for a specific environment (dev/stage/production), or those that contain sensitive data. You can, however, upload them manually to the filesystem. This way they will be uploaded together with the artifacts and repo files.
 Pipeline filesystem
Environment variables
For each pipeline you can define environment variables for your actions. This includes SSH keys, certificates, and other assets required by your scripts and builds.
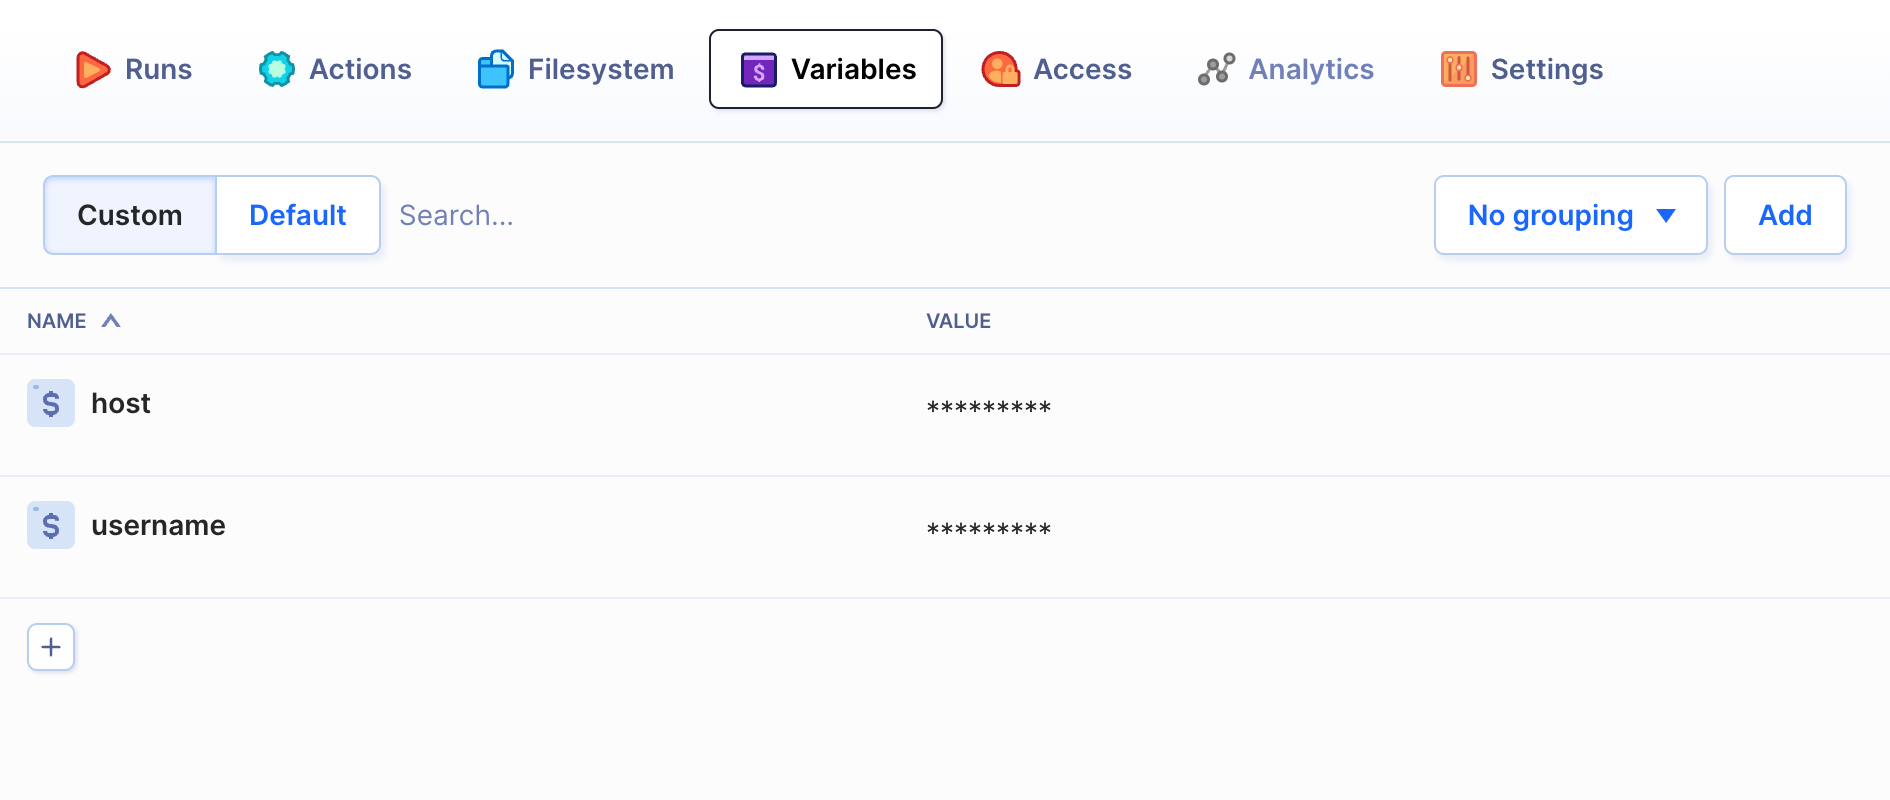 Variables tab
Advanced pipeline settings
The Settings tab also will reveal a couple of advanced features that will let you fine-tune your pipeline.
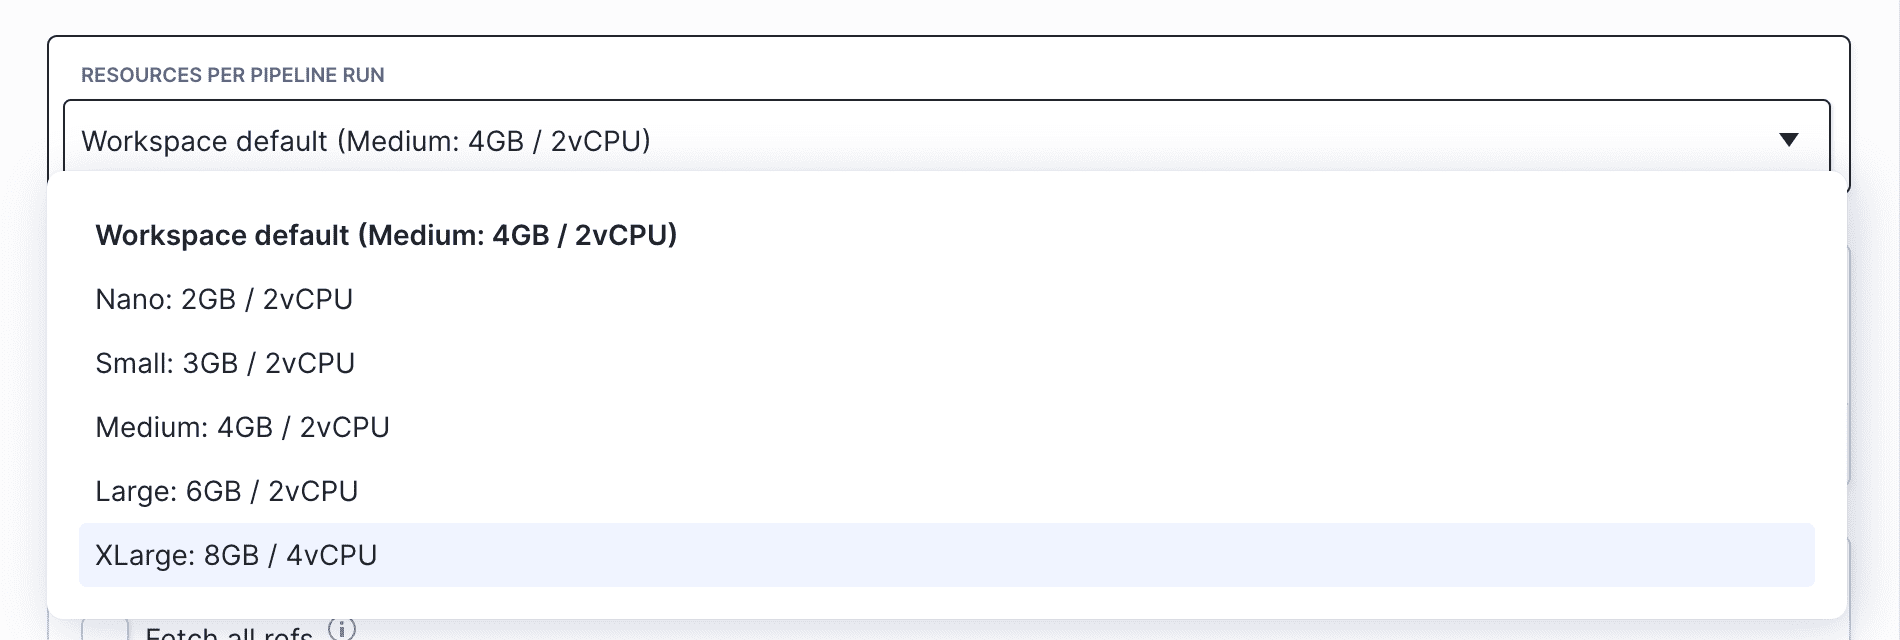
Resources
This option lets you optimize the efficiency of your processes by assigning the resources on the basis of the tasks the pipeline performs:
 Setting resources in pipeline
Priority
Priority determines how soon a queued pipeline will be triggered. For instance, if there are 4 pipelines in the queue, and you assign High priority to the last one, it will move up the line and be executed once the ongoing execution is completed:
 Setting priority in pipeline
The option is useful, e.g. when you have a backup project and a production project running simultaneously. In such cases, it is preferable for the backup project to complete before initiating the deployment to production.
Force deploy from scratch
Most of the deployment actions are based on changesets, which means only the files from the latest revision are deployed. Checking 'Force deploy from scratch' will force Buddy to deploy all files from the repository on every execution. If the option is selected, the changeset trigger conditions added in the pipeline won't be taken into account.
Clear cache before execution
The cache stores a clone of the repository and dependencies required by your build, which massively reduces build times. In some cases, however, you may need to fetch the dependencies on every build execution. To do that, select the option 'Erase filesystem, Docker layers & cached container paths on run'. It will force Buddy to download the packages every time the pipeline is run. If the option is selected, the changeset trigger conditions added in the pipeline won't be taken into account.
Skip queued runs for same Git reference
If a user triggers a pipeline that's already in progress, the execution will be queued and won't start until the first one is over. If there are more executions queued (for example 5) and you check 'New run for same Git reference terminates runs in progress', Buddy will only run the newest execution (5th) and skip the rest (2-4).
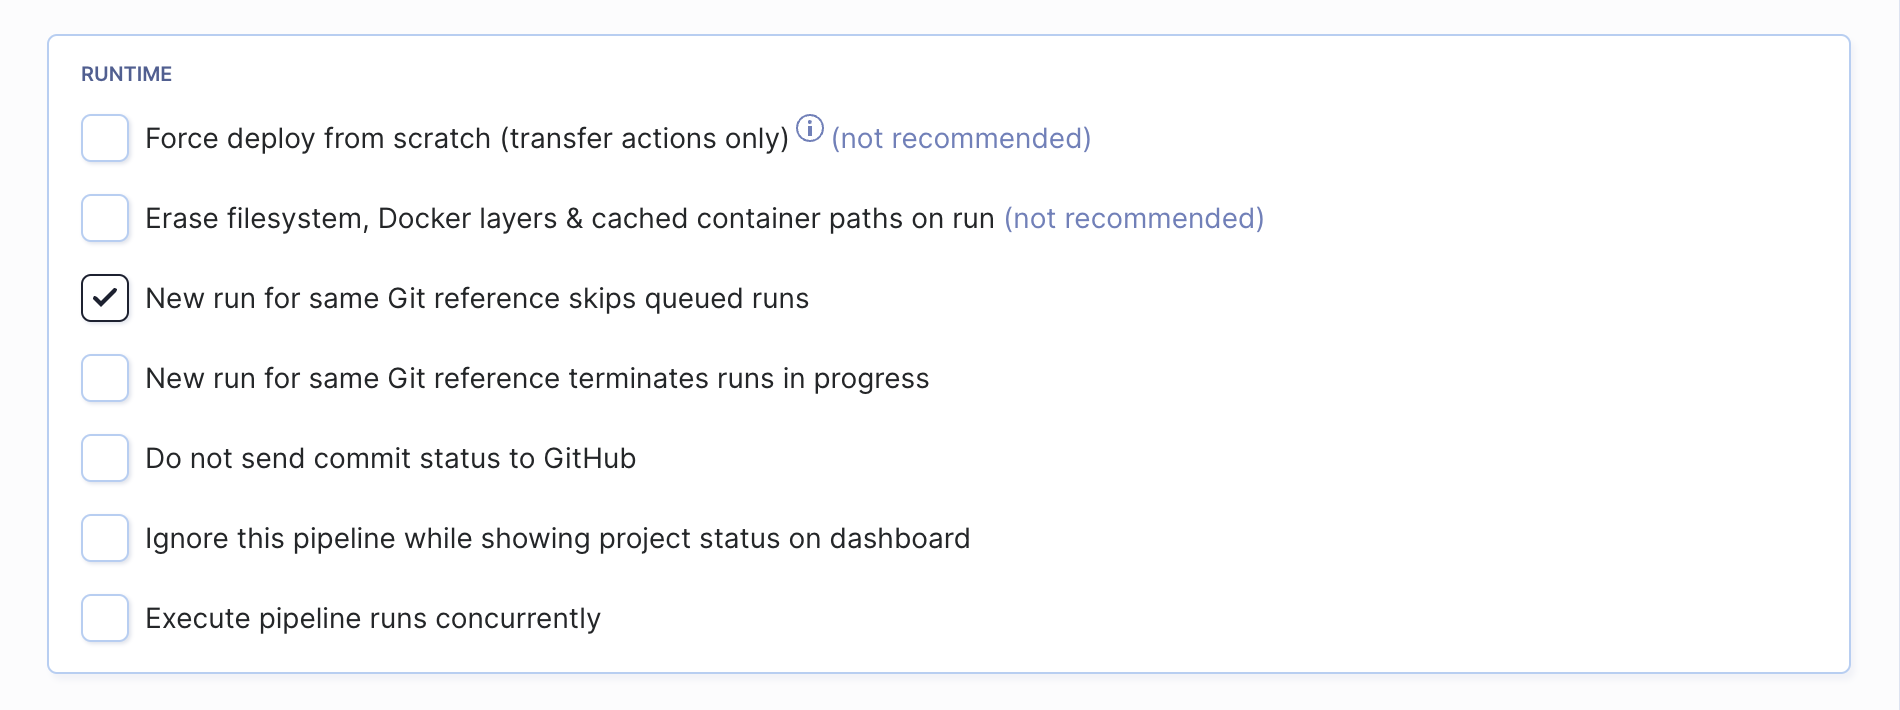 Runtime configuration
Terminate runs in progress for same Git reference
If a user triggers a pipeline that's already in progress, the ongoing execution will be terminated and replaced with the new one.
Execute pipeline runs concurrently
Selecting the option lets you trigger multiple executions of a single pipeline simultaneously. This feature is useful if you want to test every single commit or test multiple branches at the same time.
The number of concurrent executions/filesystem slots depends on the number of runners available in your plan.
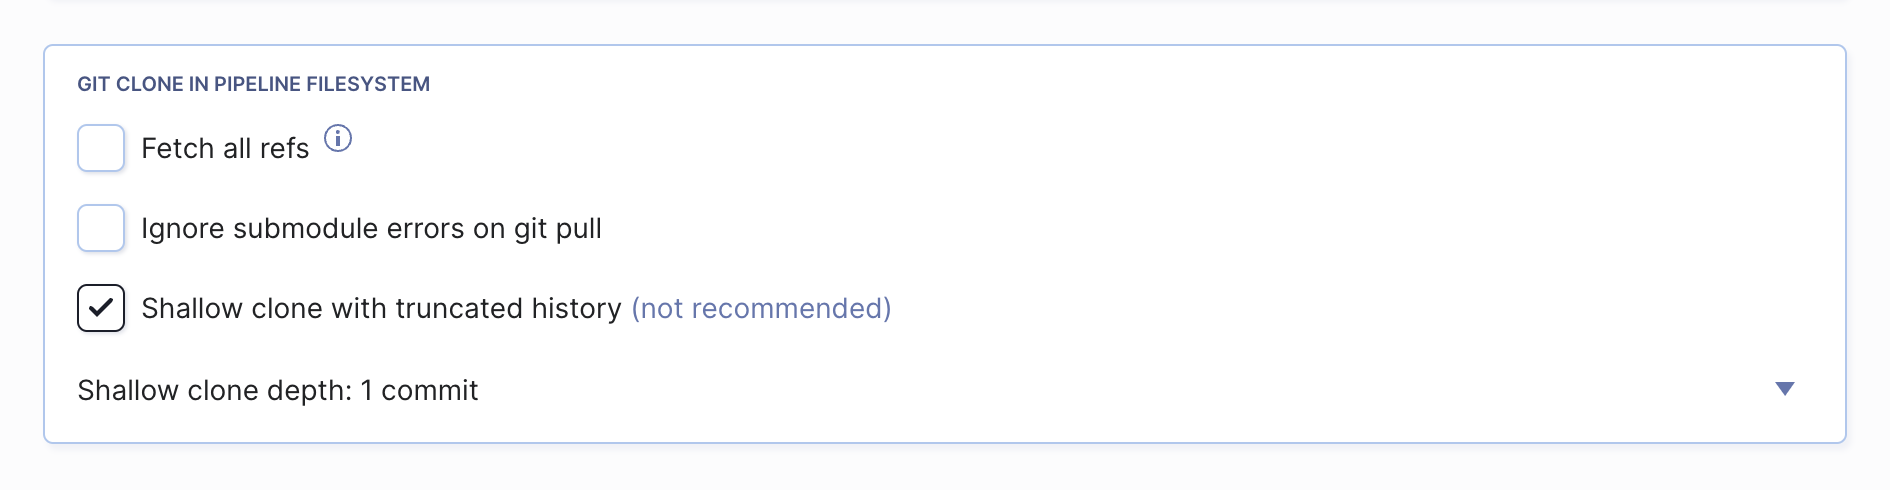
Fetch all refs
When the pipeline is run, Buddy fetches only one Git reference to the pipeline filesystem (branch, tag or pull request). Selecting the 'Fetch all refs' option will force Buddy to fetch all Git references.
Clone depth
The clone depth specifies how many commits should be cloned to the filesystem on the pipeline execution. Creating a shallow clone is useful if your .git/ directory occupies too much space.
 Clone presets
Target URL
The Quick Link puts a label on your pipeline that lets you promptly access the associated website, e.g. to review changes after a deployment.
 Setting quick link
Trigger condition
Usually, your application is first built and then deployed to the server. However, not every change in the repository requires a build. In such cases, The Run if tab is the place to go to define certain conditions that will trigger the build.
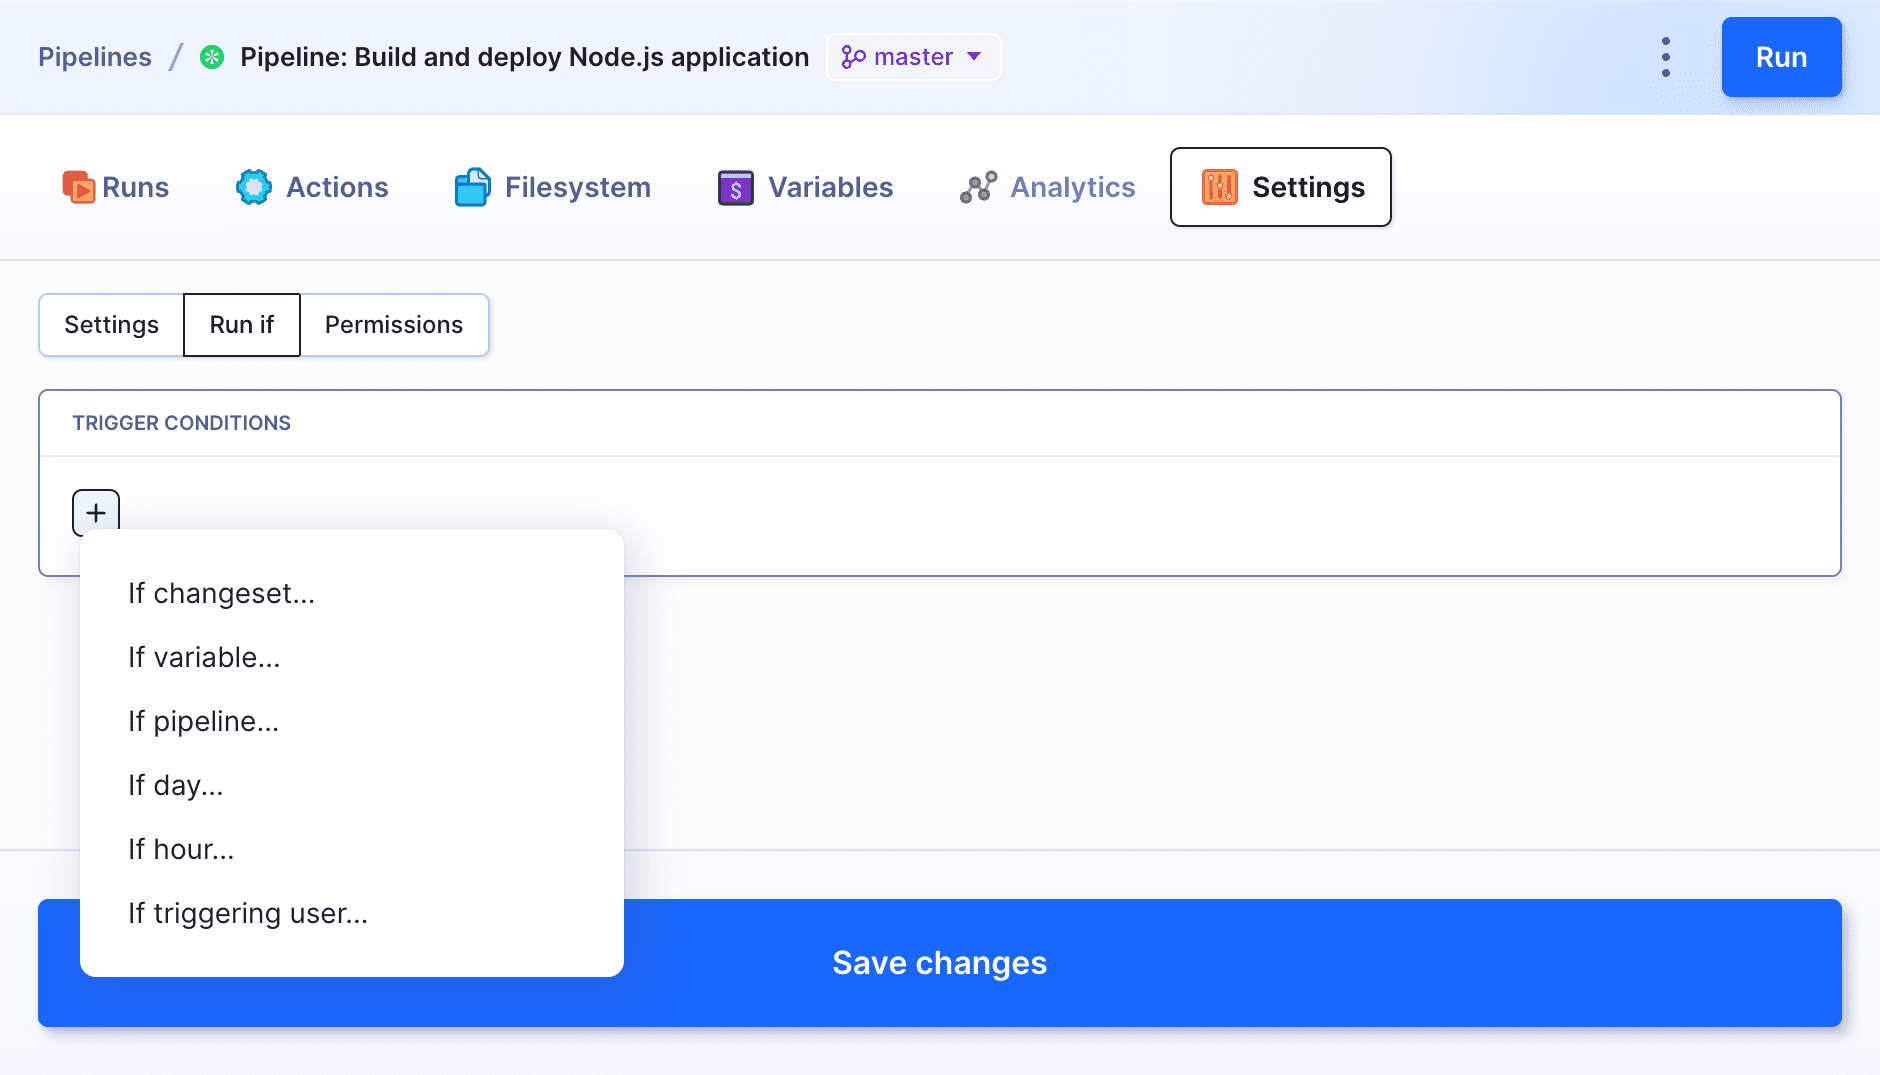 Setting trigger conditions
Visibility & permissions
The Permissions tab in the pipeline settings allows you to restrict pipeline's visibility and scope of operations to individual users and groups.
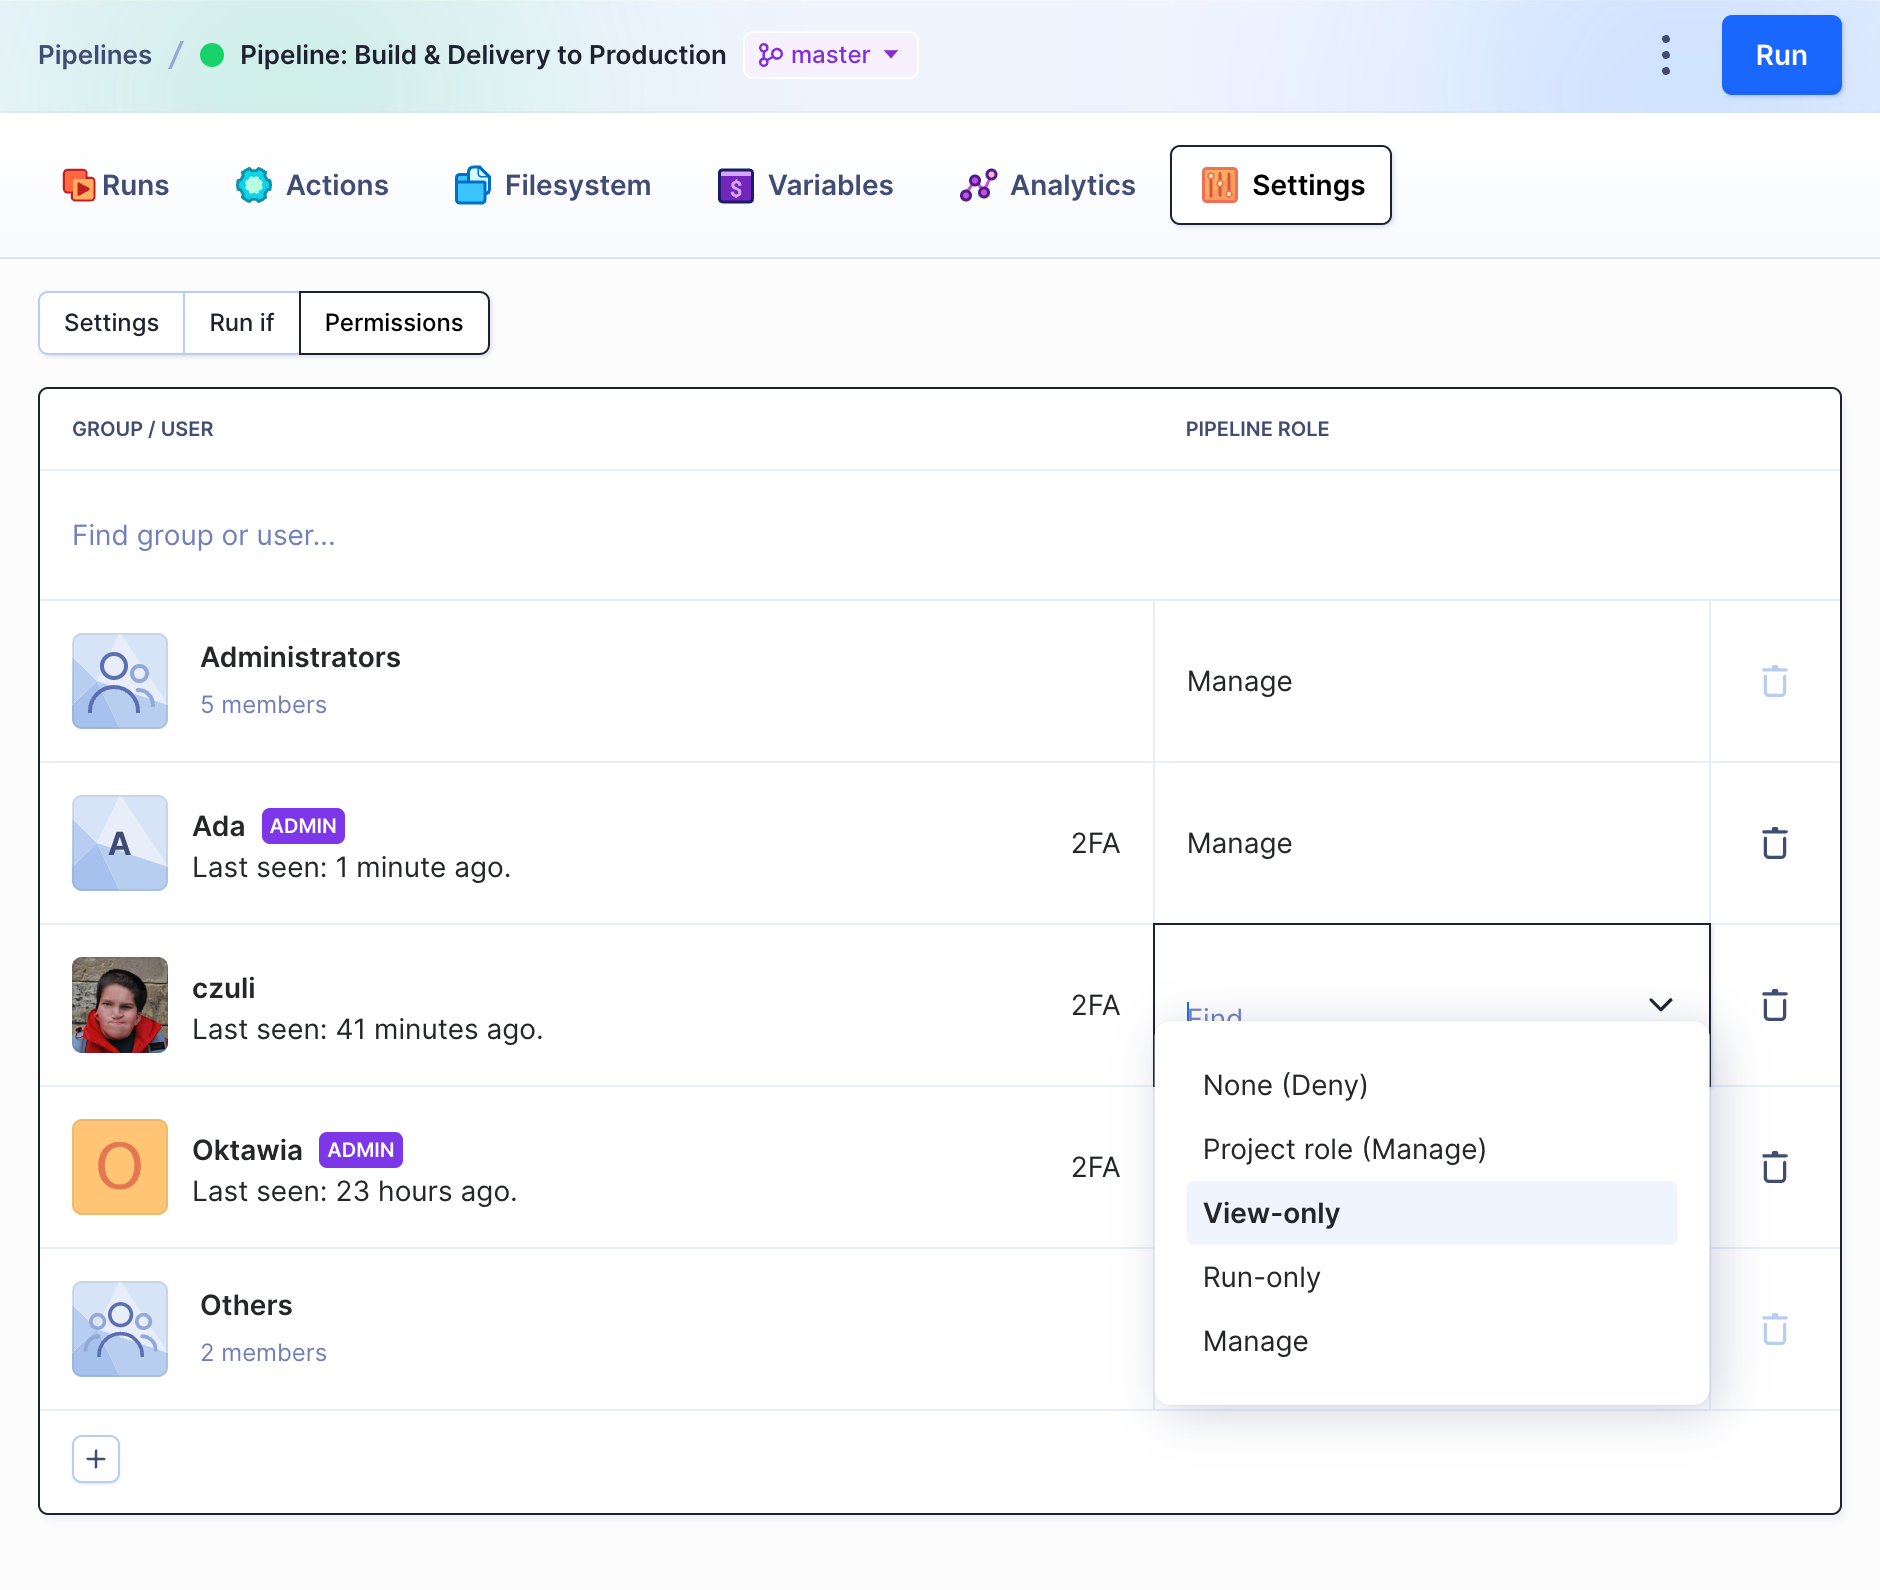 Permission settings
The permissions can be restricted to the following built-in roles:
- None (Deny) – the user cannot see the pipeline in the project at all
- Project role – the permission defined in the role with which the user was assigned to the project (default)
- View-only – the user can browse the pipeline but cannot run or modify its settings
- Run-only – the user can run the pipeline, but cannot modify its settings
- Manage – the user can run and modify the pipeline, just like with the Developer role
See also
Last modified on December 13, 2023